Apache-ActiveMQ
[TOC]
先看文章 Java-JMS http://masikkk.com/article/Java-JMS/ ,其中介绍了JMS相关理论,此篇为ActiveMQ实例。
概述
ActiveMQ是由Apache出品的,一款最流行的,能力强劲的开源消息总线。ActiveMQ是一个完全支持JMS1.1和J2EE 1.4规范的 JMS Provider实现,它非常快速,支持多种语言的客户端和协议,而且可以非常容易的嵌入到企业的应用环境中,并有许多高级功能。
AMQ服务端
Windows下载安装启动
从 http://activemq.apache.org/download.html 下载5.15Windows版 apache-activemq-5.15.0-bin.zip
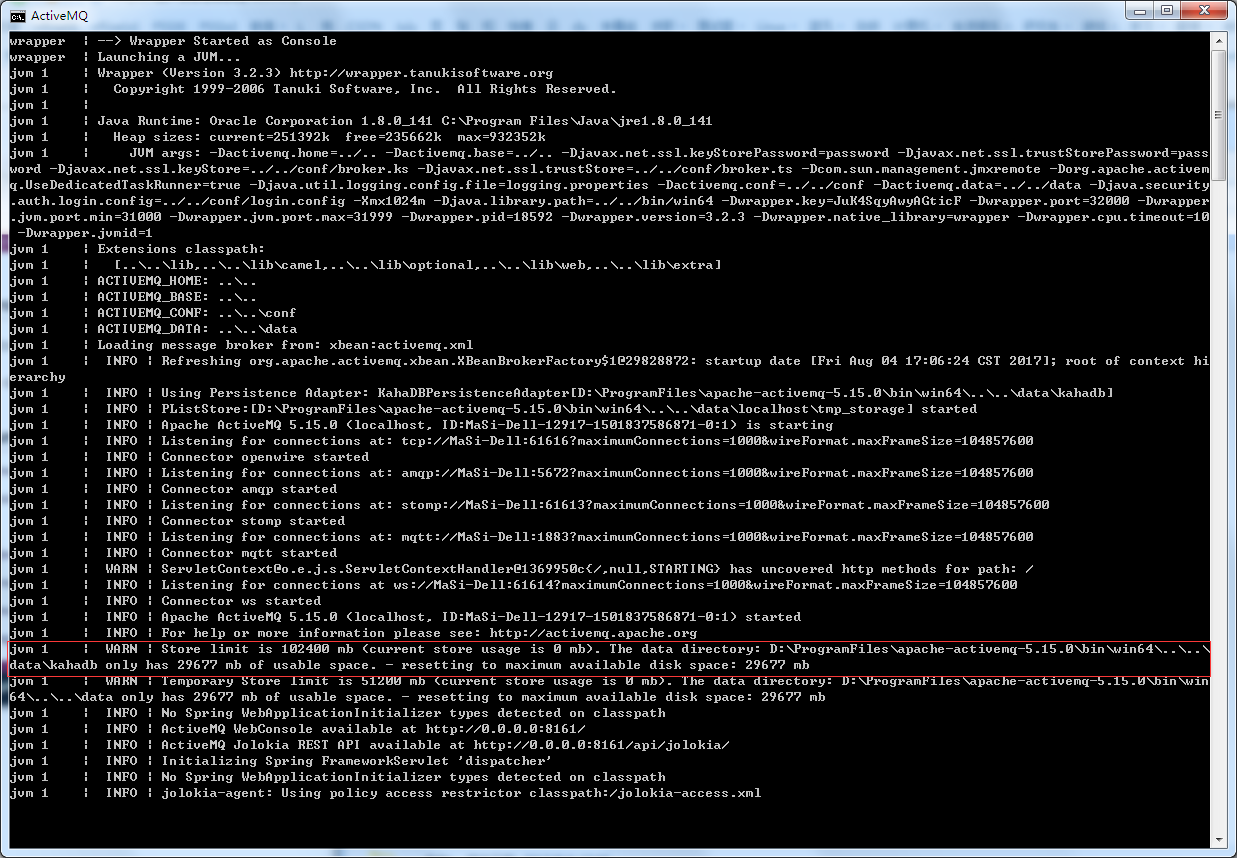
解压后运行 apache-activemq-5.15.0\bin\win64\activemq.bat 脚本启动AMQ,如下图所示,提示中能看到AMQ的数据目录
activemq.bat一闪而过
一开始直接运行bin目录下的activemq.bat 脚本启动总是一闪而过,检查了JAVA_HOME、PATH、CLASSPATH环境变量配置后也不行,后来运行bin\win64目录下的activemq.bat才启动成功。
Address already in use: JVM_Bind
错误:端口绑定失败
Java.io.IOException: Transport Connector could not be registered in JMX: Failed to bind to server socket: tcp://0.0.0.0:61616 due to: java.net.BindException: Address already in use: JVM_Bind
原因:
Windows服务Internet Connection Sharing (ICS)占用了61616这个端口,在系统的“服务”中把他关掉就可以了。用netstat是查不出的。
Linux下载安装启动
使用wget命令下载 apache-activemq-5.15.0-bin.tar.gz
wget http://archive.apache.org/dist/activemq/5.15.0/apache-activemq-5.15.0-bin.tar.gz
解压:
cd [activemq_install_dir]
tar -zxvf apache-activemq-5.15.0-bin.tar.gz
使用bin/activemq脚本启动,有两种方式,前台运行和后台运行,前台启动:
cd [activemq_install_dir]/bin
./activemq console
后台启动:
cd [activemq_install_dir]/bin
./activemq start
ActiveMQ管理控制台
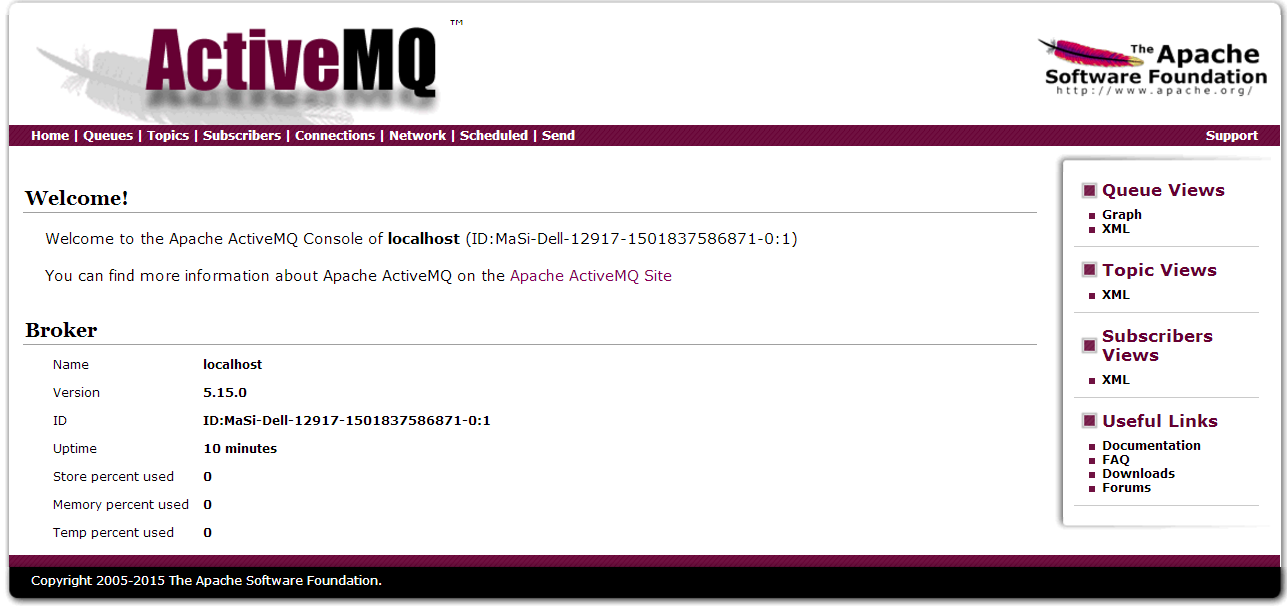
ActiveMQ默认启动时,启动了内置的jetty服务器,提供一个用于监控ActiveMQ的控制台页面,默认地址为:
http://127.0.0.1:8161/admin/ ,用户名和密码都是admin,如图:
管理控制台用户名密码配置在conf/jetty-realm.properties配置文件中:
# Defines users that can access the web (console, demo, etc.)
# username: password [,rolename ...]
admin: admin, admin
user: user, user
jetty服务器ip端口配置在conf/jetty.xml配置文件中:
<bean id="jettyPort" class="org.apache.activemq.web.WebConsolePort" init-method="start">
    <!-- the default port number for the web console -->
    <property name="host" value="0.0.0.0"/>
    <property name="port" value="8161"/>
</bean>
服务端监听端口
ActiveMQ默认使用的TCP连接端口是61616, 通过查看该端口的信息可以测试ActiveMQ是否成功启动,
Windows中,在CMD中执行:netstat -an|find "61616",结果如下:
C:\Users\MaSi>netstat -an | find "61616"
  TCP    0.0.0.0:61616          0.0.0.0:0              LISTENING
  TCP    [::]:61616             [::]:0                 LISTENING
显示AMQ正在监听61616端口,启动成功。
Linux中:
netstat -anp |grep 61616
参考
ActiveMQ 5.15.0 Release
http://activemq.apache.org/activemq-5150-release.html深入浅出JMS(二)–ActiveMQ简单介绍以及安装
http://blog.csdn.net/jiuqiyuliang/article/details/47160259
AMQ实例
本实例是一个maven多模块项目,简介如下:
- jms项目:多模块maven项目的父项目,不含任何代码,只在pom中规定各子模块依赖项的版本号
- jms-activemq项目:无spring的activemq实例,包含点对点队列发送和同步、异步接收,主题发送和同步、异步接收。
Maven添加ActiveMQ依赖
创建简单maven项目jms-activemq,pom.xml中添加ActiveMQ-5.15依赖:
<dependency>
    <groupId>org.apache.activemq</groupId>
    <artifactId>activemq-all</artifactId>
    <version>5.15.0</version>
</dependency>
点对点队列实例
发送端QueueSender
QueueSender.java:
package com.masikkk.jms.activemq;

import javax.jms.Connection;
import javax.jms.ConnectionFactory;
import javax.jms.Destination;
import javax.jms.MessageProducer;
import javax.jms.Session;
import javax.jms.TextMessage;

import org.apache.activemq.ActiveMQConnection;
import org.apache.activemq.ActiveMQConnectionFactory;

public class QueueSender {
    public static void main( String[] args )
    {
        ConnectionFactory connectionFactory;
        Connection connection = null;
        Session session; // Session,一个发送或接收消息的线程
        Destination destination;
        MessageProducer messageProducer;

        //创建ActiveMQ连接工厂
        connectionFactory = new ActiveMQConnectionFactory(
                ActiveMQConnection.DEFAULT_USER,
                ActiveMQConnection.DEFAULT_PASSWORD,
                "tcp://localhost:61616");
        try {
            //从连接工厂构造连接
            connection = connectionFactory.createConnection();
            //启动连接
            connection.start();
            //从连接创建session,事务型session
            session = connection.createSession(true, Session.AUTO_ACKNOWLEDGE);
            //从session创建一个名为"masikkkQueue"的队列
            destination = session.createQueue("masikkkQueue");
            //在session中为destination创建一个消息生产者
            messageProducer = session.createProducer(destination);

            //发送消息
            for (int i = 0; i < 5; i++) {
                //在session中创建一条消息
                TextMessage textMessage = session.createTextMessage("消息 "+i);
                messageProducer.send(textMessage);
                System.out.println("发送消息:"+textMessage.getText());
            }
            //事务型session需要commit才真正发送
            session.commit();

        } catch(Exception e) {
            e.printStackTrace();
        } finally {
            if(connection != null) {
                try {
                    connection.close();
                } catch (Exception e) {
                    e.printStackTrace();
                }
            }
        }

    }
}
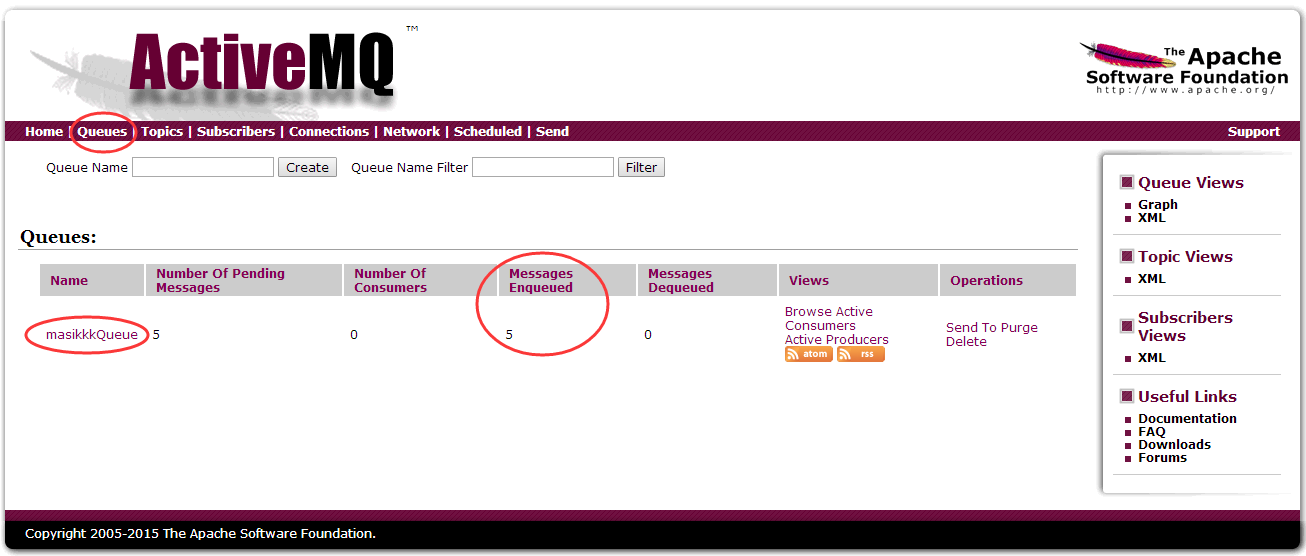
先启动AMQ服务端,然后Run As -> Java Application运行后,在控制台http://127.0.0.1:8161/admin/ 查看队列,看到创建了队列masikkkQueue,队列中有5条未处理消息,消费者个数为0:
同步接收QueueReceiverSync
QueueReceiverSync.java:
package com.masikkk.jms.activemq;

import javax.jms.Connection;
import javax.jms.ConnectionFactory;
import javax.jms.Destination;
import javax.jms.Message;
import javax.jms.MessageConsumer;
import javax.jms.Session;
import javax.jms.TextMessage;

import org.apache.activemq.ActiveMQConnection;
import org.apache.activemq.ActiveMQConnectionFactory;

public class QueueReceiverSync {
    public static void main( String[] args ) {
        ConnectionFactory connectionFactory;
        Connection connection = null;
        Session session;
        Destination destination;
        MessageConsumer messageConsumer;
        //创建AMQ连接工厂
        connectionFactory = new ActiveMQConnectionFactory(
                ActiveMQConnection.DEFAULT_USER,
                ActiveMQConnection.DEFAULT_PASSWORD,
                "tcp://localhost:61616");
        try{
            //从连接工厂构造连接
            connection = connectionFactory.createConnection();
            //启动连接
            connection.start();
            //从连接创建session,非事务session
            session = connection.createSession(false, Session.AUTO_ACKNOWLEDGE);
            //从session创建队列,与生产者发送到的队列名一致
            destination = session.createQueue("masikkkQueue");
            //在session中为destination创建一个消息消费者
            messageConsumer = session.createConsumer(destination);

            while(true) {
                //消费者同步接收消息,参数为超时时间
                Message message = messageConsumer.receive(10000);
                if(null != message) {
                    onMessage(message);//消息处理方法
                } else {
                    break;
                }
            }
        } catch (Exception e) {
            e.printStackTrace();
        } finally {
            if(connection != null){
                try {
                    connection.close();
                } catch (Exception e) {
                    e.printStackTrace();
                }
            }
        }

    }

    //消息处理方法
    public static void onMessage(Message message) {
        try {
            if(message instanceof TextMessage) {
                TextMessage textMessage = (TextMessage)message;
                String messageString = textMessage.getText();
                System.out.println("同步收到消息:" + messageString);
            }
        } catch (Exception e) {
            e.printStackTrace();
        }
    }
}
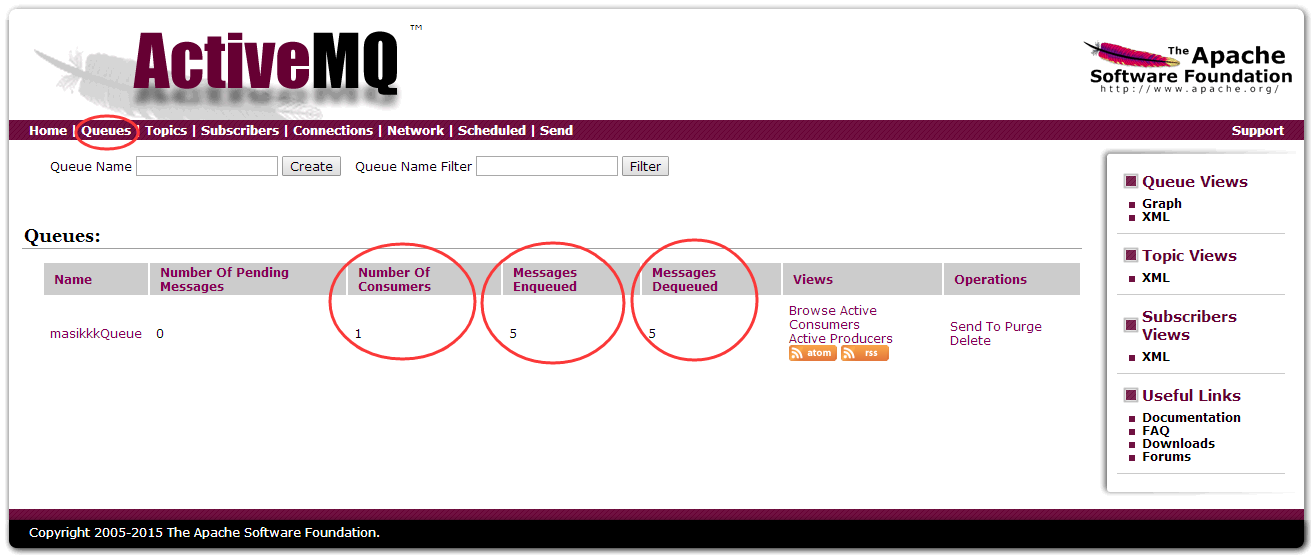
Run As -> Java Application运行后,在控制台http://127.0.0.1:8161/admin/ 刷新队列页面,可以看到入队列5条消息,出队列(被消费)5条消息,消费者个数为1(接收端程序结束前):
异步接收QueueReceiverAsync
QueueReceiverAsync.java:
package com.masikkk.jms.activemq;

import javax.jms.Connection;
import javax.jms.ConnectionFactory;
import javax.jms.Destination;
import javax.jms.Message;
import javax.jms.MessageConsumer;
import javax.jms.MessageListener;
import javax.jms.Session;
import javax.jms.TextMessage;

import org.apache.activemq.ActiveMQConnection;
import org.apache.activemq.ActiveMQConnectionFactory;

public class QueueReceiverAsync {
    public static void main( String[] args ) {
        ConnectionFactory connectionFactory;
        Connection connection = null;
        Session session;
        Destination destination;
        MessageConsumer messageConsumer;
        //创建AMQ连接工厂
        connectionFactory = new ActiveMQConnectionFactory(
                ActiveMQConnection.DEFAULT_USER,
                ActiveMQConnection.DEFAULT_PASSWORD,
                "tcp://localhost:61616");
        try{
            //从连接工厂构造连接
            connection = connectionFactory.createConnection();
            //启动连接
            connection.start();
            //从连接创建session,非事务session
            session = connection.createSession(false, Session.AUTO_ACKNOWLEDGE);
            //从session创建队列,与生产者发送到的队列名一致
            destination = session.createQueue("masikkkQueue");
            //在session中为destination创建一个消息消费者
            messageConsumer = session.createConsumer(destination);
            //为消费者注册消息监听器
            messageConsumer.setMessageListener(new MyListener());
            System.out.println("消费者消息监听器注册完成");
            Thread.sleep(1000000); //若不sleep程序会直接结束
        } catch (Exception e) {
            e.printStackTrace();
        } finally {
            if(connection != null){
                try {
                    connection.close();
                } catch (Exception e) {
                    e.printStackTrace();
                }
            }
        }

    }

}

//消息监听类
class MyListener implements MessageListener {
    @Override
    //消息到达后系统自动调用监听器的onMessage()方法
    public void onMessage(Message message) {
        try {
            if(message instanceof TextMessage) {
                TextMessage textMessage = (TextMessage)message;
                String messageString = textMessage.getText();
                System.out.println("异步收到消息:" + messageString);
            }
        } catch (Exception e) {
            e.printStackTrace();
        }
    }
}
发布/订阅主题实例
发布端TopicSender
TopicSender.java:
package com.masikkk.jms.activemq;

import javax.jms.Connection;
import javax.jms.ConnectionFactory;
import javax.jms.Destination;
import javax.jms.MessageProducer;
import javax.jms.Session;
import javax.jms.TextMessage;

import org.apache.activemq.ActiveMQConnection;
import org.apache.activemq.ActiveMQConnectionFactory;

public class TopicSender {
    public static void main(String[] args) {
        ConnectionFactory connectionFactory;
        Connection connection = null;
        Session session; // Session,一个发送或接收消息的线程
        Destination destination;
        MessageProducer messageProducer;

        //创建ActiveMQ连接工厂
        connectionFactory = new ActiveMQConnectionFactory(
                ActiveMQConnection.DEFAULT_USER,
                ActiveMQConnection.DEFAULT_PASSWORD,
                "tcp://localhost:61616");
        try {
            //从连接工厂构造连接
            connection = connectionFactory.createConnection();
            //启动连接
            connection.start();
            //从连接创建session,事务型session
            session = connection.createSession(true, Session.AUTO_ACKNOWLEDGE);
            //从session创建一个名为"masikkkTopic"的主题
            destination = session.createTopic("masikkkTopic");
            //在session中为destination创建一个消息生产者
            messageProducer = session.createProducer(destination);

            //发送消息
            for (int i = 0; i < 5; i++) {
                //在session中创建一条消息
                TextMessage textMessage = session.createTextMessage("topic消息 "+i);
                messageProducer.send(textMessage);
                System.out.println("发送topic消息:"+textMessage.getText());
            }
            //事务型session需要commit才真正发送
            session.commit();

        } catch (Exception e) {
            e.printStackTrace();
        } finally {
            if(connection != null) {
                try {
                    connection.close();
                } catch (Exception e) {
                    e.printStackTrace();
                }
            }
        }

    }

}
同步接收TopicReceiverSync
TopicReceiverSync.java:
package com.masikkk.jms.activemq;

import javax.jms.Connection;
import javax.jms.ConnectionFactory;
import javax.jms.Destination;
import javax.jms.Message;
import javax.jms.MessageConsumer;
import javax.jms.Session;
import javax.jms.TextMessage;

import org.apache.activemq.ActiveMQConnection;
import org.apache.activemq.ActiveMQConnectionFactory;

public class TopicReceiverSync {
    public static void main(String[] args) {
        ConnectionFactory connectionFactory;
        Connection connection = null;
        Session session;
        Destination destination;
        MessageConsumer messageConsumer;
        //创建AMQ连接工厂
        connectionFactory = new ActiveMQConnectionFactory(
                ActiveMQConnection.DEFAULT_USER,
                ActiveMQConnection.DEFAULT_PASSWORD,
                "tcp://localhost:61616");

        try {
            //从连接工厂构造连接
            connection = connectionFactory.createConnection();
            //启动连接
            connection.start();
            //从连接创建session,非事务session
            session = connection.createSession(false, Session.AUTO_ACKNOWLEDGE);
            //从session创建topic,与生产者发送到的主题名一致
            destination = session.createTopic("masikkkTopic");
            //在session中为destination创建一个消息订阅者
            messageConsumer = session.createConsumer(destination);

            while(true) {
                //订阅者同步接收消息,参数为超时时间
                Message message = messageConsumer.receive(100000);
                if(null != message) {
                    onMessage(message);//消息处理方法
                } else {
                    break;
                }
            }
        } catch (Exception e) {
            e.printStackTrace();
        } finally {
            if(connection != null){
                try {
                    connection.close();
                } catch (Exception e) {
                    e.printStackTrace();
                }
            }
        }
    }

    //消息处理方法
    public static void onMessage(Message message) {
        try {
            if(message instanceof TextMessage) {
                TextMessage textMessage = (TextMessage)message;
                String messageString = textMessage.getText();
                System.out.println("同步收到消息:" + messageString);
            }
        } catch (Exception e) {
            e.printStackTrace();
        }
    }

}
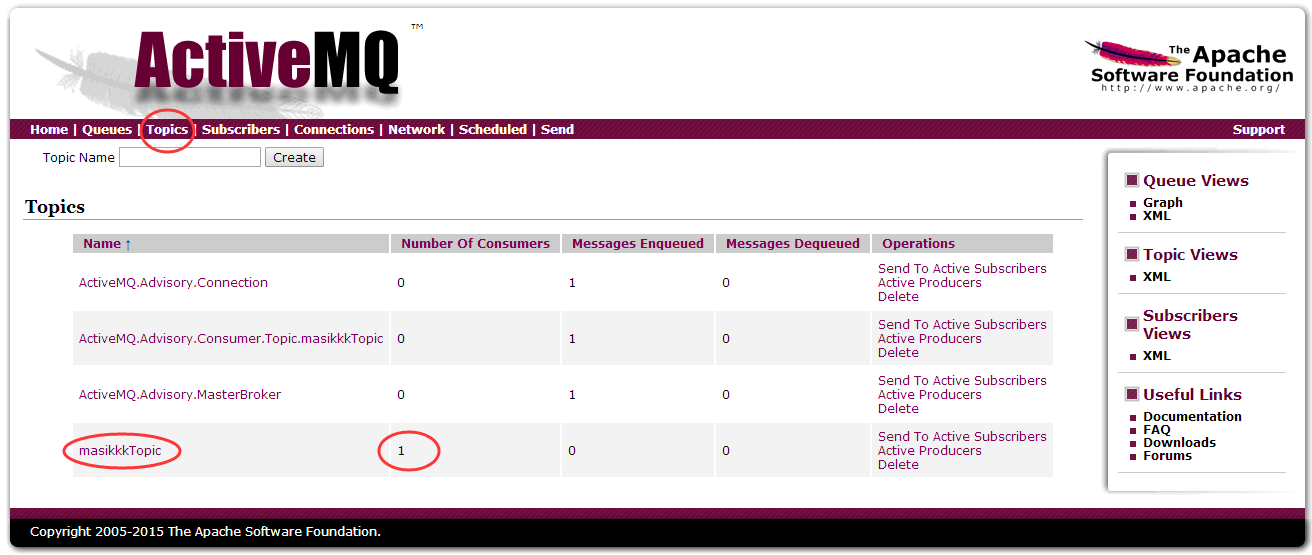
先运行订阅端,Run As -> Java Application运行后,在控制台http://127.0.0.1:8161/admin/ 查看Topics,可以看到主题masikkkTopic有一个订阅者:
然后运行发布端,消息发送后马上订阅端会收到消息,刷新控制台可看到发布了5条消息,消费了5条消息:
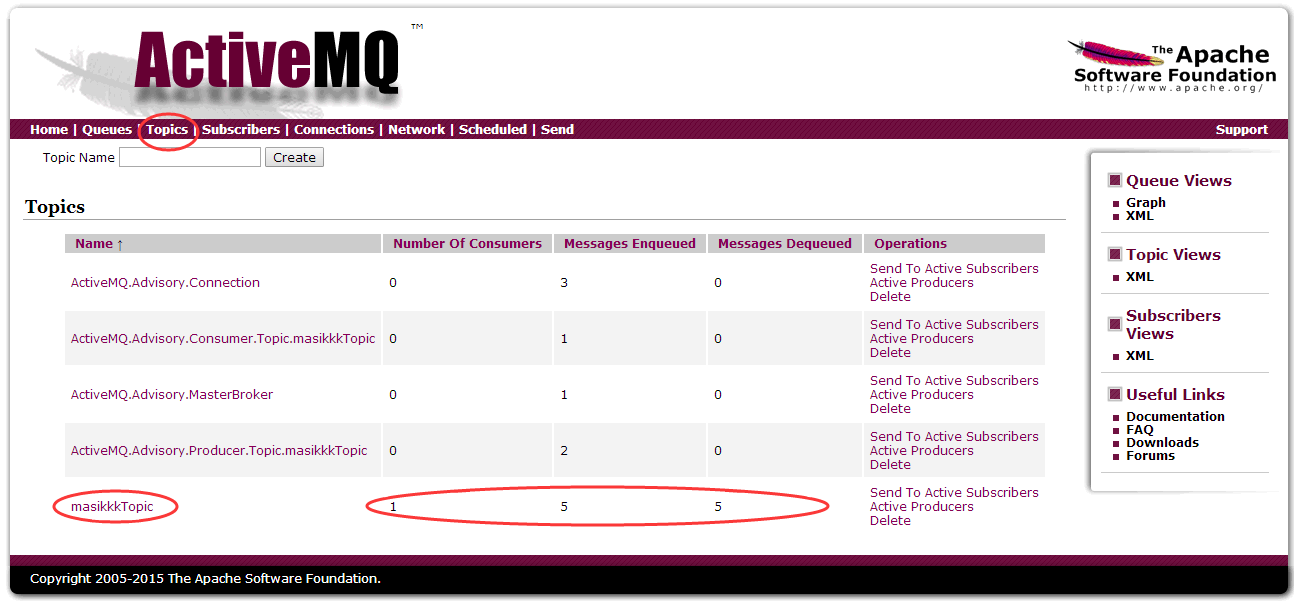
注意:和点对点队列形式不同,发布/订阅方式必须先有运行着的订阅者,然后发布的消息才能被收到。
异步接收TopicReceiverAsync
TopicReceiverAsync.java:
package com.masikkk.jms.activemq;

import javax.jms.Connection;
import javax.jms.ConnectionFactory;
import javax.jms.Destination;
import javax.jms.Message;
import javax.jms.MessageConsumer;
import javax.jms.MessageListener;
import javax.jms.Session;
import javax.jms.TextMessage;

import org.apache.activemq.ActiveMQConnection;
import org.apache.activemq.ActiveMQConnectionFactory;

public class TopicReceiverAsync {
    public static void main(String[] args) {
        ConnectionFactory connectionFactory;
        Connection connection = null;
        Session session;
        Destination destination;
        MessageConsumer messageConsumer;
        //创建AMQ连接工厂
        connectionFactory = new ActiveMQConnectionFactory(
                ActiveMQConnection.DEFAULT_USER,
                ActiveMQConnection.DEFAULT_PASSWORD,
                "tcp://localhost:61616");

        try {
            //从连接工厂构造连接
            connection = connectionFactory.createConnection();
            //启动连接
            connection.start();
            //从连接创建session,非事务session
            session = connection.createSession(false, Session.AUTO_ACKNOWLEDGE);
            //从session创建topic,与生产者发送到的主题名一致
            destination = session.createTopic("masikkkTopic");
            //在session中为destination创建一个消息订阅者
            messageConsumer = session.createConsumer(destination);
            //为消费者注册消息监听器
            messageConsumer.setMessageListener(new MyTopicListener());
            System.out.println("消费者消息监听器注册完成");
            Thread.sleep(1000000); //若不sleep程序会直接结束
        } catch (Exception e) {
            e.printStackTrace();
        } finally {
            if(connection != null){
                try {
                    connection.close();
                } catch (Exception e) {
                    e.printStackTrace();
                }
            }
        }
    }

}

//消息监听类
class MyTopicListener implements MessageListener {
    @Override
    //消息到达后系统自动调用监听器的onMessage()方法
    public void onMessage(Message message) {
        try {
            if(message instanceof TextMessage) {
                TextMessage textMessage = (TextMessage)message;
                String messageString = textMessage.getText();
                System.out.println("异步收到消息:" + messageString);
            }
        } catch (Exception e) {
            e.printStackTrace();
        }
    }
}
错误:AMQ5.15不兼容JDK1.8以下版本
Run As -> Java Application运行时报错:
Exception in thread "main" java.lang.UnsupportedClassVersionError: org/apache/activemq/ActiveMQConnectionFactory : Unsupported major.minor version 52.0
原因:
JDK版本错误,activemq-all-5.15.0.jar是用更高的Java版本编译的,而本地运行环境jdk版本低,不兼容。
https://stackoverflow.com/questions/10382929/how-to-fix-java-lang-unsupportedclassversionerror-unsupported-major-minor-versi
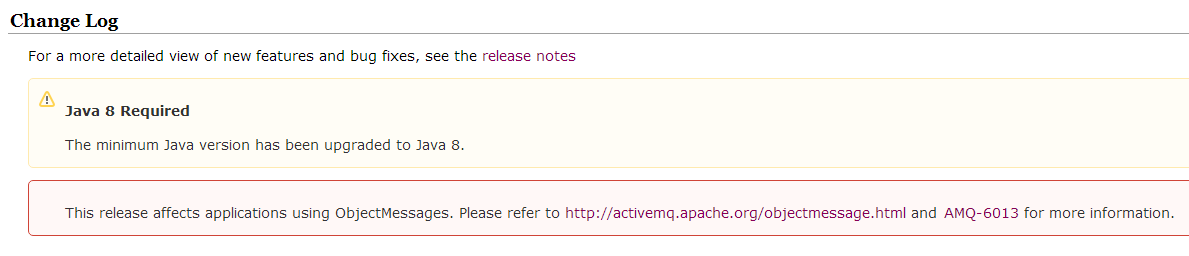
AMQ5.15版本要求最低Java版本为1.8
http://activemq.apache.org/activemq-5150-release.html
打开activemq-all-5.15.0.jar中的MANIFEST.MF文件,可以看到是用Java1.8编译的:
Manifest-Version: 1.0
Implementation-Title: ActiveMQ :: All JAR bundle
Implementation-Version: 5.15.0
Archiver-Version: Plexus Archiver
Built-By: cshannon
Specification-Vendor: The Apache Software Foundation
Specification-Title: ActiveMQ :: All JAR bundle
Implementation-Vendor-Id: org.apache.activemq
Implementation-Vendor: The Apache Software Foundation
Main-Class: org.apache.activemq.console.command.ShellCommand
Created-By: Apache Maven 3.5.0
Build-Jdk: 1.8.0_112
Specification-Version: 5.15.0
解决:
修改项目的Build Path,修改JRE System libraries 为1.8
参考
ActiveMQ入门实例
http://www.cnblogs.com/xwdreamer/archive/2012/02/21/2360818.html实战activeMQ
http://www.iteye.com/topic/275045JMS使用ActiveMQ实现Queue和Topic两种模式
http://blog.csdn.net/zmx729618/article/details/51082844
ActiveMQ与Spring整合实例
本实例是一个maven多模块项目,简介如下:
- jms项目:多模块maven项目的父项目,不含任何代码,只在pom中规定各子模块依赖项的版本号
- jms-spring-api项目,activemq与spring整合项目,消息发送接收的接口与实现
- jms-spring-client项目,activemq与spring整合项目的调用端,调用jms-spring-api定义的接口进行消息的发送和接收,可直接运行其中的JUnit测试类进行测试。
jms-spring-api项目
maven添加spring-jms依赖
jms-spring-api项目中只添加javax.jms和spring-jms框架的依赖,并不依赖具体的JMS Provider(例如AMQ)。
需要注意的是,默认的maven中央仓库中没有javax.jms:jms-1.1.jar这个包,需要给maven额外配上JBoss远程仓库才能成功导入。
<dependencies>
    <!-- Spring -->
    <dependency>
        <groupId>org.springframework</groupId>
        <artifactId>spring-jms</artifactId>
        <version>${spring.version}</version>
    </dependency>

    <!-- jms -->
    <dependency>
        <groupId>javax.jms</groupId>
        <artifactId>jms</artifactId>
        <version>1.1</version>
    </dependency>
</dependencies>
生产者接口ProducerService
ProducerService.java
package com.masikkk.jms.spring.api;

import javax.jms.Destination;

public interface ProducerService {
    //向成员目的地destination发送文本消息message
    public void sendTextMessage(final String message);

    //向指定目的地destination发送文本消息message
    public boolean sendTextMessage(Destination destination, final String message);

    //向成员目的地destination发送字节消息byteMsg
    public void sendBytesMessage(final byte[] byteMsg);

    //向指定目的地destination发送字节消息byteMsg
    public boolean sendBytesMessage(Destination destination, final byte[] byteMsg);
}
生产者实现类ProducerServiceImpl
ProducerServiceImpl.java,调用Spring提供的JmsTemplate实现消息发送:
package com.masikkk.jms.spring.api;

import javax.jms.BytesMessage;
import javax.jms.Destination;
import javax.jms.JMSException;
import javax.jms.Message;
import javax.jms.Session;

import org.springframework.jms.core.JmsTemplate;
import org.springframework.jms.core.MessageCreator;

public class ProducerServiceImpl implements ProducerService{
    private JmsTemplate jmsTemplate;
    private Destination destination;

    @Override
    //向成员目的地destination发送文本消息message
    public void sendTextMessage(final String message) {
        jmsTemplate.send(destination, new MessageCreator() {
            public Message createMessage(Session session) throws JMSException {
                return session.createTextMessage(message);
            }
        });
    }

    @Override
    //向指定目的地destination发送文本消息message
    public boolean sendTextMessage(Destination destination, final String message) {
        boolean ret=true;
        try {
            jmsTemplate.send(destination, new MessageCreator() {
                public Message createMessage(Session session) throws JMSException {
                    return session.createTextMessage(message);
                }
            });
        } catch (Exception e) {
            e.printStackTrace();
            ret = false;
        }
        return ret;
    }


    @Override
    //向成员目的地destination发送字节消息byteMsg
    public void sendBytesMessage(final byte[] byteMsg) {
        jmsTemplate.send(destination, new MessageCreator() {
            public Message createMessage(Session session) throws JMSException {
                BytesMessage bytesMessage = session.createBytesMessage();
                bytesMessage.writeBytes(byteMsg);
                return bytesMessage;
            }
        });
    }


    @Override
    //向指定目的地destination发送字节消息byteMsg
    public boolean sendBytesMessage(Destination destination, final byte[] byteMsg) {
        boolean ret=true;
        try {
            jmsTemplate.send(destination, new MessageCreator() {
                public Message createMessage(Session session) throws JMSException {
                    BytesMessage bytesMessage = session.createBytesMessage();
                    bytesMessage.writeBytes(byteMsg);
                    return bytesMessage;
                }
            });
        } catch (Exception e) {
            e.printStackTrace();
            ret = false;
        }
        return ret;
    }

    public JmsTemplate getJmsTemplate() {
        return jmsTemplate;
    }

    public void setJmsTemplate(JmsTemplate jmsTemplate) {
        this.jmsTemplate = jmsTemplate;
    }

    public Destination getDestination() {
        return destination;
    }

    public void setDestination(Destination destination) {
        this.destination = destination;
    }

}
同步消费者接口ConsumerSync
ConsumerSync.java:
package com.masikkk.jms.spring.api;

public interface ConsumerSync {
    //从成员destination中收取消息
    public void receiveTextMessage();
}
同步消费者实现类ConsumerSyncImpl
ConsumerSyncImpl.java:
package com.masikkk.jms.spring.api;

import javax.jms.Destination;
import javax.jms.Message;
import javax.jms.TextMessage;

import org.springframework.jms.core.JmsTemplate;

public class ConsumerSyncImpl implements ConsumerSync {
    private JmsTemplate jmsTemplate;
    private Destination destination;

    @Override
    public void receiveTextMessage() {
        Message message = null;
        try {
            //receive方法同步收取消息,收到消息前会阻塞等待
            message = jmsTemplate.receive(destination);
            if(null != message) {
                if(message instanceof TextMessage) {
                    TextMessage textMessage = (TextMessage)message;
                    System.out.println("Spring同步收到消息:"+textMessage.getText());
                }
            }
        } catch (Exception e) {
            e.printStackTrace();
        }
    }

    public JmsTemplate getJmsTemplate() {
        return jmsTemplate;
    }

    public void setJmsTemplate(JmsTemplate jmsTemplate) {
        this.jmsTemplate = jmsTemplate;
    }

    public Destination getDestination() {
        return destination;
    }

    public void setDestination(Destination destination) {
        this.destination = destination;
    }

}
异步消费监听器TextMessageListener
TextMessageListener.java:
package com.masikkk.jms.spring.api;

import javax.jms.Message;
import javax.jms.MessageListener;
import javax.jms.TextMessage;

public class TextMessageListener implements MessageListener{
    //消息到达后系统自动调用监听器的onMessage()方法
    @Override
    public void onMessage(Message message) {
        try {
            if(message instanceof TextMessage) {
                TextMessage textMessage = (TextMessage)message;
                String messageString = textMessage.getText();
                System.out.println("Spring 异步收到消息:" + messageString);
            }
        } catch (Exception e) {
            e.printStackTrace();
        }
    }

}
jms-spring-client项目
jms-spring-client项目调用jms-spring-api定义的接口进行消息的发送和接收。
Maven添加ActiveMQ依赖
添加自己封装的jms-spring-api依赖,AMQ相关依赖,Spring相关依赖,JUnit相关依赖:
pom.xml:
<properties>
    <project.build.sourceEncoding>UTF-8</project.build.sourceEncoding>
    <!-- Spring版本 -->
    <spring.version>4.1.7.RELEASE</spring.version>
    <!-- ActiveMQ版本 -->
    <activemq.version>5.15.0</activemq.version>
    <!-- JUnit版本 -->
    <junit.version>4.11</junit.version>
</properties>
<dependencies>
    <!-- 自己封装的jms-spring-api -->
    <dependency>
        <groupId>com.masikkk.jms</groupId>
        <artifactId>jms-spring-api</artifactId>
        <version>0.0.1-SNAPSHOT</version>
    </dependency>

    <!-- JUnit -->
    <dependency>
        <groupId>junit</groupId>
        <artifactId>junit</artifactId>
        <version>${junit.version}</version>
        <scope>test</scope>
    </dependency>

    <!-- Spring -->
    <dependency>
        <groupId>org.springframework</groupId>
        <artifactId>spring-jms</artifactId>
        <version>${spring.version}</version>
    </dependency>
    <dependency>
        <groupId>org.springframework</groupId>
        <artifactId>spring-test</artifactId>
        <version>${spring.version}</version>
    </dependency>

    <!-- ActiveMQ -->
    <dependency>
        <groupId>org.apache.activemq</groupId>
        <artifactId>activemq-all</artifactId>
        <version>${activemq.version}</version>
    </dependency>
    <dependency>
        <groupId>org.apache.activemq</groupId>
        <artifactId>activemq-pool</artifactId>
        <version>${activemq.version}</version>
    </dependency>
</dependencies>
注意:如果使用AMQ的池化连接工厂org.apache.activemq.pool.PooledConnectionFactory,只添加activemq-all依赖不行,还需要单独添加activemq-pool,因为虽然activemq-all中包含activemq-pool,但由于其依赖时加了<optional>true</optional>项阻断了依赖传递性,所以maven并不会自动导入activemq-pool依赖的commons-pool2,导致找不到commons-pool2中的类而bean创建失败:
Exception in thread "main" org.springframework.beans.factory.BeanCreationException: Error creating bean with name 'pooledConnectionFactory' defined in class path resource [applicationContext-hello.xml]: Instantiation of bean failed; nested exception is java.lang.NoClassDefFoundError: org/apache/commons/pool2/KeyedPooledObjectFactory
这个问题就是maven的依赖传递问题:
avtivemq-all —>activemq-pool —>commons-pool2,添加了avtivemq-all,自动导入了activemq-pool,但由于avtivemq-all依赖activemq-pool时加了<optional>true</optional>项,并不会自动导入commons-pool2,所以解决方法可以是显式添加activemq-pool依赖或者显式添加commons-pool2依赖。
Spring上下文配置文件
编辑项目的Java Build path,创建src/main/resources文件夹,在里面创建Spring配置文件
applicationContext-core.xml
applicationContext-core.xml中是共用bean配置,包括AMQ连接工厂ActiveMQConnectionFactory、Spring连接工厂SingleConnectionFactory、JMS工具类JmsTemplate、Queue和Topic目的地。
<?xml version="1.0" encoding="UTF-8"?>
<beans xmlns="http://www.springframework.org/schema/beans"
       xmlns:xsi="http://www.w3.org/2001/XMLSchema-instance"
       xsi:schemaLocation="http://www.springframework.org/schema/beans
       http://www.springframework.org/schema/beans/spring-beans.xsd">

    <!-- 真正可以产生Connection的ConnectionFactory,由对应的JMS服务厂商提供,这里是ActiveMQ -->
    <bean id="targetConnectionFactory" class="org.apache.activemq.ActiveMQConnectionFactory">
        <!-- <property name="brokerURL" value="tcp://localhost:61616"/>  -->
        <property name="brokerURL" value="failover:(tcp://localhost:61616,tcp://127.0.0.1:61616)"/>
    </bean>

    <!-- AMQ池化连接工厂,需要单独引入activemq-pool依赖-->
    <bean id="pooledConnectionFactory" class="org.apache.activemq.pool.PooledConnectionFactory">
        <property name="connectionFactory" ref="targetConnectionFactory"/>
        <property name="maxConnections" value="10"/>
    </bean>

    <!-- Spring用于管理真正的ConnectionFactory的ConnectionFactory -->
    <bean id="connectionFactory" class="org.springframework.jms.connection.SingleConnectionFactory">
        <!-- 目标ConnectionFactory对应真实的可以产生JMS Connection的ConnectionFactory -->
        <property name="targetConnectionFactory" ref="targetConnectionFactory"/>
    </bean>

    <!-- Spring提供的JMS工具类,它可以进行消息发送、接收等 -->
    <bean id="jmsTemplate" class="org.springframework.jms.core.JmsTemplate">
        <!-- 这个connectionFactory对应的是我们定义的Spring提供的那个ConnectionFactory对象 -->
        <property name="connectionFactory" ref="connectionFactory"/>
        <property name="receiveTimeout" value="10000"></property>
    </bean>

    <!--这个是队列目的地,点对点的-->
    <bean id="queueDestination" class="org.apache.activemq.command.ActiveMQQueue">
        <constructor-arg>
            <value>masikkk.spring.queue</value>
        </constructor-arg>
    </bean>

    <!--这个是主题目的地,一对多的-->
    <bean id="topicDestination" class="org.apache.activemq.command.ActiveMQTopic">
        <constructor-arg value="masikkk.spring.topic"/>
    </bean>

</beans>
applicationContext-producer.xml
生产者bean配置:
<?xml version="1.0" encoding="UTF-8"?>
<beans xmlns="http://www.springframework.org/schema/beans"
       xmlns:xsi="http://www.w3.org/2001/XMLSchema-instance"
       xsi:schemaLocation="http://www.springframework.org/schema/beans
       http://www.springframework.org/schema/beans/spring-beans.xsd">

    <bean id="producerService" class="com.masikkk.jms.spring.api.ProducerServiceImpl">
        <property name="jmsTemplate" ref="jmsTemplate"></property>
        <property name="destination" ref="queueDestination"></property>
    </bean>
</beans>
applicationContext-consumer-sync.xml
同步消费者bean配置:
<?xml version="1.0" encoding="UTF-8"?>
<beans xmlns="http://www.springframework.org/schema/beans"
       xmlns:xsi="http://www.w3.org/2001/XMLSchema-instance"
       xsi:schemaLocation="http://www.springframework.org/schema/beans
       http://www.springframework.org/schema/beans/spring-beans.xsd">

    <bean id="consumerSync" class="com.masikkk.jms.spring.api.ConsumerSyncImpl">
        <property name="jmsTemplate" ref="jmsTemplate"></property>
        <property name="destination" ref="queueDestination"></property>
    </bean>
</beans>
applicationContext-consumer-async.xml
异步消费者bean配置:
<?xml version="1.0" encoding="UTF-8"?>
<beans xmlns="http://www.springframework.org/schema/beans"
       xmlns:xsi="http://www.w3.org/2001/XMLSchema-instance"
       xsi:schemaLocation="http://www.springframework.org/schema/beans
       http://www.springframework.org/schema/beans/spring-beans.xsd">

    <!-- 消息监听器 -->
    <bean id="textMessageListener" class="com.masikkk.jms.spring.api.TextMessageListener"/>

    <!-- 消息监听容器 -->
    <bean id="jmsContainer" class="org.springframework.jms.listener.DefaultMessageListenerContainer">
        <property name="connectionFactory" ref="connectionFactory" />
        <property name="destination" ref="queueDestination" />
        <property name="messageListener" ref="textMessageListener" />
    </bean>
</beans>
写main函数手动调用bean进行测试
生产者调用类ProducerMain
ProducerMain.java
package com.masikkk.jms.spring.client;

import org.springframework.context.ApplicationContext;
import org.springframework.context.support.ClassPathXmlApplicationContext;

import com.masikkk.jms.spring.api.ProducerService;

public class ProducerMain {
    public static void main(String[] args) {
        ApplicationContext context = new ClassPathXmlApplicationContext(
                new String[]{"applicationContext-core.xml","applicationContext-producer.xml"});
        ProducerService producerService = (ProducerService)context.getBean("producerService");
        for(int i=0; i<5; i++) {
            producerService.sendTextMessage("Spring JmsTemplate消息:"+i);
            System.out.println("Spring JmsTemplate发送消息:"+i);
        }
    }
}
同步消费者调用类ConsumerSyncMain
ConsumerSyncMain.java
package com.masikkk.jms.spring.client;

import org.springframework.context.ApplicationContext;
import org.springframework.context.support.ClassPathXmlApplicationContext;

import com.masikkk.jms.spring.api.ConsumerSync;

public class ConsumerSyncMain {
    public static void main(String[] args) {
        ApplicationContext context = new ClassPathXmlApplicationContext(
                new String[]{"applicationContext-core.xml","applicationContext-consumer-sync.xml"});
        ConsumerSync consumerSync = (ConsumerSync)context.getBean("consumerSync");
        for(int i=0; i<5; i++) {
            consumerSync.receiveTextMessage(); //同步收取消息
        }
    }
}
异步消费者调用类ConsumerAsyncMain
ConsumerAsyncMain.java
package com.masikkk.jms.spring.client;

import org.springframework.context.ApplicationContext;
import org.springframework.context.support.ClassPathXmlApplicationContext;

public class ConsumerAsyncMain {
    public static void main(String[] args) {
        //加载Spring上下文后自动开始监听消息
        ApplicationContext context = new ClassPathXmlApplicationContext(
                new String[]{"applicationContext-core.xml","applicationContext-consumer-async.xml"});
    }
}
使用JUnit测试
生产者测试类ProducerTest
ProducerTest.java
package com.masikkk.jms.spring.client;

import org.junit.Test;
import org.junit.runner.RunWith;
import org.springframework.beans.factory.annotation.Autowired;
import org.springframework.test.context.ContextConfiguration;
import org.springframework.test.context.junit4.SpringJUnit4ClassRunner;

import com.masikkk.jms.spring.api.ProducerService;

@RunWith(SpringJUnit4ClassRunner.class)
@ContextConfiguration(locations={"classpath:applicationContext-core.xml",
        "classpath:applicationContext-producer.xml"})
public class ProducerTest {
    @Autowired
    ProducerService producerService;

    @Test
    public void testSendTextMessage() {
        for(int i=0; i<5; i++) {
            producerService.sendTextMessage("JUnit测试Spring JMS消息:"+i);
            System.out.println("JUnit测试Spring JMS消息:"+i);
        }
    }
}
同步消费者测试类ConsumerSyncTest
ConsumerSyncTest.java
package com.masikkk.jms.spring.client;

import org.junit.Test;
import org.junit.runner.RunWith;
import org.springframework.beans.factory.annotation.Autowired;
import org.springframework.test.context.ContextConfiguration;
import org.springframework.test.context.junit4.SpringJUnit4ClassRunner;

import com.masikkk.jms.spring.api.ConsumerSync;

@RunWith(SpringJUnit4ClassRunner.class)
@ContextConfiguration(locations={"classpath:applicationContext-core.xml",
        "classpath:applicationContext-consumer-sync.xml"})
public class ConsumerSyncTest {
    @Autowired
    ConsumerSync consumerSync;

    @Test
    public void testConsumerSync() {
        for(int i=0; i<5; i++) {
            consumerSync.receiveTextMessage(); //同步收取消息
        }
    }
}
异步消费者测试类ConsumerAsyncTest
ConsumerAsyncTest.java
package com.masikkk.jms.spring.client;

import org.junit.Test;
import org.junit.runner.RunWith;
import org.springframework.beans.factory.annotation.Autowired;
import org.springframework.test.context.ContextConfiguration;
import org.springframework.test.context.junit4.SpringJUnit4ClassRunner;

import com.masikkk.jms.spring.api.ProducerService;

@RunWith(SpringJUnit4ClassRunner.class)
@ContextConfiguration(locations={"classpath:applicationContext-core.xml",
        "classpath:applicationContext-consumer-async.xml",
        "classpath:applicationContext-producer.xml"})
public class ConsumerAsyncTest {
    @Autowired
    ProducerService producerService;

    @Test
    public void testSendTextMessage() {
        //加载applicationContext-consumer-async.xml后监听器自动启动,调producerService发消息即可收到
        for(int i=0; i<5; i++) {
            producerService.sendTextMessage("JUnit测试Spring JMS消息:"+i);
            System.out.println("JUnit测试Spring JMS消息:"+i);
        }
    }
}
参考
Spring整合JMS(一)——基于ActiveMQ实现(讲的很细)
http://elim.iteye.com/blog/1893038ActiveMQ学习笔记(5)——使用Spring JMS收发消息
(很好,有源码下载,Q和Topic分别实现,同步接收和异步接收分别实现,还有JUnit测试)
https://my.oschina.net/xiaoxishan/blog/381209在Spring下集成ActiveMQ
http://www.cnblogs.com/xwdreamer/archive/2012/02/27/2369967.htmlSpring+ActiveMQ实现消息收发和订阅
http://blog.csdn.net/linlzk/article/details/13290699
GitHub项目源码
本文中所有代码已分享到GitHub,repo地址:https://github.com/masikkk/java-jms ,是一个多模块maven项目,可导入为maven工程运行。
项目介绍
本项目是一个maven多模块项目,简介如下:
- jms项目,多模块maven项目的父项目,无任何代码,只在pom中定义spring,activemq和junit的版本号
- jms-activemq项目,无spring的activemq实例,包含点对点队列发送和同步、异步接收,主题发送和同步、异步接收。
- jms-spring-api项目,activemq与spring整合项目,消息发送接收的接口与实现
- jms-spring-client项目,activemq与spring整合项目的调用端,调用jms-spring-api定义的接口进行消息的发送和接收,可直接运行其中的JUnit测试类进行测试。
运行方法
首先本地安装并启动ActiveMQ,之后随时可在控制台http://127.0.0.1:8161/admin/ 查看队列
- jms-activemq项目
- 队列发送与接收:首先Run As->Java Application运行消息生产者QueueSender向队列发送消息,然后运行消费者QueueReceiverSync或QueueReceiverAsync从队列接收消息,查看控制台输出。
- 主题订阅与发布:首先Run As->Java Application运行订阅端TopicReceiverSync或TopicReceiverAsync订阅该主题,然后运行发布端TopicSender,查看控制台输出。
- jms-spring-client项目
- 手动加载Spring上下文进行测试:首先Run As->Java Application运行ProducerMain向目的地发送消息,然后运行ConsumerSyncMain或ConsumerAsyncMain从目的地接收消息,查看控制台输出。
- JUnit自动测试:(1)测试同步接收:首先Run As->JUnit Test运行ProducerTest向目的地发送消息,然后运行ConsumerSyncTest从目的地接收消息。(2)测试异步接收:直接Run As->JUnit Test运行ConsumerAsyncTest
参考博文
- Java-JMS http://masikkk.com/article/Java-JMS/
- Apache-ActiveMQ http://masikkk.com/article/Apache-ActiveMQ/
上一篇 Java-JWS
页面信息
location:protocol: host: hostname: origin: pathname: href: document:referrer: navigator:platform: userAgent: