当前位置 : 首页 » 文章分类 :  开发  »  Elasticsearch-索引

Elasticsearch-索引

Elasticsearch 索引


文档插入性能调优

Elasticsearch Guide [7.17] » How to » Tune for indexing speed
https://www.elastic.co/guide/en/elasticsearch/reference/current/tune-for-indexing-speed.html

使用批量操作API

_bulk 批量操作,批量插入、更新、删除文档

多线程插入

修改或关闭刷新间隔(refresh_interval)

index.refresh_interval
https://www.elastic.co/guide/en/elasticsearch/reference/current/index-modules.html#index-refresh-interval-setting

默认值 1 秒,可设为 -1 来禁用 refresh。
未显式设置时,分片在 index.search.idle.after 秒未收到 search 请求后会停止后台的定时 refresh 任务,直到再次收到 search 请求。这么做的目的是为了加快批量索引的速度。
refresh_interval 可以在既存索引上进行动态更新。

1、当正在建立一个大的新索引时,可以将刷新间隔临时调整为较大的值,创建完再调整为默认值。
注意:refresh_interval 需要一个 持续时间 值, 例如 1s (1 秒) 或 2m (2 分钟)。 一个绝对值 1 表示的是 1 毫秒。

PUT /index/_settings
{ "refresh_interval": "30s" } 30s自动刷新。
 
PUT /index/_settings
{ "refresh_interval": "1s" }  每秒自动刷新。

2、当正在建立一个大的新索引时,可以先关闭自动刷新,待开始使用该索引时,再把它们调回来:

PUT /index/_settings
{ "refresh_interval": -1 }    关闭自动刷新。
 
PUT /index/_settings
{ "refresh_interval": "1s" }  每秒自动刷新。

禁用副本

在做批量索引时,可以考虑把副本数 index.number_of_replicas 设置成0,因为document从主分片(primary shard)复制到从分片(replica shard)时,从分片也要执行相同的分析、索引和合并过程,这样的开销比较大,你可以在构建索引之后再开启副本,这样只需要把数据从主分片拷贝到从分片

curl -XPUT 'localhost:9200/my_index/_settings' -d ' {
    "index" : {
        "number_of_replicas" : 0
    }
}'

禁用操作系统swap

增加操作系统文件cache

使用自动生成的id

如果指定 id 创建文档,es 需要先检查此 id 是否已存在,较为耗时。

使用SSD磁盘

增加索引buffer size

读写分离


Index 索引 API

index 相当于数据库的表,是 Elasticsearch 数据管理的顶层单位


PUT /index 创建索引

Elasticsearch Guide [7.17] » REST APIs » Index APIs » Create index API
https://www.elastic.co/guide/en/elasticsearch/reference/current/indices-create-index.html

PUT /<index> 创建索引

例1、使用默认配置、不指定 mapping 创建索引 article
curl -X PUT 'http://localhost:9200/article'
返回如下

{
    "acknowledged": true,
    "shards_acknowledged": true,
    "index": "article"
}

例2、指定分片、副本数创建索引 my-index-000001

PUT /my-index-000001
{
  "settings": {
    "index": {
      "number_of_shards": 3,  
      "number_of_replicas": 2 
    }
  }
}

body 请求体可以简化,无需指定 index 块,如下:

PUT /my-index-000001
{
  "settings": {
    "number_of_shards": 3,
    "number_of_replicas": 2
  }
}

例3、指定分片数、mapping创建索引 test

PUT /test
{
  "settings": {
    "number_of_shards": 1
  },
  "mappings": {
    "properties": {
      "field1": { "type": "text" }
    }
  }
}

例4、指定mapping、基于ik的自定义分析器+同义词+停用词创建索引

PUT /test
{
  "mappings": {
    "properties":{
        "title": {
            "type": "text",
            "analyzer": "ik_max_word",
            "search_analyzer": "ik_smart",
            "fields": {
                "keyword":{
                    "type":"keyword"
                }
            }
        },
        "content": {
            "type": "text",
            "analyzer": "ik_max_word",
            "search_analyzer": "ik_smart"
        }
     }
  },
  "settings": {
      "index": {
          "analysis": {
              "filter": {
                "my_synonyms": {
                  "type": "synonym_graph",
                  "synonyms": [
                    "应用,服务",
                  ]
                },
                "my_stop": {
                  "type": "stop",
                  "ignore_case": true,
                  "stopwords": ["的", "一", "不", "在", "人", "有", "是", "为", "以", "于", "上", "他", "而", "后", "之", "来", "及", "了", "因", "下", "可", "到", "由", "这", "与", "也", "此", "但", "并", "个", "其", "已", "无", "小", "我", "们", "起", "最", "再", "今", "去", "好", "只", "又", "或", "很", "亦", "某", "把", "那", "你", "乃", "它", "吧", "被", "比", "别", "趁", "当", "从", "到", "得", "打", "凡", "儿", "尔", "该", "各", "给", "跟", "和", "何", "还", "即", "几", "既", "看", "据", "距", "靠", "啦", "了", "另", "么", "每", "们", "嘛", "拿", "哪", "那", "您", "凭", "且", "却", "让", "仍", "啥", "如", "若", "使", "谁", "虽", "随", "同", "所", "她", "哇", "嗡", "往", "哪", "些", "向", "沿", "哟", "用", "于", "咱", "则", "怎", "曾", "至", "致", "着", "诸", "自"]
                }
              },
              "analyzer": {
                "ik_max_custom": {
                  "type": "custom",
                  "tokenizer": "ik_max_word",
                  "filter": [
                    "my_synonyms", "my_stop"
                  ]
                },
                "ik_smart_custom": {
                  "type": "custom",
                  "tokenizer": "ik_smart",
                  "filter": [
                    "my_synonyms", "my_stop"
                  ]
                }
              }
          }
      }
  }
}

GET /index 查询索引

Elasticsearch Guide [7.16] » REST APIs » Index APIs » Get index API
https://www.elastic.co/guide/en/elasticsearch/reference/current/indices-get-index.html

curl -X GET 'http://localhost:9200/article'
返回

{
    "article": {
        "aliases": {},
        "mappings": {},
        "settings": {
            "index": {
                "routing": {
                    "allocation": {
                        "include": {
                            "_tier_preference": "data_content"
                        }
                    }
                },
                "number_of_shards": "1",
                "provided_name": "article",
                "creation_date": "1643005891480",
                "number_of_replicas": "1",
                "uuid": "phMOfBkAT8yE6lE1WHQniA",
                "version": {
                    "created": "7160299"
                }
            }
        }
    }
}

DELETE /index 删除索引

Elasticsearch Guide [7.16] » REST APIs » Index APIs » Delete index API
https://www.elastic.co/guide/en/elasticsearch/reference/7.6/indices-delete-index.html

curl -X DELETE 'localhost:9200/article'
返回如下

{
    "acknowledged": true
}

ignore_unavailable 幂等删除(不存在时不报错)

默认情况下,如果 index 不存在,会报错返回 “status”: 404 index_not_found_exception
添加参数 ignore_unavailable=true 后即使 index 不存在也不会报错,接口变为幂等的。
curl -X DELETE localhost:9200/article?ignore_unavailable=true
java 中:

DeleteIndexRequest request = new DeleteIndexRequest("index_name"); 
request.indicesOptions(IndicesOptions.lenientExpandOpen());  // 设置 ignoreUnavailable 为 true

GET /index/_mapping 查询mapping

Elasticsearch Guide [7.17] » REST APIs » Index APIs » Get mapping API
https://www.elastic.co/guide/en/elasticsearch/reference/7.17/indices-get-mapping.html

curl -X GET 'http://localhost:9200/article/_mapping'
无 mapping 结果如下:

{
    "user_1.24.14": {
        "mappings": {}
    }
}

PUT /index/_mapping 修改mapping

Elasticsearch Guide [7.17] » REST APIs » Index APIs » Update mapping API
https://www.elastic.co/guide/en/elasticsearch/reference/7.17/indices-put-mapping.html
https://www.elastic.co/guide/en/elasticsearch/reference/7.6/indices-put-mapping.html

添加新字段

PUT /my-index-000001/_mapping
{
  "properties": {
    "email": {
      "type": "keyword"
    }
  }
}

给已存在的 object 字段添加新的子字段

创建索引 my_index, name 字段有个 first 子字段:

PUT /my_index
{
  "mappings": {
    "properties": {
      "name": {
        "properties": {
          "first": {
            "type": "text"
          }
        }
      }
    }
  }
}

用 PUT /_mapping 请求给 name 字段添加 last 子字段:

PUT /my_index/_mapping
{
  "properties": {
    "name": {
      "properties": {
        "last": {
          "type": "text"
        }
      }
    }
  }
}

单个text字段加keyword子字段

https://www.elastic.co/guide/en/elasticsearch/reference/7.17/indices-put-mapping.html#add-multi-fields-existing-field-ex

index1 原来有 text 类型的子字段 content,单独给 content 字段加个 keyword 子字段,不影响其他字段:
添加 keyword 子字段后,老数据还无法直接通过 content.keyword 做 term 匹配,需要执行 POST index1/_update_by_query?conflicts=proceed 重新构建索引后才行

PUT /index1/_mapping
{
  "properties": {
    "content": {
      "type": "text",
      "analyzer": "ik_max_word",
      "search_analyzer": "ik_smart",
      "fields": {
        "keyword": {
          "type": "keyword"
        }
      }
    }
  }
}

GET /index/_settings 查询索引的配置参数

Elasticsearch Guide [7.17] » REST APIs » Index APIs » Get index settings API
https://www.elastic.co/guide/en/elasticsearch/reference/7.17/indices-get-settings.html

GET /<target>/_settings 查询指定索引的全部配置项
GET /<target>/_settings/<setting> 查询指定索引的指定配置项

查询 index.number_of_shards 配置项

GET /my_blog_3shards/_settings/index.number_of_shards
{
    "my_blog_3shards": {
        "settings": {
            "index": {
                "number_of_shards": "3"
            }
        }
    }
}

查询索引的全部配置项

GET /my_blog_3shards/_settings
{
    "my_blog_3shards": {
        "settings": {
            "index": {
                "routing": {
                    "allocation": {
                        "include": {
                            "_tier_preference": "data_content"
                        }
                    }
                },
                "number_of_shards": "3",
                "provided_name": "my_blog_3shards",
                "creation_date": "1645156600073",
                "sort": {
                    "field": "timestamp",
                    "order": "desc"
                },
                "number_of_replicas": "1",
                "uuid": "6uNlMASdSAGPNjHUNo9JiA",
                "version": {
                    "created": "7160299"
                }
            }
        }
    }
}

PUT /index/_settings 修改索引的动态配置

Elasticsearch Guide [7.17] » REST APIs » Index APIs » Update index settings API
https://www.elastic.co/guide/en/elasticsearch/reference/current/indices-update-settings.html

PUT /<target>/_settings 实时修改索引的动态配置参数

这个API经常被用来打开/关闭 index.refresh_interval 自动刷新,以便快速批量索引大量数据。

例如动态修改索引的副本数

PUT /my-index-000001/_settings
{
  "index" : {
    "number_of_replicas" : 2
  }
}

修改索引的分词器

必须先关闭索引才能修改分词器配置。

给 my-index-000001 索引加一个名为 content_analyzer 的索引:

POST /my-index-000001/_close

PUT /my-index-000001/_settings
{
  "analysis" : {
    "analyzer":{
      "content_analyzer":{
        "type":"custom",
        "tokenizer":"whitespace"
      }
    }
  }
}

POST /my-index-000001/_open

POST /index/_close 关闭索引

Elasticsearch Guide [7.17] » REST APIs » Index APIs » Close index API
https://www.elastic.co/guide/en/elasticsearch/reference/current/indices-close.html

POST /<index>/_close 关闭索引

索引可以被关闭,关闭的索引不可读写数据,只能查看元数据信息。


POST /index/_open 打开索引

Elasticsearch Guide [7.17] » REST APIs » Index APIs » Open index API
https://www.elastic.co/guide/en/elasticsearch/reference/current/indices-open-close.html

POST /<target>/_open 打开索引

重新打开关闭的索引使之再次可读写数据。


POST /index/_refresh 刷新索引

Elasticsearch Guide [7.17] » REST APIs » Index APIs » Refresh API
https://www.elastic.co/guide/en/elasticsearch/reference/current/indices-refresh.html

刷新指定索引:

POST <target>/_refresh
GET <target>/_refresh

刷新全部索引:

POST /_refresh
GET /_refresh

refresh 操作将内存缓冲区中的数据写入 Lucene segment 使之可读
refresh 可以使最近的操作对 search 可见,比如新插入的文档在 refresh 操作后才可被检索到
默认情况下 es 每隔一秒钟执行一次 refresh,可以通过参数 index.refresh_interval 来修改这个刷新间隔

refresh 操作包括:
1、所有在内存缓冲区中的文档被写入到一个新的segment中,但是没有调用fsync,因此内存中的数据可能丢失
2、segment被打开使得里面的文档能够被搜索到
3、清空内存缓冲区


POST /index/_flush 刷入磁盘

Elasticsearch Guide [7.17] » REST APIs » Index APIs » Flush API
https://www.elastic.co/guide/en/elasticsearch/reference/current/indices-flush.html

刷指定索引的:

POST /<target>/_flush
GET /<target>/_flush

刷全部索引的:

POST /_flush
GET /_flush

flush 操作将 translog 中的操作记录刷入磁盘,默认5s一次

flush 过程主要做了如下操作:
1、通过refresh操作把所有在内存缓冲区中的文档写入到一个新的segment中
2、清空内存缓冲区
3、往磁盘里写入commit point信息
4、文件系统的page cache(segments) fsync到磁盘
5、删除旧的translog文件,因此此时内存中的segments已经写入到磁盘中,就不需要translog来保障数据安全了


POST /index/_forcemerge 强制段合并

Elasticsearch Guide [7.17] » REST APIs » Index APIs » Force merge API
https://www.elastic.co/guide/en/elasticsearch/reference/current/indices-forcemerge.html

POST /<target>/_forcemerge 强制合并指定的索引
POST /_forcemerge 强制合并全部索引


POST /_reindex 数据拷贝

https://www.elastic.co/guide/en/elasticsearch/reference/7.17/docs-reindex.html

POST /_reindex 将一个索引的数据复制到另一个索引

query 参数:

  • wait_for_completion 如果包含 wait_for_completion=false 参数则是异步处理,es校验请求参数后立即返回一个 task,后续可用此 task 取消或查询任务状态
  • requests_per_second 参数可以限流,限制单位时间处理的文档数

body 参数:

  • source 原索引
    • index 原索引名称,必填
  • dest 目标索引
    • index 目标索引名称,必填
    • pipeline 指定数据处理的 ingest pipeline
  • script 指定数据处理脚本

script 数据处理脚本

index1 索引中有两个 1024 维的向量,拷贝数据到 index2,同时将向量数据改为 512 维的:

{
  "source": {
    "index": "index1"
  },
  "dest": {
    "index": "index2"
  },
  "script": {
    "source": "ctx._source.title_vector = ctx._source.title_vector.subList(0,512); ctx._source.content_vector = ctx._source.content_vector.subList(0,512)",
    "lang": "painless"
  }
}

pipeline 数据处理流

dest 参数中指定 pipeline 参数,可以指定已创建好的 ingest pipeline,对数据进行加工处理

POST _reindex
{
  "source": {
    "index": "source"
  },
  "dest": {
    "index": "dest",
    "pipeline": "some_ingest_pipeline"
  }
}

POST /index/_split/new_index 拆分索引

Elasticsearch Guide [7.17] » REST APIs » Index APIs » Split index API
https://www.elastic.co/guide/en/elasticsearch/reference/7.17/indices-split-index.html

POST /<index>/_split/<target-index>
PUT /<index>/_split/<target-index>

将已有的索引拆分为分片数更多的新索引,原索引的每个主分片会拆分为多个目标索引上的新分片

例如将 my_source_index 拆分为新索引 my_target_index

POST /my_source_index/_split/my_target_index
{
  "settings": {
    "index.number_of_shards": 2
  }
}

上述操作在新索引创建后会立即返回,并不会等待索引分割操作完成。

索引拆分前提条件

  • 原索引必须是只读的,防止操作时有新数据写入
  • 集群健康状态必须是绿色
  • 目标索引必须不存在
  • 原索引的主分片数必须少于目标索引
  • 目标索引的主分片数必须是原索引主分片数的整数倍
  • 处理拆分过程的节点必须有足够的磁盘空间来容纳原索引的一份数据拷贝

可通过 index.blocks.write 设为 true 将索引设为数据只读,此时依然允许元数据操作,比如删除索引

PUT /my_source_index/_settings
{
  "settings": {
    "index.blocks.write": true 
  }
}

索引可拆分的倍数

索引可拆分的倍数由 index.number_of_routing_shards 静态配置项决定。
例如,索引分片数为 5, number_of_routing_shards 设为 30(5 × 2 × 3),30 可被因子 2 和 3 整除,所以可进行下面的拆分:
5 -> 10 -> 30 先1分2,再1分3
5 -> 15 -> 30 先1分3,再1分2
5 -> 30 1分6

index.number_of_routing_shards 是静态配置项,必须在创建索引时指定,或在关闭的索引上修改。

index.number_of_routing_shards 的默认值依赖于主分片的个数,目的是为了允许将索引以 2 为倍数拆分为最多 1024 个分片。例如索引有 5 个主分片,可以以 2 倍一次或多次拆分为 10,20,40,80,160,320,640 个分片,则 index.number_of_routing_shards 默认值为 640。

如果原索引只有一个主分片(或者多分片索引被 收缩 为一个主分片),则可被拆分为任意个分片,拆分后 index.number_of_routing_shards 的默认值也会随之变化。

索引拆分过程

1、创建一个新索引,和原索引定义相同,主分片数更多。
2、将原索引的段数据 硬链接(Hard Link) 到新索引的段数据上,Linux 中只是 inode 链接数的变化,很快。如果文件系统不支持硬链接,会执行数据拷贝,耗时会很长。
3、对全部文档进行重新哈希,之后删除不需要的段数据。
4、恢复目标索引,类似一个关闭的索引刚被打开一样。

为什么ES不支持增量reshard

监控拆分过程


POST /index/_shrink/new_index 收缩索引

Elasticsearch Guide [7.17] » REST APIs » Index APIs » Shrink index API
https://www.elastic.co/guide/en/elasticsearch/reference/7.17/indices-shrink-index.html

POST /<index>/_shrink/<target-index>
PUT /<index>/_shrink/<target-index>

将已有的索引收缩为分片数更少的新索引,目标索引的主分片数必须是原索引主分片数的整数因子

例如原索引的主分片数是 8,可以收缩为主分片数为 4, 2, 1 的新索引。如果原索引的主分片数是素数,则只能收缩为单分片的索引。

索引收缩过程:
1、创建一个新索引,和原索引定义相同,主分片数更少。
2、将原索引的段数据 硬链接(Hard Link) 到新索引的段数据上。如果文件系统不支持硬链接,会执行数据拷贝,耗时会很长。或者如果使用多数据目录(多磁盘分区),不同数据目录间的数据也需要完全拷贝,因为硬链接无法跨越磁盘。
3、恢复目标索引,类似一个关闭的索引刚被打开一样。


POST /index/_cache/clear 清理缓存

Elasticsearch Guide [7.17] » REST APIs » Index APIs » Clear cache API
https://www.elastic.co/guide/en/elasticsearch/reference/7.17/indices-clearcache.html

POST /<target>/_cache/clear 清理指定索引的缓存
POST /_cache/clear 清理全部缓存

默认清理全部缓存,可以指定清理 query, request, fielddata 三种缓存之一

POST /my-index-000001/_cache/clear?fielddata=true  // 只清理 fielddata 缓存
POST /my-index-000001/_cache/clear?query=true      // 只清理 query 缓存
POST /my-index-000001/_cache/clear?request=true    // 只清理 request 缓存

GET /index/_stats 查询索引统计信息

Elasticsearch Guide [7.17] » REST APIs » Index APIs » Index stats API
https://www.elastic.co/guide/en/elasticsearch/reference/7.17/indices-stats.html

GET /<target>/_stats/<index-metric> 查询指定索引的指定统计指标
GET /<target>/_stats 查询指定索引的全部统计指标
GET /_stats 查询全部索引的全部统计指标

例如查询一个 3分片1副本的索引的 store 信息,结果显示总共大小为9.8g,其中主分片4.8g

GET /index1/_stats/store
{
  "_shards": {
    "total": 6,
    "successful": 6,
    "failed": 0
  },
  "_all": {
    "primaries": {
      "store": {
        "size_in_bytes": 4865706422
      }
    },
    "total": {
      "store": {
        "size_in_bytes": 9827457637
      }
    }
  },
  "indices": {
    "index1": {
      "uuid": "Ox5GfotcSjikFg08MHv-lQ",
      "primaries": {
        "store": {
          "size_in_bytes": 4865706422
        }
      },
      "total": {
        "store": {
          "size_in_bytes": 9827457637
        }
      }
    }
  }
}

索引模块

Elasticsearch Guide [7.17] » Index modules
https://www.elastic.co/guide/en/elasticsearch/reference/7.17/index-modules.html

索引的配置参数分为静态配置和动态配置:

  • 静态配置只能在创建索引时设置,或在已关闭的索引上设置
  • 动态配置可在打开的索引上通过 API /index/_settings 动态修改

静态配置

https://www.elastic.co/guide/en/elasticsearch/reference/current/index-modules.html#_static_index_settings

index.number_of_shards 主分片数

index.number_of_shards 索引的主分片(primary shards)数,默认值是 1
主分片数只能在创建索引时设定,已关闭的索引也无法修改分片数

默认分片数最大为 1024,可通过在每个节点上设置 export ES_JAVA_OPTS="-Des.index.max_number_of_shards=128" 来修改最大分片数限制

分片数设置的一个经验值:当单个分片内数据量小于10万时,查询时merge的网络开销就会大于分片带来的性能提升,再增加分片已经没有意义了

index.number_of_routing_shards 路由分片数

index.number_of_routing_shardsindex.number_of_shards 一起决定数据如何被路由到主分片上,具体分片公式在 Mapping 映射 -> 元数据字段 -> _routing 字段的解释中。
index.number_of_routing_shards 的默认值依赖于主分片的个数,目的是为了允许将索引以 2 为倍数拆分为最多 1024 个分片。例如索引有 5 个主分片,可以以 2 倍一次或多次拆分为 10,20,40,80,160,320,640 个分片,则 index.number_of_routing_shards 默认值为 640。

number_of_routing_shards 的目的是为了后续扩展分片时不需要重新计算哈希,通常是 number_of_shards 整数倍。


index.store.preload 预热索引列表


动态配置

https://www.elastic.co/guide/en/elasticsearch/reference/current/index-modules.html#dynamic-index-settings

index.number_of_replicas 副本数

index.number_of_replicas 每个主分片的副本(replicas)数, 默认值是 1,设为 0 表示禁用副本

index.refresh_interval 刷新间隔

index.refresh_interval 后台定期自动 refresh 操作的间隔,默认值 1 秒,可设为 -1 来禁用 refresh
refresh 操作将内存缓冲区中的数据写入 Lucene segment 使之可读
未显式设置时,分片在 index.search.idle.after 秒未收到 search 请求后会停止后台的定时 refresh 任务,直到再次收到 search 请求。这么做的目的是为了加快批量索引的速度。

index.max_result_window 最大分页数据量

from + size 分页可获取的最大结果数,默认值 10000


Translog

Elasticsearch Guide [7.17] » Index modules » Translog
https://www.elastic.co/guide/en/elasticsearch/reference/current/index-modules-translog.html

插入文档时,ES 将文档写入内存缓冲区中,并将此次操作写入 translog,内存缓冲区的数据会以同步/异步方式刷入文件系统缓冲区(形成 Segment 段数据),之后可被检索到。文件系统缓冲区中的 Segment 以同步/异步方式 fysnc 到磁盘,形成 Lucene commit point,同时清理对应的 translog,完成持久化。

ES 使用 translog(transaction log) 事务日志来记录所有的操作,增删改一条记录时会把数据写到 translog 中。这样一旦发生崩溃,数据可以从 Translog 中恢复。但如果系统崩溃时 translog 内容在系统缓冲区而没写入磁盘,也会造成数据丢失。

Lucene Segment 内部是 LSM Tree 结构,这种数据结构充分利用磁盘顺序写速度大于随机写的特点,将随机写的操作都在内存里进行,当内存达到一定阈值后,使用顺序写一次性刷到磁盘里。

translog 中存储还未在 Lucene 中被安全持久化(即还不是 Lucene commit point 一部分,即还未 fsync 刷入磁盘)的操作记录,这部分操作虽然可被搜索到,但当出现系统掉电、OS崩溃、JVM崩溃等故障时这部分数据会丢失

写入 translog 的数据并不一定立即被写入磁盘,一般情况下,对磁盘文件的 write 操作,更新的只是内存中的页缓存,而脏页面不会立即更新到磁盘中,而是由操作系统统一调度,如由专门的 flusher 内核线程在满足一定条件时(如一定时间间隔、内存中的脏页面达到一定比例)将脏页面同步到磁盘上。因此如果服务器在 write 之后、磁盘同步之前宕机,则数据会丢失。

大量的segment 和 commit point 在磁盘中存在,会影响数据的读性能。因此 Lucene 会按照一定的策略将磁盘中的 segment 和 commit point 合并,多个小的文件合并成一个大的文件并删除小文件,从而减少磁盘中文件数据,提升数据的读性能。

相关可动态更新的配置参数:
index.translog.durability 控制 translog 是每 5 秒钟刷新一次还是每次请求都 fsync,这个参数有 2 个取值:

  • request 默认值,同步刷盘,每次请求(增、删、改、bulk批量操作)都要等fsync到磁盘且在主/从分片上提交后才会返回成功,所有已返回成功的数据操作都不会丢失
  • async 异步刷盘,translog每隔 index.translog.sync_interval 时间(默认5秒钟)fsync一次,写入性能会有提升,但期间出故障则此部分数据丢失

index.translog.sync_interval 控制 translog 多久 fsync 到磁盘,默认为 5 秒,允许的最小为 100ms

index.translog.flush_threshold_size translog 的大小超过这个参数后 flush 然后生成一个新的 translog,默认 512mb


ES 持久化

es 为了保证高可用,会定期将全部数据持久化到磁盘上。

Elasticsearch持久化过程详解
https://blog.csdn.net/aa1215018028/article/details/108746679
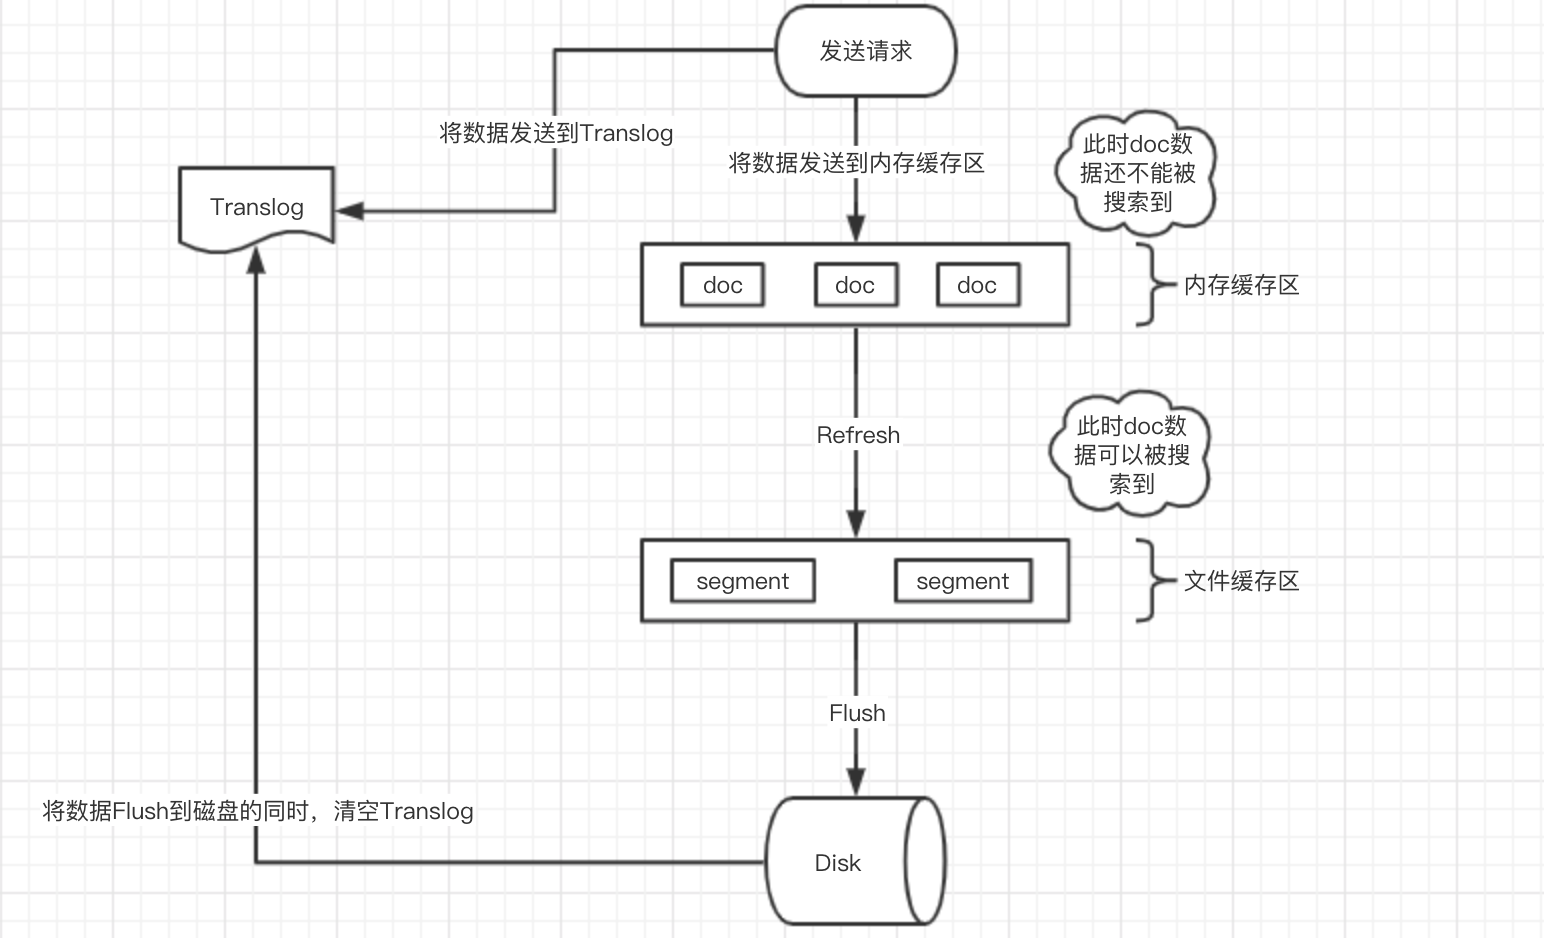

Elasticsearch 持久化存储过程

这个描述是 异步持久化的过程。

1、数据写入内存缓存区和 Translog 日志文件中。
当写一条数据 doc 的时候,一方面写入到内存缓冲区中,一方面同时写入到 Translog 日志文件中。

2、如果 index.translog.durability=async,内存缓存区满了或者每隔1秒(默认1秒),refresh 将内存缓存区的数据生成 index segment 文件并写入文件系统缓存区,此时 index segment 可被打开以供 search 查询读取,这样文档就可以被搜索到了(注意,此时文档还没有写到磁盘上);然后清空内存缓存区供后续使用。可见,refresh 实现的是文档从内存缓存区移到文件系统缓存区的过程。
如果 index.translog.durability=request 每次文档 CRUD 请求都要等 refresh 并 fsync 后才返回。

3、重复上两个步骤,新的 segment 不断添加到文件系统缓存区,内存缓存区不断被清空,而 translog 的数据不断增加,随着时间的推移,Translog 文件会越来越大。

4、当 Translog 长度达到一定程度的时候,会触发 flush 操作,否则默认每隔 30 分钟也会定时 flush,其主要过程:
4.1、执行 refresh 操作将内存缓存区中的数据写入到新的 segment 并写入文件系统缓存区,然后打开本 segment 以供 search 使用,最后再次清空内存缓存区。
4.2、一个 commit point 被写入磁盘,这个 commit point 中标明所有的 index segment。
4.3、文件系统中缓存的所有的 index segment 文件被 fsync 强制刷到磁盘,当 index segment 被 fsync 强制刷到磁盘上以后,就会被打开,供查询使用。
4.4、translog 被清空和删除,创建一个新的translog。


段合并

Elasticsearch Guide [7.17] » Index modules » Merge
https://www.elastic.co/guide/en/elasticsearch/reference/current/index-modules-merge.html

如果使用默认的 index.translog.durability=request 同步刷新方式,每个请求都会创建一个新的 Lucene Segment,这样会导致短时间内的段数量暴增。
段数目太多会带来较大的麻烦,每一个段都会消耗文件句柄、内存和cpu运行周期。此外,每个搜索请求都必须轮流检查每个段;所以段越多,搜索也就越慢。
Elasticsearch 通过在后台进行段合并来解决这个问题。

段合并的时候会将标记为已删除的文档和文档的旧版本从文件系统中清除

ES 中有后台线程根据 Lucene 的合并规则定期进行段合并操作,一般不需要用户担心或者采取任何行动。

通过 /index/_forcemerge API 可以手动强制段合并


存储类型(mmap内存映射)

Elasticsearch Guide [7.17] » Index modules » Store
https://www.elastic.co/guide/en/elasticsearch/reference/7.17/index-modules-store.html

存储类型用于配置索引数据在磁盘上的存储和访问方式。

默认情况下,Elasticsearch 会基于操作系统选择最优存储类型。

支持的存储类型:
fs 基于操作系统选择最优存储类型,当前在全部系统上都是 hybridfs
simplefs 在 7.15 版本中废弃,在 8.0 版本中会删除,使用 niofs 代替。对应 Lucene 的 SimpleFsDirectory 类型,直接随机访问文件,并发性能较差,
niofs 对应 Lucene 的 NIOFSDirectory 类型,使用 Java NIO 读写索引数据文件。允许多线程并发读取同一个文件。
mmapfs 对应 Lucene 的 MMapDirectory 类型,通过 mmap 零拷贝内存映射读写索引文件,内存映射会占用进程的 virt 虚拟地址空间,virt 大小等于被 mmap 映射的索引文件大小。使用这个存储类型要保证系统有足够的虚拟地址空间。对应到文件扩展名,就是 nvd(norms),dvd(doc values),tim(term dictionary),tip(term index),cfs(compound) 类型的文件使用 mmap 方式加载,其余使用 nio。
hybridfsniofsmmapfs 的混合,基于每种文件的读写模式选择最合适的文件系统类型。对于 Lucene term dictionary, norms, doc values 使用 mmap 内存映射打开,其他使用 NIOFSDirectory 打开。

node.store.allow_mmap 使用 mmapfshybridfs 存储类型时,是否允许开启 mmap 内存映射,默认值是允许。

操作系统的 mmap 虚拟内存区域个数会影响 Elasticsearch 读写索引数据的性能,sysctl -w vm.max_map_count=262144 提高进程的虚拟内存区域个数,sysctl vm.max_map_count 查看改后的值。


预加载文件系统缓存

Elasticsearch Guide [7.17] » Index modules » Store » Preloading data into the file system cache
https://www.elastic.co/guide/en/elasticsearch/reference/7.17/preload-data-to-file-system-cache.html

默认情况下,Elasticsearch 完全依赖操作系统的文件系统缓存来进行 I/O 操作。可以将常用的索引配置在 index.store.preload 中,实现 ES 启动时就预加载索引数据到系统缓存。
注意索引预加载可能会减慢索引的打开速度,并且只有当索引数据加载到物理内存后才可用。

索引预加载只是尽最大努力进行,具体是否生效依赖存储类型以及操作系统类型。

index.store.preload 静态参数,配置逗号分割的索引列表,默认为空,即不预加载任何索引到系统缓存。
例如 index.store.preload: ["nvd", "dvd"]
支持通配符,例如 index.store.preload: ["*"]
在创建索引时设置此参数

PUT /my-index-000001
{
  "settings": {
    "index.store.preload": ["nvd", "dvd"]
  }
}

Index blocks 索引限制(锁)

Elasticsearch Guide [7.17] » Index modules » Index blocks
https://www.elastic.co/guide/en/elasticsearch/reference/7.17/index-modules-blocks.html

索引 block 用于限制在指定索引上的操作,用于限制读、写、元数据操作。

index.blocks.read_only

index.blocks.read_only 动态参数,设为 true 时索引的数据和元数据变为只读,设为 false 时索引数据和元数据可写。

index.blocks.read_only_allow_delete

index.blocks.read_only_allow_delete 动态参数,设为 true 时索引只读且 允许删除索引本身来释放空间,磁盘分配器在节点的磁盘使用率超过洪水位时会自动添加这个block,低于高水位时会自动解除此block

注意:**index.blocks.read_only_allow_delete 为 true 时允许删的是索引本身,而不是索引内的文档**,删除索引内文档可能还会导致空间占用更大。所以 index.blocks.read_only_allow_delete 为 true 时是不允许删除索引内的文档的。

index.blocks.read

index.blocks.read 动态参数,设为 true 时禁用索引上的读操作

index.blocks.write

index.blocks.write 动态参数,设为 true 时禁用索引上的写操作,这个设置不影响元数据操作,期间依然可读写索引元数据。

index.blocks.metadata

index.blocks.metadata 动态参数,设为 true 时禁用索引元数据读写。


索引排序

Elasticsearch Guide [7.17] » Index modules » Index Sorting
https://www.elastic.co/guide/en/elasticsearch/reference/current/index-modules-index-sorting.html

Elasticsearch 从 6.0 版本开始引入了一个新的特征,叫 Index Sorting(索引排序)。用户可以将索引数据按照指定的顺序存储在硬盘上,这样在搜索排序取前 N 条时,不需要访问所有的匹配中的记录再进行排序,只需要访问前 N 条记录即可。

默认情况下, Lucene 没有任何排序字段,可通过配置 index.sort.* 来设置 Segment 内文档的排序字段。

例1、创建索引时指定单个排序字段,按 date 倒序排序:

PUT my-index-000001
{
  "settings": {
    "index": {
      "sort.field": "date", 
      "sort.order": "desc"  
    }
  },
  "mappings": {
    "properties": {
      "date": {
        "type": "date"
      }
    }
  }
}

例2、创建索引时指定多个排序字段,按 username 正序、date 倒序排序:

PUT my-index-000001
{
  "settings": {
    "index": {
      "sort.field": [ "username", "date" ], 
      "sort.order": [ "asc", "desc" ]       
    }
  },
  "mappings": {
    "properties": {
      "username": {
        "type": "keyword",
        "doc_values": true
      },
      "date": {
        "type": "date"
      }
    }
  }
}

文档会先按 username 正序排序,username 相同的按 date 倒序排序。

早期中断

假如要搜索按日期倒序排序的前 N 条数据,无其他条件:

  • 如果索引中的文档没有排序,需要遍历索引中的全部文档后找出排序的 TopN 数据,开销巨大。
  • 如果索引中的文档已经按日期倒序排好序了,只需要访问每个 segment 中的前 N 条数据即可中断请求,这就是 早期中断(Early termination)

例如有上文中按 date 倒序排序的索引,执行下面的检索时,es发现检索条件的排序字段与索引中文档存储的排序字段一致,只需访问每个 segment 中的前 10 条数据,可更快的返回。如果完全不需要计数,可以将 track_total_hits 设为 false,进一步加速检索。

GET /my-index-000001/_search
{
  "size": 10,
  "sort": [
    { "date": "desc" }
  ],
  "track_total_hits": false
}

索引压力

Elasticsearch Guide [7.17] » Index modules » Indexing pressure
https://www.elastic.co/guide/en/elasticsearch/reference/7.17/index-modules-indexing-pressure.html

indexing_pressure.memory.limit 外部索引请求可占用的堆内存最大值,默认 JVM 堆内存的 10%。当超出次阈值时,节点会拒绝执行新的协调和主分片操作。当副本操作超过 1.5 被次阈值时,节点会拒绝执行副本操作。

FST 索引前缀

FST(Finite State Transducer)
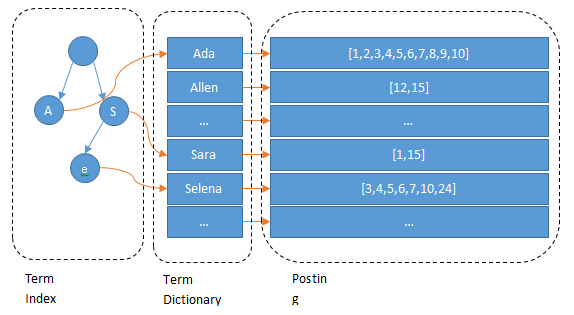
Lucene 会为每个词都生成倒排索引,数据量较大。所以倒排索引对应的倒排表被存放在磁盘上。这样如果每次查询都直接读取磁盘上的倒排表,再查询目标关键词,会有很多次磁盘 IO,严重影响查询性能。为优化磁盘 IO,Lucene 引入倒排索引的二级索引 FST(Finite State Transducer),原理类似 前缀树/字典树/Trie树,加速查询。

用户查询时,先通过关键词(Term)查询内存中的 FST,找到该 Term 对应的 Block 首地址。再读磁盘上的分词表,将该 Block 加载到内存,遍历该 Block,查找到目标 Term 对应的 DocID。再按照一定的排序规则,生成 DocID 的优先级队列,再按该队列的顺序读取磁盘中的原始数据(行存或列存)。

Lucene 使用 FST 实现 Term Index,Term Index 是 Term Dictionary 的索引,可以快速查找一个 Term 是否在 Dictionary 中;并且能够快速定位 Block 的位置。


elasticsearch-fst
elasticsearch-fst2

7.7 开始将 FST 通过mmap加载

从 ES 7.7 版本开始,将 tip(term index) 文件修改为通过 mmap 的方式加载,这使 FST 占据的内存从堆内转移到了堆外由操作系统的 pagecache 管理。
7.7 之前 FST 永驻堆内存,无法被 GC 回收,FST 约占堆内存总量的 50% - 70%,每 GB 索引大约需要几 MB 的 FST,则 10TB 索引数据需要 10-15 GB 的 FST。
将数据结构从 JVM 堆移动到磁盘,并依赖文件系统缓存(通常称为页面缓存或 OS 缓存)将热数据保存在内存中。

7.7 版本中的新改进:显著降低 Elasticsearch 堆内存使用量
https://www.elastic.co/cn/blog/significantly-decrease-your-elasticsearch-heap-memory-usage

Term 词条: 索引里面最小的存储和查询单元,对于英文来说是一个单词,对于中文来说一般指分词后的一个词。
Term Dictionary 词典:是词条 Term 的集合。搜索引擎的通常索引单位是单词,单词词典是由文档集合中出现过的所有单词构成的字符串集合,单词词典内每条索引项记载单词本身的一些信息以及指向“倒排列表”的指针。
Postings List 倒排表:一个文档通常由多个词组成,倒排表记录的是某个词在哪些文档里出现过以及出现的位置。每条记录称为一个倒排项(Posting)。倒排表记录的不单是文档编号,还存储了词频等信息。
Inverted File 倒排文件:所有单词的倒排列表往往顺序地存储在磁盘的某个文件里,这个文件被称之为倒排文件,倒排文件是存储倒排索引的物理文件。

Lucene 段文件内容

Lucene 一个 Index 会包含多个 Segment,一个 Segment 又由多个文件共同组成:
xx.tip:存储 Term Index
xx.tim:存储 Term Dictionary
xx.doc:存储 Postings 的 DocId 信息和 Term 的词频
xx.fnm:存储文档 Field 的元信息
xx.fdx:存储文档的索引,使用 SkipList 来实现
xx.fdt:存储具体的文档
xx.dvm:存储 DocValues 元信息
xx.dvd:存储具体 DocValues 数据
Lucene 没有更新跟删除逻辑,所有对 Lucene 的更新都是 Append 一个新 Doc 到 Segment。


Mapping 映射

Elasticsearch Guide [7.17] » Mapping
https://www.elastic.co/guide/en/elasticsearch/reference/7.17/mapping.html

mapping 用来规定 index 中的字段数据类型,类似 metadata 元数据、schema 等概念。


动态 Mapping

Elasticsearch Guide [7.17] » Mapping » Dynamic mapping
https://www.elastic.co/guide/en/elasticsearch/reference/7.17/dynamic-mapping.html

不需要提前定义 mapping,甚至不需要提前创建 index,直接向一个 index 插入任意字段,ES 都会自动创建 index,并自动添加 field,这就叫 动态映射。

字段类型自动映射

Elasticsearch Guide [7.17] » Mapping » Dynamic mapping » Dynamic field mapping
https://www.elastic.co/guide/en/elasticsearch/reference/7.17/dynamic-field-mapping.html

JSON 字段类型的自动识别如下:

JSON数据类型 “dynamic”:”true” “dynamic”:”runtime”
null 不添加字段 不添加字段
true 或 false boolean boolean
double float double
integer long long
object object 不添加字段
array 取决于第一个非空元素的类型 取决于第一个非空元素的类型
日期格式的string date date
数字格式的string float 或 long double 或 long
非日期且非数字格式的string 带 .keyword 子字段的 text keyword

显式 Mapping

Elasticsearch Guide [7.17] » Mapping » Explicit mapping
https://www.elastic.co/guide/en/elasticsearch/reference/7.17/explicit-mapping.html

为什么需要自定义mapping?

虽然 elasticsearch 中已经有动态 mapping(Dynamic Mapping),而且新增字段默认也会添加新的 mapping,但是毕竟是机器,有时会推算的不对,比如地理位置信息,特殊格式化的日期类型等。这时,如果需要 es 提供排序、聚合等查询功能,就不能满足我们的需求。

通过手动设置 mapping,我们可以
指定哪个字段作为全文索引
指定哪个字段包含数字、日志、地理位置信息
指定日期的格式
指定字段的分词器(比如中文字段想使用 ik 分词器)
定义动态 mapping 的规则

显式自定义 mapping 和 动态 mapping 可以结合使用,例如对于想明确指定类型的字段使用自定义 mapping,其他字段使用动态 mapping

mapping 会把 JSON 文档文档映射成 Lucene 所需要的扁平格式

一个 mapping 属于一个索引的 type,每个文档都属于一个 Type,一个 type 有一个 mapping 定义
从 es 7.0 开始,不需要在 mapping 定义中指定 type 信息,因为默认每个索引只有一个 type 叫 _doc


创建index时指定mapping

创建 index 的同时可指定 mapping,例如

PUT /my-index-000001
{
    "mappings":{
        "properties":{
            "firstName":{
                "type":"text", //text类型全文搜索
                "fields":{
                    "keyword":{
                        "type":"keyword", //keyword支持聚合查询
                        "ignore_above":256
                    }
                }
            },
            "lastName":{
                "type":"keyword",
                "null_value":"NULL" //支持字段为null,只有keyword类型支持
            },
            "mobile":{
                "type":"text",
                "index":false //此字段不被索引
            },
            "address":{
                "type":"text",
                "index_options":"offsets" //控制倒排索引记录的内容。offsets最多,记录四个
            }
        }
    }
}

添加字段到已有mapping中

可以使用 Update mapping API 向已有 index 的 mapping 中添加一个或多个字段,例如:

PUT /my-index-000001/_mapping
{
  "properties": {
    "employee-id": {
      "type": "keyword",
      "index": false
    }
  }
}

通过上面的调用,添加了一个 employee-id 字段,类型为 keyword,但不被索引。


更新已有index的mapping

不能修改已有字段的数据类型,否则索引数据会失效,只能修改 字段属性

如果想修改索引的字段类型,可以创建一个新索引,然后将已有索引的数据重新索引(reindex)过去。
https://www.elastic.co/guide/en/elasticsearch/reference/current/docs-reindex.html


Runtime fields 运行时字段(7.11+)

Elastic Docs ›Elasticsearch Guide [8.8] ›Mapping
https://www.elastic.co/guide/en/elasticsearch/reference/current/runtime.html

运行时字段是 es 7.11+ 新增的,可以在创建 mapping 或 请求中定义,可以实现例如 存储年龄数值,但查询返回 老(60+)中(40-60)青(30-)这种动态映射,还有比如分别存储ip和port,但查询返回ip:port

运行时字段(runtime fields)是在查询时评估的字段。 运行时字段使你能够:

  • 将字段添加到现有文档中,而无需重新索引数据
  • 在不了解数据结构的情况下开始使用数据
  • 覆盖查询时从索引字段返回的值
  • 为特定用途定义字段,而无需修改基础架构

Elasticsearch:使用 Runtime fields 对索引字段进行覆盖处理以修复错误 - 7.11 发布
https://blog.csdn.net/UbuntuTouch/article/details/113795062


元数据字段

Elasticsearch Guide [7.17] » Mapping » Metadata fields
https://www.elastic.co/guide/en/elasticsearch/reference/7.17/mapping-fields.html


_id 字段

Elasticsearch Guide [7.17] » Mapping » Metadata fields » _id field
https://www.elastic.co/guide/en/elasticsearch/reference/7.17/mapping-id-field.html

每个文档都有唯一的一个 _id 字段,可以通过 GET /index/_doc/_id 来查询。_id 可在插入文档时指定,也可以由 ES 自动生成,_id 字段的类型无法在 mapping 中配置。


_routing 字段(Elasticsearch 分片策略/片键)

Elasticsearch Guide [7.17] » Mapping » Metadata fields » _routing field
https://www.elastic.co/guide/en/elasticsearch/reference/7.17/mapping-routing-field.html

文档根据下面的公式被路由到指定的分片中:

routing_factor = num_routing_shards / num_primary_shards
shard_num = (hash(_routing) % num_routing_shards) / routing_factor

num_routing_shards 是索引的 index.number_of_routing_shards 配置值
num_primary_shards 是索引的 index.number_of_shards 配置值

默认的 _routing 路由字段(片键)是 _id,可在文档级别自定义路由字段,插入文档时指定路由字段后,搜索时也要指定路由字段。


_source


字段数据类型

Elasticsearch Guide [7.17] » Mapping » Field data types
https://www.elastic.co/guide/en/elasticsearch/reference/7.17/mapping-types.html

text

https://www.elastic.co/guide/en/elasticsearch/reference/current/text.html

text 类型被用来索引长文本,在建立索引前会将这些文本进行分词,转化为词的组合,建立索引。允许 es 来检索这些词语。text 类型不能用来排序和聚合。

keyword

https://www.elastic.co/guide/en/elasticsearch/reference/current/keyword.html

Keyword 类型不需要进行分词,可以被用来检索过滤(term级查询)、排序和聚合。keyword 类型字段只能用本身来进行检索

keyword最大长度:32k字节(8191字符)

keyword 类型的最大支持的长度为 32766 字节(Lucene 的限制),如果存 UTF-8 中文字符的话大概是 32766 / 4 = 8191 个字符。text 对字符长度没有限制
超过后索引报错:

max_bytes_length_exceeded_exception: bytes can be at most 32766 in length; got xxx
type=illegal_argument_exception, reason=Document contains at least one immense term in field="content.keyword" (whose UTF8 encoding is longer than the max length 32766), all of which were skipped.  Please correct the analyzer to not produce such terms. original message: bytes can be at most 32766 in length; got 63192

设置 ignore_above 后,超过给定长度后的数据将不被索引,无法通过 term 精确匹配检索返回结果。

This option is also useful for protecting against Lucene’s term byte-length limit of 32766.
The value for ignore_above is the character count, but Lucene counts bytes. If you use UTF-8 text with many non-ASCII characters, you may want to set the limit to 32766 / 4 = 8191 since UTF-8 characters may occupy at most 4 bytes.
https://www.elastic.co/guide/en/elasticsearch/reference/7.6/ignore-above.html

例如 message 字段有个子字段 keyword,类型为 keyword,设置最大长度 8191,避免 message 过长超过 32766 字节后报错
根据经验,建议可能存储变长文本的 keyword 字段都加上 ignore_above 属性,避免存入字符串过长报错

PUT my_index
{
  "mappings": {
    "properties": {
      "message": {
        "type": "text",
        "fields":{
          "keyword":{
            "type": "keyword",
            "ignore_above": 8191
          }
        }
      }
    }
  }
}
text和keyword的区别

text和keyword的区别

  • text类型:支持分词、全文检索,不支持聚合、排序操作。适合大字段存储,如:文章详情、content字段等;
  • keyword类型:支持精确匹配,支持聚合、排序操作。适合精准字段匹配,如:url、name、status、gender 等字段。
两者结合使用:text有个keyword类型的子字段

dynamic 动态映射中,es的类型自动推断会将 非数字非日期 的字符串 类型保存为 text 类型,同时有个 keyword 类型的子字段。

对于文字标题 title 这种较短的文本,有时候需要全文检索,有时候又需要精确匹配,可以参照 es 动态映射的类型定义方式:
title 本身是 text 类型,可以指定分析器 ik_max_word,同时有个 keyword 类型的子字段 keyword(字段名就叫 keyword) 可用于精确匹配:

"title": {
  "type": "text",
  "analyzer": "ik_max_word",
  "fields": {
    "keyword": {
      "type": "keyword"
    }
  } 
}

date

https://www.elastic.co/guide/en/elasticsearch/reference/current/date.html

Date 类型在 es 内部被转为 UTC 并存储为 long 型毫秒时间戳。
Date 类型的查询内部以 range 查询实现。

1、Date 类型的默认格式
如果不指定 Date 的 format 格式,使用默认 strict_date_optional_time 配置项配置的格式或毫秒时间戳,即:strict_date_optional_time||epoch_millis

strict_date_optional_time 是 ISO 日期时间格式,格式为 yyyy-MM-dd,如果有时间的话必以 T 分割 yyyy-MM-dd'T'HH:mm:ss.SSSZ

Elastic Docs ›Elasticsearch Guide [8.6] ›Mapping ›Mapping parameters
https://www.elastic.co/guide/en/elasticsearch/reference/current/mapping-date-format.html#strict-date-time

2、多日期格式
可指定多个日期格式

"mappings": {
  "properties": {
    "date": {
      "type":   "date",
      "format": "yyyy-MM-dd HH:mm:ss||yyyy-MM-dd||epoch_millis"
    }
  }
}

其他类型

long, integer, short, byte, double, float
boolean
IPv4&IPv6


arrays 数组类型

https://www.elastic.co/guide/en/elasticsearch/reference/current/array.html

在 Elasticsearch 中,没有专门的数组数据类型。默认情况下,任何字段都可以包含零个或多个值,但是,数组中的所有值必须具有相同的数据类型
long 类型存储一个值是 long 类型,存储多个自然就成为 long 数组类型;
keyword 类型存储一个值是 keyword 类型,存储多个值就成为 keyword 数组类型。


object

https://www.elastic.co/guide/en/elasticsearch/reference/current/object.html

创建一个包含 object 类型字段 location 的索引 user

PUT /user
{
    "mappings": {
        "properties": {
            "name": {
                "type": "text"
            },
            "location": {
                "properties": {
                    "left": {
                        "type": "float"
                    },
                    "top": {
                        "type": "float"
                    },
                    "width": {
                        "type": "float"
                    },
                    "height": {
                        "type": "float"
                    }
                }
            }
        }
    }
}

nested 嵌套文档

https://www.elastic.co/guide/en/elasticsearch/reference/current/nested.html

普通 object 对象在 es 中平铺存储导致丢失关联关系

普通 object 在es中存储时会打平,导致丢失关联关系。

例如创建 test_user 索引:

PUT /test_user
{
    "mappings": {
        "properties": {
            "user_id": {
                "type": "long"
            },
            "user_name": {
                "type": "text"
            },
            "address": {
                "properties": {
                    "id": {
                        "type": "long"
                    },
                    "name": {
                        "type": "text"
                    },
                    "address": {
                        "type": "text"
                    }
                }
            }
        }
    }
}

插入数据:

POST /test_user/_doc
{
    "user_id": 1,
    "user_name": "张三",
    "address": [
        {
            "id": 1,
            "name": "公司",
            "address": "北京市海淀区"
        },
        {
            "id": 2,
            "name": "家",
            "address": "北京市昌平区"
        }
    ]
}

查询:

POST /test_user/_search
{
  "query": {
    "bool": {
      "must": [
        { "match": { "address.id": 1 }},
        { "match": { "address.name":"家"}}
      ]
    }
  }
}

结果:

{
    "took": 1,
    "timed_out": false,
    "_shards": {
        "total": 1,
        "successful": 1,
        "skipped": 0,
        "failed": 0
    },
    "hits": {
        "total": {
            "value": 1,
            "relation": "eq"
        },
        "max_score": 1.287682,
        "hits": [
            {
                "_index": "test_user",
                "_type": "_doc",
                "_id": "Bi-25osB0YdeJP5JAWyt",
                "_score": 1.287682,
                "_source": {
                    "user_id": 1,
                    "user_name": "张三",
                    "address": [
                        {
                            "id": 1,
                            "name": "公司",
                            "address": "北京市海淀区"
                        },
                        {
                            "id": 2,
                            "name": "家",
                            "address": "北京市昌平区"
                        }
                    ]
                }
            }
        ]
    }
}

address.id=1 && address.name=”家” 的数据并不存在,但可以检索到,因为 es 中存储是平铺的

{
  "user_id": 1,
  "user_name": "张三",
  "address.id": [1,2],
  "address.name": ["公司", "家"],
  "address.address": ["北京市海淀区", "北京市昌平区"]
}

使用 netsted 类型保存一对多关联关系

创建索引

PUT /test_user_nested
{
  "mappings": {
    "properties": {
      "user_id": {
        "type": "long"
      },
      "user_name": {
          "type": "text"
      },
      "address": {
        "type": "nested",
        "properties": {
          "id": {
            "type": "long"
          },
          "name": {
            "type": "text"
          },
          "address": {
            "type": "text"
          }
        }
      }
    }
  }
}

添加文档

POST /test_user_nested/_doc
{
  "user_id": 1,
  "user_name": "张三",
  "address": [
    {
      "id": 1,
      "name": "公司",
      "address": "北京市海淀区"
    },
    {
      "id": 2,
      "name": "家",
      "address": "北京市昌平区"
    }
  ]
}

嵌套查询
查询 address.id=1 && address.name=”家” 是查不到数据的,address.id=1 && address.name=”公司” 才能查到数据

POST /test_user_nested/_search
{
  "query": {
    "nested": {
      "path": "address",
      "query": {
        "bool": {
          "must": [
            {
              "match": {
                "address.id": 1
              }
            },
            {
              "match": {
                "address.name": "公司"
              }
            }
          ]
        }
      }
    }
  }
}

嵌套查询可以和普通查询一起组成联合查询:

{
  "query": {
    "bool": {
      "must": [
        {
          "match": {
            "user_id": 1
          }
        },
        {
          "nested": {
            "path": "address",
            "query": {
              "bool": {
                "must": [
                  {
                    "match": {
                      "address.id": 1
                    }
                  },
                  {
                    "match": {
                      "address.name": "公司"
                    }
                  }
                ]
              }
            }
          }
        }
      ]
    }
  }
}
嵌套子文档是独立存储的

只插入了一个文档,但 _cat 可以看到文档个数是3(用 /_count 查文档数还是1),这是因为 nested 子文档在 ES 内部其实也是独立存储的隐藏 lucene 文档,查询时 es 内部做了 join 处理,对外表现为一个文档

/_cat/indices?v
health status index                    uuid                   pri rep docs.count docs.deleted store.size pri.store.size
green  open   test_user_nested         2tNlE4t8SqiLKDtW8B6Isg   1   1          3            0      9.7kb          4.8kb

如果创建一个有 100 个地址的 user 文档,则内部一共是 101 个 Lucene 文档:1个父user文档,100个子address文档

嵌套文档性能问题与个数限制

index.mapping.nested_fields.limit 每个索引的最大嵌套字段数,默认50
index.mapping.nested_objects.limit 每个文档中的嵌套子文档最大个数,默认10000


join 父子文档

https://www.elastic.co/guide/en/elasticsearch/reference/current/parent-join.html


字段映射参数

dynamic

Elasticsearch Guide [7.17] » Mapping » Mapping parameters » dynamic
https://www.elastic.co/guide/en/elasticsearch/reference/7.17/dynamic.html

dynamic 可以是整个 mapping 的属性,也可以是某个字段的属性,子字段会继承父字段或整个 mapping 的 dynamic 属性

dynamic 参数控制是否可自动添加字段,可取值如下,默认值是 true

  • true 自动添加新字段到 mapping
  • runtime 新字段作为 运行时字段 被添加到 mapping,这些字段不会被索引,但查询时会在 _source 字段中返回。
  • false 新字段会被忽略。这些字段不被索引,不可搜索,不会被添加到 mapping,但数据依然会被存储在原始 ``_source 中,_source字段保存了文档的原始 JSON 数据,依然会在查询结果的_source` 字段中返回。
  • strict 如果检测到新字段,会抛出异常,文档无法插入,新字段必须显式添加到 mapping 中。

动态 dynamic 属性设置

PUT dynamic_mapping_test/_mapping
{
  "dynamic": false
}

index 是否被索引

index 控制当前字段是否被索引,默认为 true,如果设置成 false,该字段不可被搜索

index_options

index_options 控制倒排索引记录的内容

  • docs 记录 doc id
  • freqs 记录 doc id 和 term frequencies
  • positions 记录 doc id/term frequencies/term position
  • offsets 记录 doc id/term frequencies/term position/character offects

null_value

null_value 需要对字段为 null 值实现搜索
只有 keyword 类型支持设定为 null_value

copy_to

Elasticsearch Guide [7.17] » Mapping » Mapping parameters » copy_to
https://www.elastic.co/guide/en/elasticsearch/reference/7.17/copy-to.html

copy_to 可以将字段的值拷贝到另一个字段中,常用于将多个字段的值合并到同一个字段方便检索
将字段内容拷贝到目标字段,查询时可以用目标字段作为查询条件,但是不会出现 _source 中

例如,将 first_name 和 last_name 字段的内容拷贝到 full_name 中,然后可直接在 full_name 字段上搜索全名。

PUT my-index-000001
{
  "mappings": {
    "properties": {
      "first_name": {
        "type": "text",
        "copy_to": "full_name" 
      },
      "last_name": {
        "type": "text",
        "copy_to": "full_name" 
      },
      "full_name": {
        "type": "text"
      }
    }
  }
}

fields 同一字段存储为多种类型

fields 多字段(multi-fields)
在字段下新增一个字段,可以自定义类型,使用不同的 analyzer
fields 的目的是为了使单个字段可以被多重方式索引和检索,例如可以用来实现以拼音方式搜索中文字段。

在动态 mapping 中,非日期且非数字格式的 string 字段会被自动映射为 text 类型,但是带有一个 字段名为 keyword,类型也是 keyword 的 fields 字段。
例如,下面 name 本身是 text 类型,但 name.keyword 是 keyword 类型

"name": {
    "type":"text",
    "fields":{
        "keyword":{
            "ignore_above":256,
            "type":"keyword"
        }
    }
}

ignore_above

https://www.elastic.co/guide/en/elasticsearch/reference/7.17/ignore-above.html
超过 ignore_above 长度的字符串不会被索引,不参与匹配和聚合查询,但依然会完整在 _source 中返回。
默认值 2147483647

analyzer 分析器

analyzer 分析器
standard 默认分词器,按词切分,小写处理
simple 按照非字母切分(符号被过滤),小写处理
stop 小写处理,停用词过滤(the、a、is)
whitespace 按照空格切分,不转小写
keyword 不分词,直接将输入当作输出
patter 正则表达式,默认 \W+(非字符分隔)
language 提供了 30 多种常见语言的分词器(english、german)
中文分词 icu_analyzer、ik、thulac

similarity 相关性算法

允许每个字段单独设置相关性算法。

可取值:
BM25 默认相关性算法
classic 经典的 TF/IDF 算法
boolean 无需全文相关性评分的字段,可以设置为 boolean,仅表示 term 是否匹配。


format 日期字段格式

https://www.elastic.co/guide/en/elasticsearch/reference/7.17/mapping-date-format.html

如果不指定 Date 的 format 格式,使用默认 strict_date_optional_time 配置项配置的格式或毫秒时间戳,即:strict_date_optional_time||epoch_millis

指定日期字段格式:

PUT my-index-000001
{
  "mappings": {
    "properties": {
      "date": {
        "type":   "date",
        "format": "yyyy-MM-dd"
      }
    }
  }
}

properties 嵌套字段的属性

object 或 nested 字段的子属性


doc_values 用于加速聚合/排序的正排索引

Elasticsearch Guide [7.17] » Mapping » Mapping parameters » doc_values
https://www.elastic.co/guide/en/elasticsearch/reference/7.17/doc-values.html

排序、聚合、脚本等查询需要通过访问文档的字段值来进行,这是和使用倒排索引查询不同的一种数据访问模式。这类查询不使用倒排索引,无法直接根据 term 找到对应的文档,而是需要通过访问文档来找到他包含的 term 值。

Doc Values 是磁盘上的一种数据结构,在索引文档时创建。
Doc Values 是一种类似 doc -> field value 的正排索引映射关系,可快速找到文档包含的 term,可使得排序和聚合查询更高效
除了 textannotated_text,全部字段类型都支持 Doc values。

倒排索引示例,方便查找某个 term 在哪些文档中,每个字段都有倒排索引,这里只示意 Field1 的:
| Field1 | Doc_1 | Doc_2 | Doc_3 |
| —— | —– | —– | —– |
| brown | X | X | |
| color | | X | X |
| dog | | | X |

Doc Values 正排索引示例,方便查找某个 Doc 中包含哪些 term:
| Doc | Field1 | Field2 |
| —– | ———— | ———– |
| Doc_1 | brown, color | meat |
| Doc_2 | brown | fruit, meat |
| Doc_3 | dog, color | meat |

之后的查询如果需要按 Field2 聚合,通过查 Doc Values 可以知道 Doc_1 和 Doc_3 的 Field2 字段值相同,可快速聚合。

支持 Doc values 的字段默认开启 doc_values 功能,如果确认某个字段不需要用来做排序、聚合、脚本查询,可以通过 "doc_values": false 关闭 doc_values 支持,以便节省磁盘空间。
注意:"doc_values": false 的字段不支持排序、聚合、脚本查询。
例如:

PUT my-index-000001
{
  "mappings": {
    "properties": {
      "status_code": { 
        "type":       "keyword"
      },
      "session_id": { 
        "type":       "keyword",
        "doc_values": false
      }
    }
  }
}

eager_global_ordinals 全局序号

Elasticsearch Guide [7.17] » Mapping » Mapping parameters » eager_global_ordinals
https://www.elastic.co/guide/en/elasticsearch/reference/7.17/eager-global-ordinals.html

ES 使用 Doc Values 正排索引结构来支持聚合、排序、脚本查询等需要访问文档字段值的操作。
ES 使用全局序号代替真正的 term 值来压缩优化 Doc Values 的存储,可提高聚合查询的性能、节省存储 Doc Values 使用的磁盘空间、节省 fielddata 缓存使用的内存空间。

Global Ordinals 是 Shard 级别的,因此当一个 Shard 的 Segment 发生变动时就需要重新构建 Global Ordinals,比如有新数据写入导致产生新的Segment、Segment Merge等情况。当然,如果Segment没有变动,那么构建一次后就可以一直利用缓存了(适用于历史数据)。

默认情况下,Global Ordinals 是在收到聚合查询请求并且该查询会命中相关字段时构建,而构建动作是在查询最开始做的,即在Filter之前。在遇到某个字段的值种类很多时会变的非常慢,严重影响聚合查询速度。在追求查询的场景下很影响查询性能。可以使用 eager_global_ordinals,即在每次refresh以后即可更新字典,字典常驻内存,减少了查询的时候构建字典的耗时。


7.x 开始移除 Type

Removal of mapping types
https://www.elastic.co/guide/en/elasticsearch/reference/current/removal-of-types.html
https://www.elastic.co/guide/en/elasticsearch/reference/7.17/removal-of-types.html

index 中的 document 可以分组,这种分组就叫做 Type,比如 twitter 索引中可以有 user 类型的数据和 tweet 类型的数据。

ES 6.x 之前的版本,可在一个索引库下创建多个 type
ES 6.x 版只允许每个 Index 包含一个 Type,并预告 7.x 版将会彻底移除 Type
ES 7.x 开始,彻底废弃一个 index 下多个 type 支持,包括 api 层面

为什么 ES 要移除 Type?

一开始 es 发布时,声明 index 对应关系数据库中的 database,type 对应 table,document 对应 row 数据行。
但其实并不是这样,关系数据库中不同 table 间的同名字段是互相独立互不影响的,但 es 中同一个 index 下不同 type 间的同名字段是互相影响的,其实在 Lucene 内部是存储在同一字段中的。
还以 twitter 索引中有 user 和 tweet 两种 type 的数据为例,比如两类数据中都有 user_name 字段,则 Lucene 内部都使用 user_name 字段索引,所以两类数据中 user_name 字段的类型必须一致。
某些情况下我们可能想要不同 type 中的同名字段是不同类型,比如一个 type 中 deleted 是 date 类型,另一个 type 中是 boolean 类型,这种是实现不了的。
此外,在同一个 index 中存储不同类型的文档会导致数据稀疏,和 Lucene 的文档压缩能力冲突。


Document 文档 API

Index 里面单条的记录称为 Document(文档)。许多条 Document 构成了一个 Index。

读写文档

Elasticsearch Guide [7.17] » REST APIs » Document APIs » Reading and Writing documents
https://www.elastic.co/guide/en/elasticsearch/reference/7.17/docs-replication.html

基本写模型

1、协调阶段(coordinating):根据路由规则将文档路由到主分片
2、主分片处理阶段(primary):验证文档,在主分片执行操作,转发到 in-sync 副本


/index/_doc 创建文档

https://www.elastic.co/guide/en/elasticsearch/reference/current/docs-index_.html

API

POST /<target>/_doc/           自动生成_id创建文档

PUT /<target>/_doc/<_id>       指定_id创建文档
PUT /<target>/_create/<_id>    只有当_id对应的文档不存在时才创建,否则报错
POST /<target>/_create/<_id>   只有当_id对应的文档不存在时才创建,否则报错

PUT /index/_doc/_id 指定_id创建文档

向指定的 /Index/Type/ID 发送 PUT 请求,就可以在 Index 里面新增一条记录。
ID 是调用方指定的唯一ID,如果已存在,则会完全替换更新文档并增加其版本 version
**在 ElasticSearch 7.0 及以上的版本中已经把 type 这个概念了,统一用 “_doc” 这个占位符来表示 “_type”**,你可以把 _type 看作是文档就行了,相当于 ElasticSearch 7.0 及以上版本只有索引和文档这两个概念了。

curl -X PUT 'http://localhost:9200/article/_doc/1' \
-H 'Content-Type: application/json' \
-d '{
    "title":"文章的标题",
    "pathname":"/article/postlink",
    "content":"美国留给伊拉克的是个烂摊子吗"
}'

返回

{
    "_index": "article",
    "_type": "_doc",
    "_id": "1",
    "_version": 1,
    "result": "created",
    "_shards": {
        "total": 2,
        "successful": 1,
        "failed": 0
    },
    "_seq_no": 0,
    "_primary_term": 1
}

POST /index/_doc 自动生成_id创建文档

新增记录的时候,也可以不指定 id,这时要改成 POST 请求。
向指定的 /Index/Type 发送 POST 请求,可以在 Index 里面新增一条记录,系统会自动生成唯一ID。

curl --location --request POST 'http://localhost:9200/article/_doc' \
--header 'Content-Type: application/json' \
--data-raw '{
    "title":"es的使用",
    "pathname":"/article/es",
    "content":"新增记录的时候,也可以不指定 Id,这时要改成 POST 请求。"
}'

返回

{
    "_index": "article",
    "_type": "_doc",
    "_id": "uv_ZjXEBrN9oq5tgVMuj",
    "_version": 1,
    "result": "created",
    "_shards": {
        "total": 2,
        "successful": 1,
        "failed": 0
    },
    "_seq_no": 0,
    "_primary_term": 1
}

返回的 _id 是自动生成的唯一 id


refresh 刷新操作

Elasticsearch 为了提高写入性能,会将文档写入操作(创建、更新、删除)的相关改变暂存到内存中的一个缓冲区里,然后在后台周期性地将这些改变刷新(refresh)到硬盘上的索引文件中。只有刷新操作完成后,这些改变才对搜索操作可见。

refresh 参数就是用来控制这个刷新操作的:

  • false 默认值,不执行刷新操作,这次写入的改变会在下次周期性刷新时被应用(1秒钟间隔)。
  • true 立即执行刷新操作,使得这次写入的改变对搜索操作立即可见。
  • wait_for 等待直到这次写入的改变被刷新并对搜索操作可见,es内部自动刷新默认是1秒钟间隔

频繁执行刷新操作会对 Elasticsearch 的性能产生影响,因此在大量写入操作时,通常是使用默认设置(false),即在后台周期性地执行刷新。
只有在某些需要改变立即对搜索可见的场景下,才会设置 refresh 参数为 true 或者 wait_for。


version 外部版本号

https://www.elastic.co/guide/en/elasticsearch/reference/current/docs-index_.html#index-versioning
ES 允许不使用内置的 version 进行版本控制,可以自定义使用外部的 version,此时将 version_type 设为 external,此时可传入一个大于 0 小于 9.2e+18 的 long 型 version 参数。
使用外部版本号时,只有当你提供的 version 比当前文档的 _version 大的时候,才能完成修改(包括删除)。

例如常见的双写方案,MySQL 和 ES 各存一份数据,ES 用于加速查询,此时可以将 version 维护在 MySQL 中。
例如:

PUT my-index-000001/_doc/1?version=2&version_type=external
{
  "user": {
    "id": "elkbee"
  }
}

POST /index/_update/_id 指定id更新文档

Elasticsearch Guide [7.16] » REST APIs » Document APIs » Update API
https://www.elastic.co/guide/en/elasticsearch/reference/current/docs-update.html

POST /<index>/_update/<_id>
之前版本的api是 POST /index/_doc/_id/_update

通过脚本更新文档。脚本可更新、删除或跳过文档。更新 API 还支持传入一部分文档内容,最终合并到已存在文档中。如果想完全替换更新已存在文档,使用带 ID 的文档创建 API 即可。

update API 实现的逻辑中,其实可以理解为三步操作:
1、qeury:通过文档 ID 去 GET 文档,此时可获取文档的 _version 版本
2、update:根据 script 脚本来更新 document;
3、reindex:将更新后的 document 重新写回到索引,

如果在 GET 和 Reindex 期间,文档被更新,_version 值发生变化,则更新失败。可以使用 retry_on_conflict 参数来设置当发生更新上述情况更新失败时,自动重试的次数。retry_on_conflict 的默认值为0,即不重试。

因此,ES 的 update API 依然是需要对文档做一次完全的 reindex 操作,而不是直接去修改原始document。但 update API 所能做的是减少了网络交互次数,当然这比起我们自己通过index获取数据并在业务代码中更新再写回到ES来实现,大大的减少了版本冲突的概率。

在遇到版本冲突问题时,ES 将会返回 409 Conflict HTTP 错误码。因此,当遇到 409 后,为了保证数据的最终插入,我们就必须要考虑到 retry 机制。为了实现冲突后的retry,有两种方案来实现:
1、业务代码自定义
通过识别 409 错误,在业务代码中,跟据自己的需求来进行 retry。因为是自定义的逻辑,所以我们可以任意的操作 retry 的回退策略,以及 retry 的内容等;
2、retry_on_conflict
通过在参数中指定来实现 retry_on_conflict 来实现

script 脚本更新

将文档 1 的 counter 值加4

POST test/_update/1
{
  "script" : {
    "source": "ctx._source.counter += params.count",
    "lang": "painless",
    "params" : {
      "count" : 4
    }
  }
}

doc 文档部分值更新

更新文档 1 的 name 值:

  • 如果原来 name 没有值或者没有 name 字段,会新增 name 字段
  • 如果 name 字段有值,会更新 name 字段的值
    POST test/_update/1
    {
    "doc": {
      "name": "new_name"
    }
    }
    

POST /index/_update_by_query 根据查询更新

Elasticsearch Guide [7.16] » REST APIs » Document APIs » Update By Query API
https://www.elastic.co/guide/en/elasticsearch/reference/current/docs-update-by-query.html

/_update_by_query 可用于热更新ik词库后重建索引

POST /my_index/_update_by_query?conflicts=proceed
可用于 ik 词库热更新后,重建索引,使词库中新加的单词生效

conflicts: 遇到文档版本冲突时如何处理,默认 abort,可设为 proceed 继续处理。


script 脚本条件更新

删除 status=published,且发布时间在指定范围的数据

POST /my_index/_update_by_query
{
  "query": {
    "bool": {
      "must": [{
        "term": {
          "status": "published"
        }
      },
      {
        "range": {
          "publish_time": {
            "lt": "2023-10-01 00:00:00",
            "gte": "2023-09-20 00:00:00"
          }
        }
      }]
    }
  },
  "script": {
    "lang": "painless",
    "source": "ctx._source.key1 = ctx._source.key2; ctx._source.key3.subkey31 = ctx._source.key4.subkey41;"
  }
}

删除 dense_vector 向量字段

删除 title_vector 和 content_vector 两个 dense_vector 向量字段

POST /my_index/_update_by_query
{
  "script": {
    "source": "ctx._source.remove('title_vector'); ctx._source.remove('content_vector');",
    "lang": "painless"
  },
  "query": {
    "term": {
      "id": "e76dc6ec97ad415882658dd62bcf69e3"
    }
  }
}

GET /index/_doc/_id 根据id查询文档

Elasticsearch Guide [7.16] » REST APIs » Document APIs » Get API
https://www.elastic.co/guide/en/elasticsearch/reference/current/docs-get.html

GET <index>/_doc/<_id> 根据 ID 查询文档

ES 文档上的每一次写操作,包括删除,都会使文档的 _version 递增,已删除文档的 version 会在一小段时间内保持可见,时间由配置项 index.gc_deletes 决定,默认是 60 秒。

例如 GET 'http://localhost:9200/article/_doc/uv_ZjXEBrN9oq5tgVMuj' 返回

{
    "_index": "article",
    "_type": "_doc",
    "_id": "uv_ZjXEBrN9oq5tgVMuj",
    "_version": 1,
    "_seq_no": 0,
    "_primary_term": 1,
    "found": true,
    "_source": {
        "title": "es的使用",
        "pathname": "/article/es",
        "content": "新增记录的时候,也可以不指定 Id,这时要改成 POST 请求。"
    }
}

ID 不存在时,返回 "found": false

{
    "_index": "article",
    "_type": "_doc",
    "_id": "1",
    "found": false
}

DELETE /index/_doc/_id 删除文档

Elasticsearch Guide [8.1] » REST APIs » Document APIs » Delete API
https://www.elastic.co/guide/en/elasticsearch/reference/current/docs-delete.html

DELETE /<index>/_doc/<_id>

通过修改 version 进行删除,异步合并 Segment 时才真正删除。


POST /index/_delete_by_query 根据条件删除

https://www.elastic.co/guide/en/elasticsearch/reference/7.6/docs-delete-by-query.html

POST /<target>/_delete_by_query 根据条件删除文档,使用和 search 接口相同的查询条件语法,可使用 URI 条件或 body 条件。

例如

POST /my-index-000001/_delete_by_query
{
  "query": {
    "match": {
      "user.id": "elkbee"
    }
  }
}

删除索引中的全部文档(清空索引)

使用空条件删除即可

POST /my-index-000001/_delete_by_query
{
    "query": {
        "match_all": {}
    }
}

wait_for_completion=false 异步删除

Elasticsearch 的 /_delete_by_query 接口默认是同步执行的,它会等待所有的匹配文档被处理后才返回。这意味着如果查询命中的数据量很大,那么删除操作可能会花费相当长的时间。
可以通过在请求中设置 wait_for_completion=false 参数来将其变为异步操作。在这种情况下,Elasticsearch 会先做一些请求合法性检查,然后立即返回一个任务ID,你可以使用这个ID来获取删除操作的进度或取消任务。内部是在 .tasks/task/${taskId} 索引中插入了一个文档来记录删除任务。

ignore_unavailable=true 幂等删除

默认情况下,如果索引不存在,返回 index_not_found_exception 错误
如果希望在索引不存在时不报错,你可以使用 ignore_unavailable=true 选项。这个选项会让 Elasticsearch 忽略那些在执行操作时不存在的索引。

POST /your_index/_delete_by_query?ignore_unavailable=true
{
    "query": {
        "match_all": {}
    }
}

java中:

DeleteByQueryRequest request = new DeleteByQueryRequest("your_index");
request.setQuery(QueryBuilders.matchAllQuery());
request.setIndicesOptions(IndicesOptions.lenientExpandOpen()); // 索引不存在时不报错
BulkByScrollResponse response = client.deleteByQuery(request, RequestOptions.DEFAULT);

slices 划分子任务

_delete_by_query 接口的 slices 参数用于将删除操作划分为多个并行任务以提高性能。这个参数的值可以是一个整数或者是 auto。
默认值是 1,表示不会划分子任务。
当你设定 slices 参数为一个大于1的整数,比如设定为5,那么 Elasticsearch 将把需要删除的文档划分为5个分片,每个分片都会并行地进行删除操作。这种方式可以有效地提高大规模删除操作的效率。
如果你设定 slices 参数为 auto,那么 Elasticsearch 会自动选择合适的分片数量,这个数量通常是索引的分片(shards)数。
需要注意的是,虽然增加 slices 的数量可以提高删除操作的速度,但是也会增加 Elasticsearch 集群的负载。因此,你需要根据你的集群的性能和负载情况来合理设定这个参数。
此外,slices 参数并不是越大越好。如果你的删除操作涉及的文档数量本身就不大,那么增加 slices 的数量并不会带来显著的性能提升,反而可能会因为创建过多的并行任务而浪费资源。
总的来说,slices 参数是一个用于优化删除操作性能的工具,你需要根据你的实际情况来合理使用它。

scroll 和 scroll_size 批次间隔与数量

由于删除的数据量可能很大,无法一次性处理删除,_delete_by_query 内部使用 scroll 进行批量查询并删除。

  • scroll 参数的值为一个时间值,表示上下文的保持时间,默认值 5 分钟。例如,如果设置scroll=1m,则表示上下文将保持1分钟。
  • scroll_size 参数用于控制每个批次检索和删除的文档数量,默认值 1000

scroll 是 Elasticsearch 中用于处理大量数据的机制,它可以在多个请求之间保留搜索上下文,以便能够获取到所有符合查询条件的文档,而不仅仅是返回的第一批文档。
scroll 参数的保持时间不宜设置得过长,因为保持搜索上下文会占用资源。
scroll_size 参数决定了每次批量操作的文档数量。例如,如果设置 scroll_size 为 1000,那么每个批次将处理 1000 个文档,然后再处理下一个批次。
这个参数可以根据你的需求和 Elasticsearch 集群的能力来调整。如果你设置的 scroll_size 太大,可能会消耗大量的内存和CPU资源,从而导致性能问题。反之,如果 scroll_size 太小,那么每次处理的文档数量就会很少,从而需要更多的批次来完成所有文档的处理,这可能会导致整个操作的效率较低。
因此,你需要根据你的情况来适当地设置 scroll_size 参数,以在性能和效率之间找到一个平衡。

requests_per_second 限制删除速度

requests_per_second 参数在 Elasticsearch 的删除查询接口中用于控制删除操作的吞吐量。这个参数的目标是防止删除操作过于频繁或过快地执行,从而影响 Elasticsearch 集群的性能。
这个参数是一个可选的参数,它的默认值是-1,表示删除操作将尽可能快地执行。你可以设置这个参数为任意浮点数,比如1.5,这表示 Elasticsearch 将每秒执行1.5次删除操作。

条件删除原理

_delete_by_query 并不是真正意义上物理文档删除,而是只是版本变化并且对文档增加了删除标记。当我们再次搜索的时候,会搜索全部然后过滤掉有删除标记的文档。因此,该索引所占的空间并不会随着该 API 的操作磁盘空间会马上释放掉,只有等到下一次段合并的时候才真正被物理删除,这个时候磁盘空间才会释放。相反,在被查询到的文档标记删除过程同样需要占用磁盘空间,这个时候,你会发现触发该 API 操作的时候磁盘不但没有被释放,反而磁盘使用率上升了。


POST /_bulk 批量操作

Elasticsearch Guide [7.17] » REST APIs » Document APIs » Bulk API
https://www.elastic.co/guide/en/elasticsearch/reference/current/docs-bulk.html

POST /_bulk
POST /<target>/_bulk

注意:

  • _bulk 批量操作操作使用 NDJSON(Newline Delimited JSON) 格式的请求体,批量操作的 body 必须是一行 action 紧接着一行数据(delete 不需要数据),数据必须在一行中且中间不能换行,一行数据结束后必须换行才能接下一个 action,且最后必须以一个空行结束
  • _bulk 批量操作的 HTTP 请求 Content-Type 可以使用 application/jsonapplication/x-ndjson

例如

POST _bulk
{ "index" : { "_index" : "test", "_id" : "1" } }
{ "field1" : "value1" }
{ "index" : { "_index" : "test"} }
{ "field1" : "value1" }
{ "delete" : { "_index" : "test", "_id" : "2" } }
{ "create" : { "_index" : "test", "_id" : "3" } }
{ "field1" : "value3" }
{ "update" : {"_id" : "1", "_index" : "test"} }
{ "doc" : {"field2" : "value2"} }

{ "index": { "_index": "mytest", "_id": "1" } }
{ "content": "美国留给伊拉克的是个烂摊子吗" }
{ "index": { "_index": "mytest", "_id": "2" } }
{ "content": "公安部:各地校车将享最高路权" }
{ "index": { "_index": "mytest", "_id": "3" } }
{ "content": "中韩渔警冲突调查:韩警平均每天扣1艘中国渔船" }
{ "index": { "_index": "mytest", "_id": "4" } }
{ "content": "中国驻洛杉矶领事馆遭亚裔男子枪击 嫌犯已自首" }

返回体中,每个操作有一个单独的结果,按入参请求顺序排列,各个操作是否成功互不影响
例如

{
  "took": 131,
  "errors": false,
  "items": [
    {
      "index": {
        "_index": "index_ik",
        "_id": "1",
        "_version": 1,
        "result": "created",
        "_shards": {
          "total": 2,
          "successful": 1,
          "failed": 0
        },
        "_seq_no": 0,
        "_primary_term": 1,
        "status": 201
      }
    },
    {
      "index": {
        "_index": "index_ik",
        "_id": "2",
        "_version": 1,
        "result": "created",
        "_shards": {
          "total": 2,
          "successful": 1,
          "failed": 0
        },
        "_seq_no": 1,
        "_primary_term": 1,
        "status": 201
      }
    }
  ]
}

refresh=true 操作后立即对搜索可见

默认情况下, /bulk 操作后如果立即执行 /_search 或 /_count 可能无法检索到操作的数据,因为索引分片还未刷新。

refresh 参数可控制索引刷新:

  • true 在该批次操作完成后,立即刷新所有相关的分片。这意味着,在该批次操作后,所有的更改都将立即对搜索可见。
  • false 默认值,在该批次操作完成后,不立即刷新相关的分片。Elasticsearch 将按照其默认的刷新间隔进行刷新。这也是默认行为。
  • wait_for 在该批次操作完成后,等待自动刷新使得更改对搜索可见,之后再返回。这意味着,请求将在刷新完成后才返回。

所以,refresh=true 或 wait_for 时,请求返回后都立即对搜索可见,只不过 refresh=true 内部会触发立即刷新,而 refresh=wait_for 内部是等自动刷新完成。
注意,refresh=true 或 wait_for 时,只会等待批量操作文档路由到的相关的 shards 刷新,而不是等待全部 shards 刷新

Java 代码中设置 refresh

BulkRequest bulkRequest = new BulkRequest();
bulkRequest.setRefreshPolicy(WriteRequest.RefreshPolicy.IMMEDIATE);

enum RefreshPolicy implements Writeable {
    /**
     * Don't refresh after this request. The default.
     */
    NONE("false"),
    /**
     * Force a refresh as part of this request. This refresh policy does not scale for high indexing or search throughput but is useful
     * to present a consistent view to for indices with very low traffic. And it is wonderful for tests!
     */
    IMMEDIATE("true"),
    /**
     * Leave this request open until a refresh has made the contents of this request visible to search. This refresh policy is
     * compatible with high indexing and search throughput but it causes the request to wait to reply until a refresh occurs.
     */
    WAIT_UNTIL("wait_for");
}

Malformed action/metadata line

原因:批量操作的 body 必须是一行 action 一行数据(delete 不需要数据),数据必须在一行中且中间不能换行,一行数据结束后必须换行才能接下一个 action,且最后必须以一个空行结束
比如

{ "index": {"_index": "user_profile", "_type": "base_info", "_id": 1234567 } }
{ "user_id": 1234567 }

是正确的,但如果 改为

{ "index": {"_index": "user_profile", "_type": "base_info", "_id": 1234567 } }
{
  "user_id": 1234567
}

就会报下面的错误

{
    "error": {
        "root_cause": [
            {
                "type": "illegal_argument_exception",
                "reason": "Malformed action/metadata line [3], expected START_OBJECT but found [VALUE_STRING]"
            }
        ],
        "type": "illegal_argument_exception",
        "reason": "Malformed action/metadata line [3], expected START_OBJECT but found [VALUE_STRING]"
    },
    "status": 400
}

如果请求 body 的最后没有换行 \n,就会报下面的错误:

{
    "error":{
        "root_cause":[
            {
                "type":"illegal_argument_exception",
                "reason":"The bulk request must be terminated by a newline [
]"
            }
        ],
        "type":"illegal_argument_exception",
        "reason":"The bulk request must be terminated by a newline [
]"
    },
    "status":400
}

BULK API : Malformed action/metadata line [3], expected START_OBJECT but found [VALUE_STRING]
https://stackoverflow.com/questions/45792309/bulk-api-malformed-action-metadata-line-3-expected-start-object-but-found


乐观并发控制

Elasticsearch Guide [7.17] » REST APIs » Document APIs » Optimistic concurrency control
https://www.elastic.co/guide/en/elasticsearch/reference/7.17/optimistic-concurrency-control.html

每个文档都有一个 _version 版本号,当文档被修改时版本号递增。 Elasticsearch 使用这个 _version 号来确保变更以正确顺序得到执行。如果旧版本的文档在新版本之后到达,它可以被简单的忽略。

为了避免丢失数据, 更新 API 会在获取步骤中获取当前文档中的 _version,然后将其传递给重新索引步骤中的 索引 请求。如果其他的进程在这两步之间修改了这个文档,那么 _version 就会不同,这样更新就会失败。

409/Conflict

2 个请求并发对同一个 id 的文档进行更新:
请求 1 获取文档版本号是 1
请求 2 获取文档版本号是 1
请求 2 重新索引文档,写入成功,版本号更新为 2
请求 1 重新索引文档时,发现已有的文档 版本号是 2,索引失败,返回 409 Conflict


Ingest pipeline 数据处理流

https://www.elastic.co/guide/en/elasticsearch/reference/7.17/ingest.html

Elasticsearch 中的 Ingest Pipeline 允许在文档被索引之前对其进行预处理转换操作。这些转换可以包括删除字段、从文本中提取值以及其他丰富数据的操作。
Pipeline 是由一系列称为处理器(Processors)的可配置任务组成。每个处理器按顺序运行,对传入的文档进行特定的更改。处理器运行后,Elasticsearch 会将转换后的文档添加到数据流或索引中。

Ingest Pipeline 提供了多种处理器,如:

  • Remove 删除字段。
  • Rename 重命名字段。
  • Set 设置字段的值。
  • Convert 转换字段的数据类型。
  • Grok 使用正则表达式解析字段。
  • Date 解析日期字段。
  • Dot Expander 展开以点分隔的字段。
  • JSON 解析 JSON 格式的字段。

script 脚本处理器

https://www.elastic.co/guide/en/elasticsearch/reference/7.17/script-processor.html

参数:

  • lang 脚本的语言,默认是 painless
  • id 已存储的脚本id,id和source至少指定1个
  • source inline 内联脚本的文本,id和source至少指定1个

访问文档源(_source)字段:ctx['my-field'].ctx.<my-field>
访问文档元数据(meta)字段:例如 ctx['_index'], _type, _version


/_ingest/pipeline/name 创建处理流

PUT /_ingest/pipeline/<pipeline> 创建处理流

PUT _ingest/pipeline/my-pipeline-id
{
  "description" : "My optional pipeline description",
  "processors" : [
    {
      "set" : {
        "description" : "My optional processor description",
        "field": "my-keyword-field",
        "value": "foo"
      }
    }
  ]
}

pipeline+reindex将1024维向量截断为512维

index1 索引中有两个 1024 维的向量,拷贝数据到 index2,同时将向量数据改为 512 维的。

1、创建脚本处理器,将 1024 维向量的 title_vector 和 content_vector 字段内容处理为 512 维向量

PUT _ingest/pipeline/truncate_vector
{
  "description" : "truncate vector fields",
  "processors" : [
    {
      "script" : {
        "source": "ctx.title_vector = ctx.title_vector.stream().limit(512).collect(Collectors.toList())"
      }
    },
    {
      "script" : {
        "source": "ctx.content_vector = ctx.content_vector.stream().limit(512).collect(Collectors.toList())"
      }
    }
  ]
}

2、创建新索引 index2,两个向量字段改为 512 维的

3、使用 _reindex api 拷贝索引数据,指定 pipeline 为 truncate_vector

POST /_reindex
{
  "source": {
    "index": "index1"
  },
  "dest": {
    "index": "index2",
    "pipeline": "truncate_vector"
  }
}

上一篇 Elasticsearch-搜索

下一篇 SDKMAN

阅读
评论
21.3k
阅读预计92分钟
创建日期 2024-01-02
修改日期 2024-11-12
类别
目录
  1. 文档插入性能调优
    1. 使用批量操作API
    2. 多线程插入
    3. 修改或关闭刷新间隔(refresh_interval)
    4. 禁用副本
    5. 禁用操作系统swap
    6. 增加操作系统文件cache
    7. 使用自动生成的id
    8. 使用SSD磁盘
    9. 增加索引buffer size
    10. 读写分离
  2. Index 索引 API
    1. PUT /index 创建索引
    2. GET /index 查询索引
    3. DELETE /index 删除索引
      1. ignore_unavailable 幂等删除(不存在时不报错)
    4. GET /index/_mapping 查询mapping
    5. PUT /index/_mapping 修改mapping
      1. 添加新字段
      2. 给已存在的 object 字段添加新的子字段
      3. 单个text字段加keyword子字段
    6. GET /index/_settings 查询索引的配置参数
    7. PUT /index/_settings 修改索引的动态配置
      1. 修改索引的分词器
    8. POST /index/_close 关闭索引
    9. POST /index/_open 打开索引
    10. POST /index/_refresh 刷新索引
    11. POST /index/_flush 刷入磁盘
    12. POST /index/_forcemerge 强制段合并
    13. POST /_reindex 数据拷贝
      1. script 数据处理脚本
      2. pipeline 数据处理流
    14. POST /index/_split/new_index 拆分索引
      1. 索引拆分前提条件
      2. 索引可拆分的倍数
      3. 索引拆分过程
      4. 为什么ES不支持增量reshard
      5. 监控拆分过程
    15. POST /index/_shrink/new_index 收缩索引
    16. POST /index/_cache/clear 清理缓存
    17. GET /index/_stats 查询索引统计信息
  3. 索引模块
    1. 静态配置
      1. index.number_of_shards 主分片数
      2. index.number_of_routing_shards 路由分片数
      3. index.store.preload 预热索引列表
    2. 动态配置
      1. index.number_of_replicas 副本数
      2. index.refresh_interval 刷新间隔
      3. index.max_result_window 最大分页数据量
    3. Translog
    4. ES 持久化
    5. 段合并
    6. 存储类型(mmap内存映射)
      1. 预加载文件系统缓存
    7. Index blocks 索引限制(锁)
      1. index.blocks.read_only
      2. index.blocks.read_only_allow_delete
      3. index.blocks.read
      4. index.blocks.write
      5. index.blocks.metadata
    8. 索引排序
      1. 早期中断
    9. 索引压力
      1. FST 索引前缀
      2. 7.7 开始将 FST 通过mmap加载
      3. Lucene 段文件内容
  4. Mapping 映射
    1. 动态 Mapping
      1. 字段类型自动映射
    2. 显式 Mapping
      1. 为什么需要自定义mapping?
      2. 创建index时指定mapping
      3. 添加字段到已有mapping中
      4. 更新已有index的mapping
    3. Runtime fields 运行时字段(7.11+)
    4. 元数据字段
      1. _id 字段
      2. _routing 字段(Elasticsearch 分片策略/片键)
      3. _source
    5. 字段数据类型
      1. text
      2. keyword
        1. keyword最大长度:32k字节(8191字符)
        2. text和keyword的区别
        3. 两者结合使用:text有个keyword类型的子字段
      3. date
      4. 其他类型
      5. arrays 数组类型
      6. object
      7. nested 嵌套文档
        1. 普通 object 对象在 es 中平铺存储导致丢失关联关系
        2. 使用 netsted 类型保存一对多关联关系
        3. 嵌套子文档是独立存储的
        4. 嵌套文档性能问题与个数限制
      8. join 父子文档
    6. 字段映射参数
      1. dynamic
      2. index 是否被索引
      3. index_options
      4. null_value
      5. copy_to
      6. fields 同一字段存储为多种类型
      7. ignore_above
      8. analyzer 分析器
      9. similarity 相关性算法
      10. format 日期字段格式
      11. properties 嵌套字段的属性
      12. doc_values 用于加速聚合/排序的正排索引
      13. eager_global_ordinals 全局序号
    7. 7.x 开始移除 Type
      1. 为什么 ES 要移除 Type?
  5. Document 文档 API
    1. 读写文档
      1. 基本写模型
    2. /index/_doc 创建文档
      1. PUT /index/_doc/_id 指定_id创建文档
      2. POST /index/_doc 自动生成_id创建文档
      3. refresh 刷新操作
      4. version 外部版本号
    3. POST /index/_update/_id 指定id更新文档
      1. script 脚本更新
      2. doc 文档部分值更新
    4. POST /index/_update_by_query 根据查询更新
      1. /_update_by_query 可用于热更新ik词库后重建索引
      2. script 脚本条件更新
      3. 删除 dense_vector 向量字段
    5. GET /index/_doc/_id 根据id查询文档
    6. DELETE /index/_doc/_id 删除文档
    7. POST /index/_delete_by_query 根据条件删除
      1. 删除索引中的全部文档(清空索引)
      2. wait_for_completion=false 异步删除
      3. ignore_unavailable=true 幂等删除
      4. slices 划分子任务
      5. scroll 和 scroll_size 批次间隔与数量
      6. requests_per_second 限制删除速度
      7. 条件删除原理
    8. POST /_bulk 批量操作
      1. refresh=true 操作后立即对搜索可见
      2. Malformed action/metadata line
    9. 乐观并发控制
      1. 409/Conflict
  6. Ingest pipeline 数据处理流
    1. script 脚本处理器
    2. /_ingest/pipeline/name 创建处理流
    3. pipeline+reindex将1024维向量截断为512维

页面信息

location:
protocol:
host:
hostname:
origin:
pathname:
href:
document:
referrer:
navigator:
platform:
userAgent:

评论