Kong
网关 Kong 使用笔记
Kong / kong
https://github.com/Kong/kong
概述
Kong 是云原生、高效、可扩展、分布式的微服务 API 网关,在 2015 年 4 月由 Mashape 公司开源,基于 OpenResty 和 Cassandra/PostgreSQL 构建,提供易于使用的 RESTful API 来操作和配置 API 系统。
Kong,作为微服务网关,能通过插件提供负载均衡、日志记录、鉴权、限流、转换以及其他等功能。Kong 将这些通用功能中心化,让微服务更加专注于业务本身。
准确的说,Kong 是一个运行在 Nginx 之上的 Lua 应用,基于 Nginx 的 lua-nginx-module 模块。Kong 会内置 OpenResty 一起发行,OpenResty 其实就是 Nginx+Lua.
Lua 脚本是 Kong 可插拔结构的基础,在 Kong 中称为 plugin.
名词解释
Service: Kong 中使用 Service 表示上游微服务。
Route: Route 指定 Service 上的路径,一个 Service 可以对应多个 Route.
Plugin: 可插拔的lua脚本。
Consumer: 服务的使用者。
Upstream: 用于负载均衡、健康检测、断路的虚拟host.
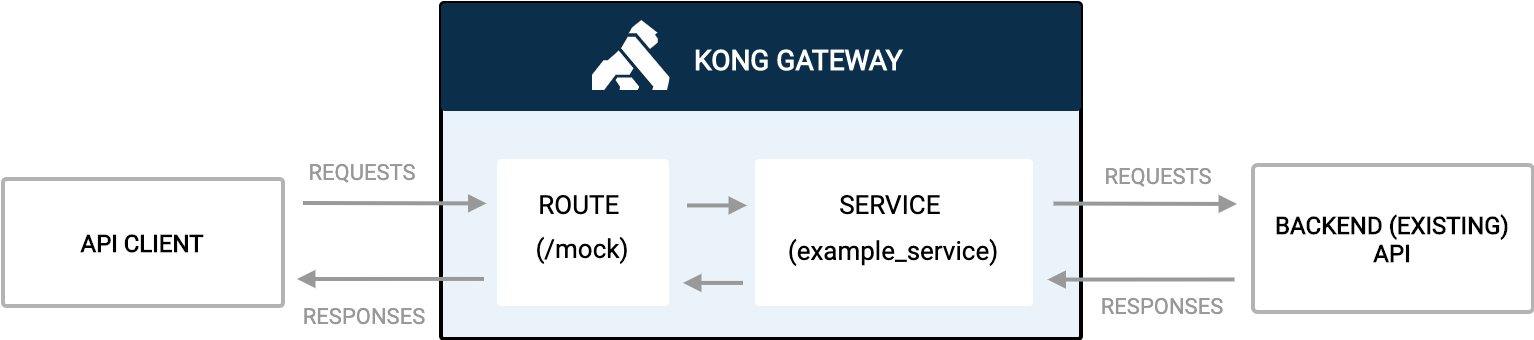
Service 和 Route
特性
限流
Protect your Services
https://docs.konghq.com/getting-started-guide/2.5.x/protect-services/
通过 Admin 配置限流插件
$ curl -i -X POST http://<admin-hostname>:8001/plugins \
  --data name=rate-limiting \
  --data config.minute=5 \
  --data config.policy=local
代理缓存
Improve Performance with Proxy Caching
https://docs.konghq.com/getting-started-guide/2.5.x/improve-performance/
Kong 的代理缓存插件提供反向代理缓存功能,从而提高性能。
Kong 会基于请求方法、返回码、content type 来缓存 response 实体,还会缓存每个 API 的消费者。
缓存时间可配置,超时后请求会被转发给上游服务然后继续缓存 response.
缓存数据存储在内存或 Redis 中。
通过 Admin API 配置缓存插件:
$ curl -i -X POST http://<admin-hostname>:8001/plugins \
  --data name=proxy-cache \
  --data config.content_type="application/json; charset=utf-8" \
  --data config.cache_ttl=30 \
  --data config.strategy=memory
从 response 的 X-Cache-Status, X-Kong-Proxy-Latency, X-Kong-Upstream-Latency 三个头部可以观察到响应是否被缓存。
认证
Secure your Services Using Authentication
https://docs.konghq.com/getting-started-guide/2.5.x/secure-services/
认证插件提供认证功能,支持:
- 基本认证
- Key 认证
- OAuth 2.0
- LDAP
- OpenID
- JWT
负载均衡
Set Up Intelligent Load Balancing
https://docs.konghq.com/getting-started-guide/2.5.x/load-balancing/
Upstream: 用于负载均衡、健康检测、断路的虚拟 host.
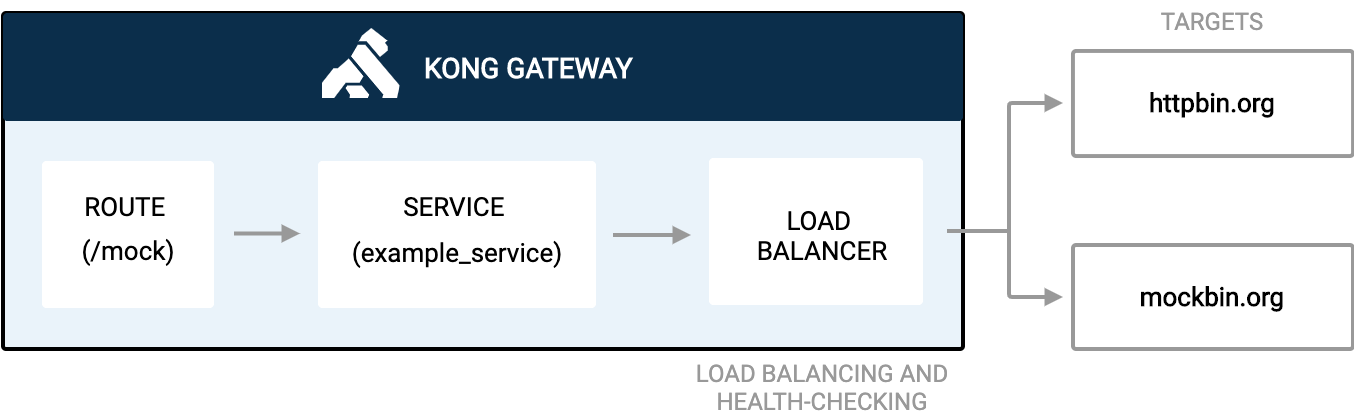
Upstream 负载均衡
RBAC授权
Manage Administrative Teams
https://docs.konghq.com/getting-started-guide/2.5.x/manage-teams/
只有企业版支持,可通过插件自定义。
WebSocket支持
Proxy WebSocket traffic
https://docs.konghq.com/gateway-oss/2.5.x/proxy/#proxy-websocket-traffic
nginx 原生支持 websocket, 基于 nginx 的 kong 对 websocket 也支持。
高可用
Configuring API Gateways for High Availability (HA) Clusters
https://konghq.com/learning-center/api-gateway/api-gateways-for-high-availability-clusters
多个 Kong 节点组成的集群共享数据存储,只要 Kong 依赖的数据库(Postgres 或 Cassandra)做到了高可用,Kong 自然就是高可用的。
每个 Kong 节点会缓存数据库中的配置数据,只能保证数据最终一致性。
可通过下面的参数进行调节:
缓存更新时间间隔可配,默认 db_update_frequency 是 5 秒钟
更新传播 db_update_propagation 默认 0 秒
安装 Kong
Docker 安装 Kong
Mac 安装
macOS Installation
https://docs.konghq.com/install/macos/
Mac Brew 安装 Kong
1、brew tap kong/kong brew tap 安装第三方仓库
2、brew install kong brew 安装 kong
安装目录: /usr/local/Cellar/kong/2.5.0
过程中会安装 openresty, 如果之前安装过 nginx, 最后设置 /usr/local/bin/nginx 链接的时候会报错冲突:
Error: The `brew link` step did not complete successfully
The formula built, but is not symlinked into /usr/local
Could not symlink bin/nginx
Target /usr/local/bin/nginx
is a symlink belonging to nginx. You can unlink it:
  brew unlink nginx

To force the link and overwrite all conflicting files:
  brew link --overwrite openresty@1.19.3.1

To list all files that would be deleted:
  brew link --overwrite --dry-run openresty@1.19.3.1

Possible conflicting files are:
/usr/local/bin/nginx -> /usr/local/Cellar/nginx/1.21.0/bin/nginx
执行 brew link --overwrite openresty@1.19.3.1 强制链接到 openresty
3、kong version 查看版本号
kong version
2.5.0
使用无数据库模式启动 Kong
1、使用命令 kong config init 在当前目录生成一个 kong.yml 配置文件,里面包含了如何填写配置的说明。
cd /usr/local/Cellar/kong/2.5.0
kong config init
2、下载默认配置文件 https://github.com/Kong/kong/blob/master/kong.conf.default 重命名为 kong.conf
编辑 kong.conf, 关闭数据库,并指明声明式配置文件的位置
database = off
declarative_config = /usr/local/Cellar/kong/2.5.0/kong.yml
3、kong start -c kong.conf 指定配置文件启动 kong
kong start -c kong.conf
2021/08/04 12:10:24 [warn] ulimit is currently set to "256". For better performance set it to at least "4096" using "ulimit -n"
Kong started
4、浏览器打开 http://localhost:8001/ 能看到返回 json 信息说明运行正常。
5、停止 Kong kong stop
使用 Kong
无DB声明式配置
传统上,Kong 需要 Postgres 或 Cassandra 来存储器其路由、服务、消费者、插件等配置实体。在 Kong 的配置文件 kong.conf 中指定 Cassandra/PostgreSQL 配置。
从 Kong 1.1 开始,新增了无数据库模式(DB-less mode),只使用内存存储各种配置实体。使用无数据库模式时,需要在单独的配置文件中进行实体配置,比如 yaml 或 json, 并使用 声明式 配置。
注意:
1、无 DB 模式中无法通过 Admin API 动态创建 Service 等实体。
2、无 DB 模式不支持 Workspace 和 RBAC 权限控制配置。
DB-less and Declarative Configuration
https://docs.konghq.com/gateway-oss/2.5.x/db-less-and-declarative-config/
启动 Kong
Start Kong Gateway (OSS)
https://docs.konghq.com/gateway-oss/2.5.x/getting-started/quickstart/
1、启动 Kong
使用默认的带数据库模式时,需要先执行数据库迁移:kong migrations bootstrap [-c /path/to/kong.conf]
使用无数据库模式时,直接启动即可。
指定配置文件启动 Kong kong start [-c /path/to/kong.conf]
2、验证 Kong 成功启动
默认 Kong 监听下面的接口::8000 在此端口监听 HTTP 流量并转发到配置的上游服务:8443 在此端口监听 HTTPS 流量并转发到上游服务:8001 管理 API 端口,浏览器打开 http://localhost:8001/ 可看到返回的 json 格式的 Kong 配置信息。:8444 HTTPS 管理 API 端口
3、kong stop 停止 Kong
4、kong reload 重新加载配置文件
使用 Admin API 配置 Service 和 Route
Configuring a Service
https://docs.konghq.com/gateway-oss/2.5.x/getting-started/configuring-a-service/
Kong 中使用 Service 表示上游微服务。
Route 指定 Service 上的路径,一个 Service 可以对应多个 Route.
1、添加 Service
创建一个指向 Mockbin 的 Service, Mockbin 是一个 API 测试网站,会将客户端 request 中的所有信息作为 response 返回。
curl -i -X POST \
  --url http://localhost:8001/services/ \
  --data 'name=mockbin-service' \
  --data 'url=http://mockbin.org'
2、给 Service 添加 Route
curl -i -X POST \
  --url http://localhost:8001/services/example-service/routes \
  --data 'hosts[]=example.com'
3、通过 Kong 转发请求
Kong 默认在 8000 端口处理代理转发的请求
curl -i -X GET \
  --url http://localhost:8000/ \
  --header 'Host: example.com'
无DB模式中无法通过Admin API动态创建Service等实体
curl -i -X POST \
  --url http://localhost:8001/services/ \
  --data 'name=mockbin-service' \
  --data 'url=http://mockbin.org'

HTTP/1.1 405 Not Allowed
Date: Thu, 05 Aug 2021 02:58:18 GMT
Content-Type: application/json; charset=utf-8
Connection: keep-alive
Access-Control-Allow-Origin: *
Content-Length: 114
X-Kong-Admin-Latency: 12
Server: kong/2.5.0

{"name":"operation unsupported","message":"cannot create 'services' entities when not using a database","code":12}%
Kong GUI 管理工具 Konga
pantsel / konga
https://github.com/pantsel/konga
1、拉取最新 Docker 镜像
docker pull pantsel/konga
2、Docker 启动 konga
docker run -d --rm \
-p 1337:1337 \
--name konga \
pantsel/konga
3、打开 http://localhost:1337/ 注册账号并登陆 Konga.
不配置数据库连接的话,默认是内存存储账号等信息,重启容器后会全部消失。
4、连接 kong
Connection -> New Connection
Kong Admin URL 填入 Kong 的默认 Admin 地址:http://localhost:8001/
如果是在 Docker 中启动的 Kong, 使用 http://host.docker.internal:8001/ 连接到 Kong.
直接使用 Kong 的 Admin 接口 http://localhost:8001/ 连接的话会报错:
error: KongProxyController request error undefined
error: Sending 500 ("Server Error") response:
 {
  error: Error: connect ECONNREFUSED 127.0.0.1:8001
      at TCPConnectWrap.afterConnect [as oncomplete] (net.js:1141:16) {
    errno: 'ECONNREFUSED',
    code: 'ECONNREFUSED',
    syscall: 'connect',
    address: '127.0.0.1',
    port: 8001
  }
}
原因:
konga 是在 Docker 容器中启动的,非主机网络 Docker 容器中的 localhost 并不能连接到宿主机的 localhost.
解决:
使用 host.docker.internal 代替 localhost, 这是 docker 容器内配置好的可解析到宿主机 IP 的 DNS, 可以直接当宿主机的 IP 使用。
connect to kong admin fail #274
https://github.com/pantsel/konga/issues/274
5、之后就可以在 Konga 中可视化查看 Kong 运行状态,增删改服务、路由等配置了。
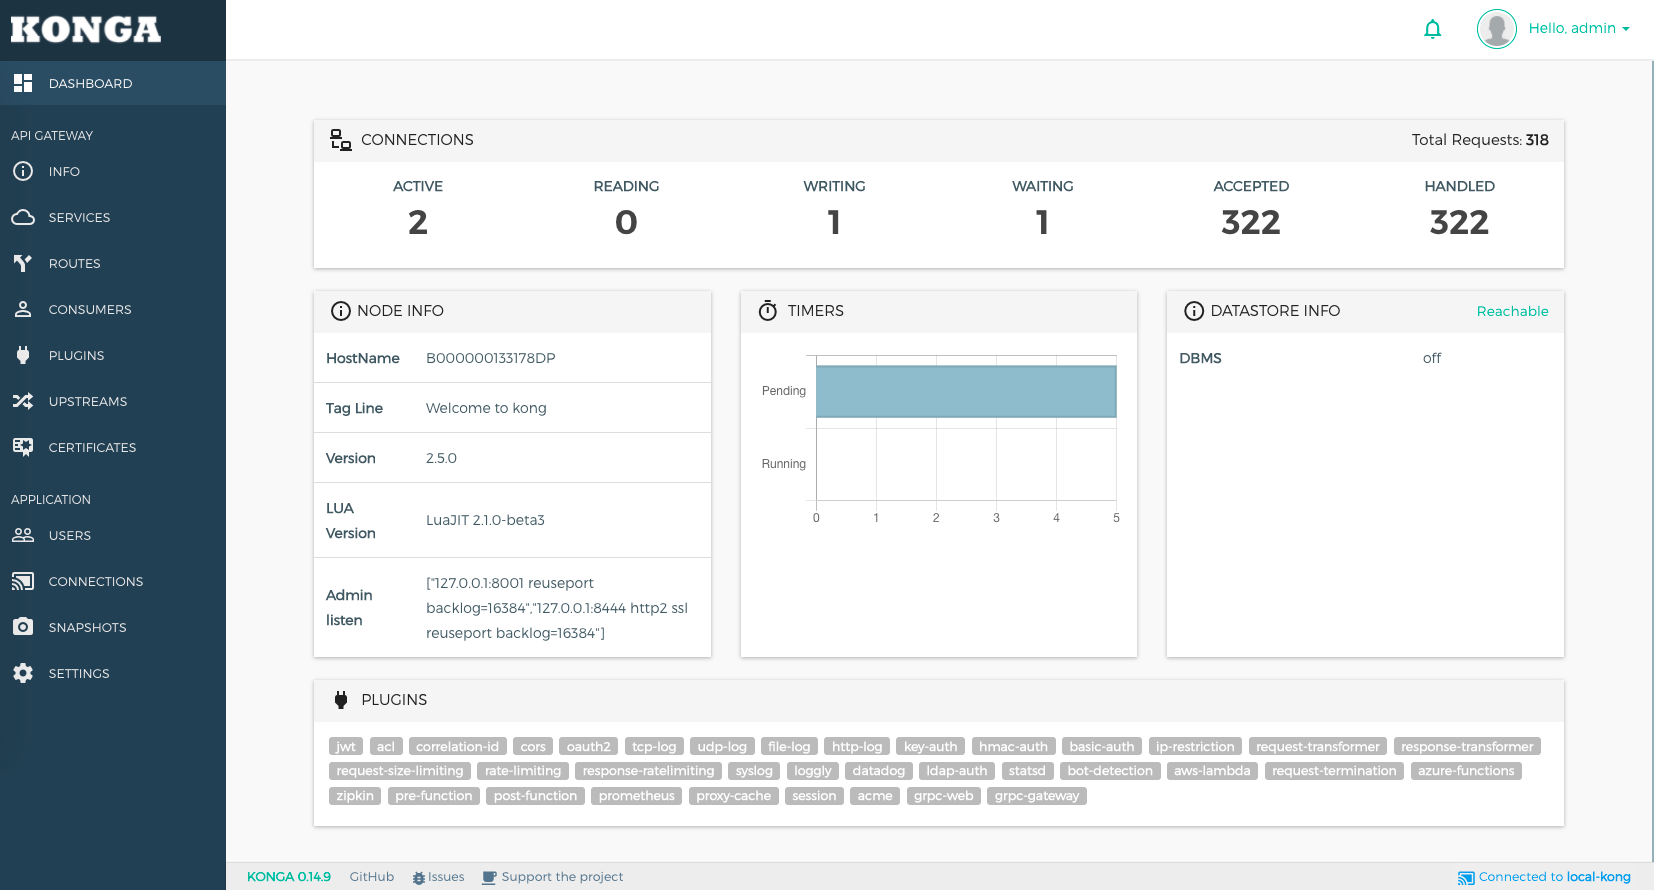
Konga Dashboard
Kong 配置说明
Configuration Reference
https://docs.konghq.com/gateway-oss/2.5.x/configuration/
默认配置及编辑
默认配置文件为 https://github.com/Kong/kong/blob/master/kong.conf.default
使用时可以先将其改名为 kong.conf 再自定义修改。
配置文件中 # 开头的是注释,修改时只需要去掉注释改为自定义配置即可。
配置文件中的 boolean 值可配置为 on/off 或 true/false, 根据自己的喜好来。
配置查找顺序
kong 启动时会在下面这些位置寻找默认配置文件:
/etc/kong/kong.conf
/etc/kong.conf
指定配置文件启动
可通过 -c, --conf 选项指定配置文件
kong start --conf /path/to/kong.conf
验证配置文件
可以通过 check 命令验证配置
kong check kong.conf
configuration at kong.conf is valid
check 验证过程中也会考虑设置的相关环境变量。
环境变量
kong 会从环境变量中读取配置, 环境变量中同名配置优先级高于配置文件,即环境变量会覆盖配置文件。
并且全部配置项都可以通过环境变量配置,这对于容器部署来说非常方便。
配置变量前加 KONG_ 前缀,并全部大写,即可声明有效的环境变量。
例如,配置文件中:
log_level = debug # in kong.conf
则可以导出 KONG_LOG_LEVEL 环境变量进行覆盖
export KONG_LOG_LEVEL=error
注入Nginx配置指令
Kong 启动时会创建一个 nginx 配置文件来启动 nginx 实例,可以直接在 Kong 的配置文件中注入 Nginx 配置指令,以实现定制化配置 Nginx 实例来优化性能。
kong.conf 中的 nginx_http_, nginx_proxy_, nginx_admin_ 开头的配置指令会被转换为等价 Nginx 指令,转化是通过去掉这些前缀并放入合适的 Nginx 配置块实现的:nginx_http_ 开头的配置会被转换为 Nginx 配置文件的 http 块中的配置。nginx_proxy_ 开头的配置会被转换为 Nginx 配置文件的 server 块中处理 Kong 代理转发端口的配置。nginx_admin_ 开头的配置会被转换为 Nginx 配置文件的 server 块中处理 Kong Admin API(即管理端) 端口的配置。
例如,kong.conf 中增加如下配置:
nginx_proxy_large_client_header_buffers=16 128k
结果会在 Nginx 配置文件的 server 块中增加如下配置:
large_client_header_buffers 16 128k;
就像其他 kong.conf 中的配置一样,也可以通过环境变量来指定,例如:
export KONG_NGINX_HTTP_OUTPUT_BUFFERS="4 64k"
结果会在 Nginx 配置文件的 http 块中增加如下配置:
output_buffers 4 64k;
注意 shell 变量含有空格时的引用规则。
注意:一些 Nginx 指令依赖于特定的 Nginx 模块,可能不在 Kong 官方 Nginx 构建中包含。
通过注入include指令引用Nginx配置文件
对于更复杂的配置场景,例如增加一个 server 配置块,可以通过上述注入 Nginx 配置指令的方式来注入 include 指令,从而实现引用包含额外 Nginx 配置的配置文件。
例如,创建一个名为 my-server.kong.conf 的配置文件,内容如下:
# custom server
server {
  listen 2112;
  location / {
    # ...more settings...
    return 200;
  }
}
然后在 kong.conf 中增加如下配置:
nginx_http_include = /path/to/your/my-server.kong.conf
即可实现让 Kong 节点代理转发这个端口的流量。
同样,也可以通过导出环境变量来实现:
export KONG_NGINX_HTTP_INCLUDE="/path/to/your/my-server.kong.conf"
注意:如果在 nginx_http_include 中使用相对路径,则相对路径会被解释为相对于 kong.conf 中 prefix 配置的路径,或者 kong start 启动命令中 -p 参数指定的路径。
自定义Nginx模板
在绝大多数用例中,上述的 Nginx 指令注入方法已足够定制 Kong 启动的 Nginx 实例的行为。直接在 kong.conf 或 单独的 Nginx 配置文件中进行个性化配置,不需要用到 Nginx 配置模板。
以下两个场景下,可能需要直接修改 Nginx 配置模板:
1、在少量场景下,可能需要修改 Kong 的默认 Nginx 配置,但这些配置不能通过 kong.conf 来调整,此时可以修改 Kong 用来生成 Nginx 配置的模板,然后使用自定义模板来启动 Kong.
2、如果需要将 Kong 嵌入到已存在的 OpenResty 实例,可以复用 Kong 生成的配置文件。
在 Kong 启动、重载配置、重启时可以通过 --nginx-conf 参数指定 Nginx 配置模板。模板使用 Penlight 模板引擎,在 Nginx 实例启动之前会生成 Nginx 配置文件到 prefix 目录。
默认模板在 https://github.com/kong/kong/tree/master/kong/templates
分为两个 Nginx 配置文件:nginx.lua 和 nginx_kong.lua, 前者包含后者,nginx_kong.lua 中包含 Kong 的所有 Nginx 默认配置。
Kong 启动后,Nginx 实例启动前,这两个配置文件会被处理并拷贝到 prefix 目录:
/usr/local/kong
├── nginx-kong.conf
└── nginx.conf
同样,nginx.conf 包含 nginx-kong.conf
如果要修改 Kong 的全局配置,但这些配置又无法通过 kong.conf 来调整,可以将 nginx_kong.lua 的内容内联到一个自定义的模板文件中(示例中是 custom_nginx.template ),修改参数,然后启动 Kong 时指定自定义模板:
kong start -c kong.conf --nginx-conf custom_nginx.template
在OpenResty中嵌入Kong
如果已经运行了 OpenResty 实例,可以通过 include Kong 的 Nginx 子配置简单地实现嵌入 Kong 到 OpenResty.
如下,在自己的 my_nginx.conf 中引入 nginx-kong.conf, 其中的 nginx-kong.conf 是 Kong 生成的
# my_nginx.conf

# ...your nginx settings...

http {
    include 'nginx-kong.conf';

    # ...your nginx settings...
}
然后指定配置文件启动 Nginx 实例:
nginx -p /usr/local/openresty -c my_nginx.conf
这样启动的 Nginx 实例就已经内嵌了 Kong.
同时代理Web页面和API
通常会使用 Kong 在 80 或 443 端口上同时代理网站页面和 APIs, 例如,https://example.net 是网站页面,https://example.net/api/v1 是 API.
这种情况下,最好是自定义 Nginx 配置模板,在其中内联全部 nginx_kong.lua 的内容,然后在 http -> server_name kong 中添加一个新的 location 块来代理 Web 网站页面,如下示例:
# ---------------------
# custom_nginx.template
# ---------------------

worker_processes ${{NGINX_WORKER_PROCESSES}}; # can be set by kong.conf
daemon ${{NGINX_DAEMON}};                     # can be set by kong.conf

pid pids/nginx.pid;                      # this setting is mandatory
error_log logs/error.log ${{LOG_LEVEL}}; # can be set by kong.conf
events {}

http {
  # here, we inline the contents of nginx_kong.lua
  charset UTF-8;

  # any contents until Kong's Proxy server block
  ...

  # Kong's Proxy server block
  server {
    server_name kong;

    # any contents until the location / block
    ...

    # here, we declare our custom location serving our website
    # (or API portal) which we can optimize for serving static assets
    location / {
      root /var/www/example.net;
      index index.htm index.html;
      ...
    }

    # Kong's Proxy location / has been changed to /api/v1
    location /api/v1 {
      set $upstream_host nil;
      set $upstream_scheme nil;
      set $upstream_uri nil;

      # Any remaining configuration for the Proxy location
      ...
    }
  }

  # Kong's Admin server block goes below
  # ...
}
http 中是 nginx_kong.lua 中的全部内容,找到 server_name kong;, 添加 location / 指向我们的 Web 页面,然后原来的 location / 改为匹配子路径 /api/v1
上一篇 群晖NAS使用笔记
页面信息
location:protocol: host: hostname: origin: pathname: href: document:referrer: navigator:platform: userAgent: