Nginx
nginx官网文档
http://nginx.org/en/docs/
《深入理解nginx》在线支持网站
http://nginx.weebly.com/
http://taohui.org.cn/
nginx的线程模型
Nginx 采用的是多进程(单线程)和 多路IO复用模型。
Nginx 在启动后,会有一个 master 进程和多个相互独立的 worker 进程。
worker 进程数,一般会设置成机器 cpu 核数。因为更多的worker 数,只会导致进程相互竞争 cpu,从而带来不必要的上下文切换。
master 进程仅用于管理worker进程,不直接对用户请求服务。master 进程能监控 worker 进程的运行状态,当 worker 进程退出后(异常情况下),会自动启动新的 worker 进程。
worker 进程处理用户请求,并提供服务。
pid文件:以ASC码存放master进程的ID
惊群现象
主进程(master 进程)首先通过 socket() 来创建一个 sock 文件描述符用来监听,然后fork生成子进程(workers 进程),子进程将继承父进程的 sockfd(socket 文件描述符),之后子进程 accept() 后将创建已连接描述符(connected descriptor)),然后通过已连接描述符来与客户端通信。
那么,由于所有子进程都继承了父进程的 sockfd,那么当连接进来时,所有子进程都将收到通知并“争着”与它建立连接,这就叫“惊群现象”。大量的进程被激活又挂起,只有一个进程可以accept() 到这个连接,这当然会消耗系统资源。
Nginx对惊群现象的处理
Nginx 提供了一个 accept_mutex 这个东西,这是一个加在accept上的一把互斥锁。即每个 worker 进程在执行 accept 之前都需要先获取锁,获取不到就放弃执行 accept()。有了这把锁之后,同一时刻,就只会有一个进程去 accpet(),这样就不会有惊群问题了。accept_mutex 是一个可控选项,我们可以显示地关掉,默认是打开的。
master 进程
主要用来管理worker进程,包含:接收来自外界的信号,向各worker进程发送信号,监控worker进程的运行状态,当worker进程退出后(异常情况下),会自动重新启动新的worker进程。
master进程充当整个进程组与用户的交互接口,同时对进程进行监护。它不需要处理网络事件,不负责业务的执行,只会通过管理worker进程来实现重启服务、平滑升级、更换日志文件、配置文件实时生效等功能。
nginx如何实现热更新
我们要控制nginx,只需要通过kill向master进程发送信号就行了。比如kill -HUP pid,则是告诉nginx,从容地重启nginx,我们一般用这个信号来重启nginx,或重新加载配置,因为是从容地重启,因此服务是不中断的。master进程在接收到HUP信号后是怎么做的呢?首先master进程在接到信号后,会先重新加载配置文件,然后再启动新的worker进程,并向所有老的worker进程发送信号,告诉他们可以光荣退休了。新的worker在启动后,就开始接收新的请求,而老的worker在收到来自master的信号后,就不再接收新的请求,并且在当前进程中的所有未处理完的请求处理完成后,再退出。当然,直接给master进程发送信号,这是比较老的操作方式,nginx在0.8版本之后,引入了一系列命令行参数,来方便我们管理。比如,./nginx -s reload,就是来重启nginx,./nginx -s stop,就是来停止nginx的运行。如何做到的呢?我们还是拿reload来说,我们看到,执行命令时,我们是启动一个新的nginx进程,而新的nginx进程在解析到reload参数后,就知道我们的目的是控制nginx来重新加载配置文件了,它会向master进程发送信号,然后接下来的动作,就和我们直接向master进程发送信号一样了。
安装nginx
Mac Brew安装nginx
brew install nginx 安装nginxbrew info nginx 查看安装信息,查看安装目录等
下面这些信息都可以通过 brew info nginx 打印出来
nginx: stable 1.19.1 (bottled), HEAD
安装目录
/usr/local/Cellar/nginx/1.19.1
配置文件目录
/usr/local/etc/nginx/nginx.conf
日志目录
/usr/local/var/log/nginx/access.log
找不到时 sudo find / -name access.log 搜一下
The default port has been set in /usr/local/etc/nginx/nginx.conf to 8080 so that
nginx can run without sudo.
nginx will load all files in /usr/local/etc/nginx/servers/.
To have launchd start nginx now and restart at login:
brew services start nginx
Or, if you don’t want/need a background service you can just run:
nginx
Docker 安装部署 Nginx
docker hub 的 nginx 官方页面里有比较全面的用法
https://hub.docker.com/_/nginx
Nginx 容器教程
https://www.ruanyifeng.com/blog/2018/02/nginx-docker.html
拉取最新alpine版本nginx镜像
如果不带标签的话,默认拉取的是 latest 版本镜像,也就是 1.17.9, mainline, 1, 1.17, latest,这个版本用的是 debian:buster-slim linux ,不是很习惯,好多基本命令没有。
所以加上 alpine 标签拉取 1.17.9-alpine, mainline-alpine, 1-alpine, 1.17-alpine, alpine 版本镜像
拉取官方 nginx alpine 版本镜像的最新版 docker pull nginx:alpine
指定配置文件启动nginx:alpine
还使用原始的 nginx:alpine 官方镜像,只不过在启动命令中加入自己的配置,很方便
docker run -d --rm \
--network host \
--name nginx \
-e TZ="Asia/Shanghai" \
-v /home/centos/git/hexo/nginx/nginx-centos.conf:/etc/nginx/nginx.conf:ro \
-v /home/centos/git/hexo/public:/home/centos/git/hexo/public \
-v /home/centos/git/hexo/image:/home/centos/git/hexo/image \
-v /var/log/nginx:/var/log/nginx \
nginx:alpine
解释:
- 以 host 网络模式启动容器,和宿主机完全共享网络,不需要再配置
-p端口映射,否则容器内的 nginx 需要配置主机 ip 才能访问主机网络。 - 容器中默认是 UTC 时区,比我们的时间慢8小时,改为 Asia/Shanghai 即东八区
- 文件和文件夹映射
把本地的配置文件 /home/centos/git/hexo/nginx/nginx-centos.conf 映射到容器中的 /etc/nginx/nginx.conf, 会自动覆盖容器的配置文件,注意必须用绝对路径。这两个文件可以不同名。
把静态文件目录 /home/centos/git/hexo/public 映射到容器中的同名目录,由于容器中没有这个目录,会自动新建并将全部内容拷贝进去,而且,以后宿主机此文件夹的更新会完全反应到容器中。
把图片文件目录 /home/centos/git/hexo/image 映射到容器中的同名目录,由于容器中没有这个目录,会自动新建并将全部内容拷贝进去,而且,以后宿主机此文件夹的更新会完全反应到容器中。
把容器中 nginx 的日志目录 /var/log/nginx 映射到本机的同名目录,由于本机没有 /var/log/nginx 目录,会自动创建,之后在本机即可看 nginx 日志 --rm表示停止容器时删除容器文件,因为 nginx 是无状态的即开即用服务,且配置文件和静态文件映射自宿主机文件,容器内不需要任何持久化,停止后删掉就行,下次再重新启动一个新容器。--name nginx指定一个容器名,方便之后的操作
RHEL/CentOS系统yum安装nginx
centos直接yum安装nginx
https://www.jianshu.com/p/0626bbd975f3
添加nginx yum源
RHEL/CentOS 7.x及以上版本中
sudo rpm -Uvh http://nginx.org/packages/centos/7/noarch/RPMS/nginx-release-centos-7-0.el7.ngx.noarch.rpm
或者按照官方给的方式,直接创建 /etc/yum.repos.d/nginx.repo 文本文件
[nginx-stable]
name=nginx stable repo
baseurl=http://nginx.org/packages/centos/$releasever/$basearch/
gpgcheck=1
enabled=1
gpgkey=https://nginx.org/keys/nginx_signing.key

[nginx-mainline]
name=nginx mainline repo
baseurl=http://nginx.org/packages/mainline/centos/$releasever/$basearch/
gpgcheck=1
enabled=0
gpgkey=https://nginx.org/keys/nginx_signing.key
http://nginx.org/en/linux_packages.html#RHEL-CentOS
yum安装nginx
$ sudo yum install nginx
已加载插件:extras_suggestions, langpacks, priorities, update-motd
nginx                                                                       | 2.9 kB  00:00:00
nginx/x86_64/primary_db                                                     |  42 kB  00:00:00
21 packages excluded due to repository priority protections
正在解决依赖关系
--> 正在检查事务
---> 软件包 nginx.x86_64.1.1.14.2-1.el7_4.ngx 将被 安装
--> 解决依赖关系完成

依赖关系解决

===============================================================================================
 Package        架构         版本                     源                    大小
===============================================================================================
正在安装:
 nginx          x86_64      1:1.14.2-1.el7_4.ngx     nginx                754 k

事务概要
===============================================================================================
安装  1 软件包

总下载量:754 k
安装大小:2.6 M
Is this ok [y/d/N]: y
Downloading packages:
nginx-1.14.2-1.el7_4.ngx.x86_64.rpm                                           | 754 kB  00:00:01
Running transaction check
Running transaction test
Transaction test succeeded
Running transaction
警告:RPM 数据库已被非 yum 程序修改。
  正在安装    : 1:nginx-1.14.2-1.el7_4.ngx.x86_64                                             1/1
----------------------------------------------------------------------

Thanks for using nginx!

Please find the official documentation for nginx here:
* http://nginx.org/en/docs/

Please subscribe to nginx-announce mailing list to get
the most important news about nginx:
* http://nginx.org/en/support.html

Commercial subscriptions for nginx are available on:
* http://nginx.com/products/

----------------------------------------------------------------------
  验证中      : 1:nginx-1.14.2-1.el7_4.ngx.x86_64                                             1/1

已安装:
  nginx.x86_64 1:1.14.2-1.el7_4.ngx

完毕!
查看nginx安装路径
$ rpm -ql nginx
/etc/logrotate.d/nginx
/etc/nginx
/etc/nginx/conf.d
/etc/nginx/conf.d/default.conf
/etc/nginx/fastcgi_params
/etc/nginx/koi-utf
/etc/nginx/koi-win
/etc/nginx/mime.types
/etc/nginx/modules
/etc/nginx/nginx.conf
/etc/nginx/scgi_params
/etc/nginx/uwsgi_params
/etc/nginx/win-utf
/etc/sysconfig/nginx
/etc/sysconfig/nginx-debug
/usr/lib/systemd/system/nginx-debug.service
/usr/lib/systemd/system/nginx.service
/usr/lib64/nginx
/usr/lib64/nginx/modules
/usr/libexec/initscripts/legacy-actions/nginx
/usr/libexec/initscripts/legacy-actions/nginx/check-reload
/usr/libexec/initscripts/legacy-actions/nginx/upgrade
/usr/sbin/nginx
/usr/sbin/nginx-debug
/usr/share/doc/nginx-1.14.2
/usr/share/doc/nginx-1.14.2/COPYRIGHT
/usr/share/man/man8/nginx.8.gz
/usr/share/nginx
/usr/share/nginx/html
/usr/share/nginx/html/50x.html
/usr/share/nginx/html/index.html
/var/cache/nginx
/var/log/nginx
yum删除nginx
sudo rpm -e nginx
nginx配置文件路径
我在 aws ec2 和 阿里云 ecs上都用yum装过 nginx,但两者安装完成后的配置文件位置却不一样
aws ec2 上是在 /usr/local/nginx/conf/nginx.conf
阿里云 ecs 上是在 /etc/nginx/nginx.conf
所以,具体安装后的配置文件位置可能还需要 find 搜索下 sudo find / -name nginx.conf
启动nginx
yum 安装的 nginx,会自动注册为系统服务
RHEL/CentOS 6.x及之前版本中,我们可以通过系统服务命令 service 来启动或停止
service nginx start   #启动 nginx 服务
service nginx stop    #停止 nginx 服务
service nginx restart #重启 nginx 服务
service nginx status  #查看 nginx 服务运行状态
如果是在 RHEL/CentOS 7.x及以上的话,用 systemctl 命令来启动和停止
systemctl start nginx.service # 启动nginx服务
systemctl stop nginx.service # 停止nginx服务
systemctl restart nginx.service # 重启nginx服务
systemctl status nginx.service # 查看nginx服务状态
service 启动的nginx 服务,一般来说都是读取的默认配置文件
设置开机启动nginx服务
RHEL/CentOS 6.x及之前版本中
$ sudo chkconfig |grep nginx
nginx              0:关闭    1:关闭    2:关闭    3:关闭    4:关闭    5:关闭    6:关闭
$ sudo chkconfig nginx on
$ sudo chkconfig |grep nginx
nginx              0:关闭    1:关闭    2:启用    3:启用    4:启用    5:启用    6:关闭
源码编译安装nginx
nginx服务器详细安装过程(使用yum 和 源码包两种安装方式,并说明其区别)
https://segmentfault.com/a/1190000007116797
Nginx 安装配置
http://www.runoob.com/linux/nginx-install-setup.html
yum安装缺少的依赖包
yum -y install gcc gcc-c++ make libtool zlib zlib-devel openssl openssl-devel pcre pcre-devel
下载nginx源码
创建并进入源码目录:~/nginx
下载最新稳定版 nginx-1.14.2
sudo wget http://nginx.org/download/nginx-1.14.2.tar.gz
解压到当前目录
sudo tar -xzvf nginx-1.14.2.tar.gz
编译安装
进入 nginx-1.14.2 目录
执行configure命令,生成Makefile
sudo ./configure --prefix=/usr/local/nginx --with-http_stub_status_module --with-http_ssl_module --with-pcre
configure结果:
Configuration summary
  + using system PCRE library
  + using system OpenSSL library
  + using system zlib library

  nginx path prefix: "/usr/local/nginx"
  nginx binary file: "/usr/local/nginx/sbin/nginx"
  nginx modules path: "/usr/local/nginx/modules"
  nginx configuration prefix: "/usr/local/nginx/conf"
  nginx configuration file: "/usr/local/nginx/conf/nginx.conf"
  nginx pid file: "/usr/local/nginx/logs/nginx.pid"
  nginx error log file: "/usr/local/nginx/logs/error.log"
  nginx http access log file: "/usr/local/nginx/logs/access.log"
  nginx http client request body temporary files: "client_body_temp"
  nginx http proxy temporary files: "proxy_temp"
  nginx http fastcgi temporary files: "fastcgi_temp"
  nginx http uwsgi temporary files: "uwsgi_temp"
  nginx http scgi temporary files: "scgi_temp"
注意:命令参数中间不要随意加空格,比如“–prefix”后和“=”号之间,否则会提示invalid option
然后,编译:sudo make
以及,安装: sudo make install
完成后进入 /usr/local/nginx/ 目录,可以看到已经有 conf, html, logs, sbin 四个目录。
查看nginx版本,进入sbin目录:
./nginx -v
nginx version: nginx/1.14.2
启动nginx: sudo ./nginx
curl localhost 访问能返回nginx欢迎页面表示启动成功。
常用编译选项说明
--prefix=PATH : 指定 nginx 的安装跟目录,其他sbin、conf、error、pid目录都在此目录之下。默认 /usr/local/nginx--conf-path=PATH : 设置nginx.conf配置文件的路径。nginx允许使用不同的配置文件启动,通过命令行中的-c选项。默认为conf/nginx.conf--user=name : 设置nginx工作进程的用户。安装完成后,可以随时在nginx.conf配置文件更改user指令。默认的用户名是nobody。–group=name类似--with-pcre : 设置PCRE库的源码路径,PCRE(Perl Compatible Regular Expressions) 作用是让 Nginx 支持 Rewrite 功能,如果已通过yum方式安装,使用--with-pcre自动找到库文件。使用--with-pcre=PATH时,需要从PCRE网站下载pcre库的源码(8.39)并解压,指定 pcre 的源码路径 ,比如:--with-pcre=/root/pcre-8.39/。perl 正则表达式使用在 location 指令和 ngx_http_rewrite_module 模块中。--with-zlib=PATH : 指定 zlib(版本1.1.3 - 1.2.5)的源码解压目录。在默认就启用的网络传输压缩模块ngx_http_gzip_module时需要使用zlib 。--with-http_ssl_module : 使用https协议模块。默认情况下,该模块没有被构建。前提是openssl与openssl-devel已安装--with-http_stub_status_module : 用来监控 Nginx 的当前状态--with-http_realip_module : 通过这个模块允许我们改变客户端请求头中客户端IP地址值(例如X-Real-IP 或 X-Forwarded-For),意义在于能够使得后台服务器记录原始客户端的IP地址--add-module=PATH : 添加第三方外部模块,如--add-module=~/source/lua-nginx-module-0.9.14或缓存模块。每次添加新的模块都要重新编译(Tengine可以在新加入module时无需重新编译)
configure执行时和编译期间产生的临时文件默认存放在 源码目录/objs 中,包括产生的Makefile文件、c源文件、目标文件、可执行文件。
官方文档:Building nginx from Sources
http://nginx.org/en/docs/configure.html
yum安装和源码包编译安装的区别
yum 安装是在线安装,好处是:安装方式简单,不易出错;
源码包 安装是先将 nginx 的源码下载下来,在自己的系统里编译生成可执行文件,然后执行,好处是:因为是在自己的系统上编译的,更符合自己系统的性能,也就是说在自己的系统上执行 nginx 服务性能效率更好。
两种安装方式之间的区别
(1)安装位置不同
yum 在线安装会将 nginx 的安装文件放在系统的不同位置,可以通过命令 rpm -ql nginx 来查看安装路径
卸载的时候,只能通过 命令来卸载,否则挨个删除太麻烦,可以通过命令 rpm -e nginx 来卸载,这个命令一般不会报错,因为 nginx 不与其他的包有依赖关系,如果提示关于 依赖包的问题 ,可以尝试 rpm -e --nodeps nginx 来卸载,这个命令相当于强制卸载,不考虑依赖问题。
源码包 安装他的所有文件(包括配置文件,库文件,资源文件等)都在同一个目录下,我们想卸载的时候,直接将这个文件删除就可以,不会有任何垃圾文件存在。
通过源码包编译安装的软件,通常都放在 /usr/local/nginx 路径下
(2)启动方式不同
yum 安装的 nginx,会自动注册为系统服务,我们可以通过 系统服务命令 service 来启动或停止
service nginx start   #启动 nginx 服务
service nginx stop    #停止 nginx 服务
service nginx restart #重启 nginx 服务
如果是在 RHEL 7 或 centos 7 的话,还可以用 systemctl 命令来启动和停止
systemctl start nginx.service # 启动nginx服务
systemctl stop nginx.service # 停止nginx服务
systemctl restart nginx.service # 重启nginx服务
systemctl status nginx.service # 查看nginx服务状态
源码包 安装 nginx 启动的时候不能使用 service 来启动,需要执行 nginx 安装目录下的 sbin 目录下的 nginx 可执行程序才行,如下
$ /usr/local/nginx/sbin/nginx           #启动 nginx 服务
$ /usr/local/nginx/sbin/nginx -s stop   #停止 nginx 服务
个人更喜欢源码编译安装这种清爽绿色的方式。
nginx服务器详细安装过程(使用yum 和 源码包两种安装方式,并说明其区别)
https://segmentfault.com/a/1190000007116797
nginx命令
nginx -t:在不启动nginx的情况下,测试配置文件是否有错误nginx -t -c /home/test/conf/nginx.conf 验证指定的配置文件nginx -v:显示nginx版本信息nginx -V:显示nginx版本信息,以及配置编译阶段的信息,如gcc版本、linux内核版本、执行configure时的参数
nginx:以默认配置文件启动,默认配置文件是 conf/nginx.confnginx -c /tmp/nginx.conf:指定配置文件启动
nginx -s stop:强制停止nginx服务,nginx通过nginx.pid文件获得master进程ID,再向master进程发送TERM信号,等同于kill master-pidnginx -s quit:优雅地停止服务,等同于kill -3 master-pid
nginx -s reload:在不停止服务的情况下重新加载配置项并生效
错误:nginx: [error] open() “/usr/local/sms/logs/nginx.pid” failed (2: No such file or directory)
原因:当前没有nginx进程,直接使用reload启动导致的,因为reload时需要去读取pid
Nginx配置文件
默认配置文件位置 /usr/local/nginx/conf/nginx.conf
如果找不到可以 find 搜索下 sudo find / -name nginx.conf
Nginx 的配置文件是以 block 的形式组织的,一个 block 通常使用大括号 {} 表示。
block 分为几个层级,整个配置文件为 main 层级,这是最大的层级;
在 main 层级下可以有 event, http 等层级,
而 http 中又会有 server 层级,server 中可以包含 location 层级。
每个层级可以有自己的指令(Directive),例如worker_processes是一个main层级指令,它指定Nginx服务的Worker进程数量。
若同一个命令既可以在外层配置,又可以在内层配置,则内层会继承外层的配置,若内层配置与外层不同则会覆盖外层配置。
在扩展模块开发时,可在解析配置项的模块中决定如何处理内外层配置冲突的问题。
配置文件可包含,例如:include mime.types,将配置文件mime.types包含进来
在http扩展模块开发过程中,需要特别注意的是main、server和location三个层级,因为扩展模块通常允许指定新的配置指令在这三个层级中。
一般来说,一个server块表示一个host,而里面的一个location则代表一个路由映射规则,这两个配置块可以说是http配置的核心。
配置项语法格式:
配置项名 配置项值1 配置项值2 …;
之间以空格分隔,若配置项值中有空格等特殊字符,需要用单引号或双引号括住配置项值
日志输出级别:debug、info、notice、warn、error、crit、alert、emerg,从左至右级别依次增大。
设定某个级别后,大于等于该级别的日志都会被输出
常用配置块:
server部分的指令主要用于指定虚拟主机域名、IP和端口;
upstream的指令用于设置一系列的后端服务器,设置反向代理及后端服务器的负载均衡;
location部分用于匹配网页位置(比如,根目录“/”,“/images”,等等)。
他们之间的关系是:server继承main,location继承server;upstream既不会继承指令也不会被继承。它有自己的特殊指令,不需要在其他地方的应用。
ngx_core_module
user 配置worker进程的用户和用户组
ngx_core_module.html/user
http://nginx.org/en/docs/ngx_core_module.html#user
Syntax:   user user [group];
Default:  user nobody nobody;
Context:  main
在 nginx.conf 文件的第一行一般是设置用户的地方(编译安装 nginx 时的参数 --user=<user> 也是指定用户的地方),如 user www www;
如不指定默认是 nobody. 这里用户的设置又有什么意义呢?
user 配置项主要是指定执行 nginx 的 worker process 的用户,linux 里所有程序都是文件,都具有权限问题,这个指定的用户对特定的文件有没有权限访问或执行,就是这个用户的意义。
Nginx 主进程(master process)会以 root 权限运行,之后主进程会读取 /etc/nginx/nginx.conf 文件中的 user 模块的配置,nginx 会使用这个指定的用户启动工作进程( worker process)。
那为什么主进程需要使用 root?因为只有 root 可以监听小于1024的端口号,通常 webserver 使用 80/443 端口,这也就是为什么需要 root 来运行了。
nginx user 模块详解
https://segmentfault.com/a/1190000012403369
user配错导致403 Forbidden错误
一开始没有配置 user 项,是以默认的 nobody 用户启动的工作线程,没有读取 /home/ec2-user/git/madaimeng 的权限,虽然我把这个目录权限改为777了,但还是不行。
后来配置了 user ec2-user ec2-user; 就好了
getpwnam(“user”) failed
2019/12/23 03:49:40 [emerg] 1#1: getpwnam(“centos”) failed in /etc/nginx/nginx.conf:2
nginx: [emerg] getpwnam(“centos”) failed in /etc/nginx/nginx.conf:2
原因: nginx.conf 中 user user [group] 指定的用户不存在
worker_processes
http://nginx.org/en/docs/ngx_core_module.html#worker_processes
Syntax:    worker_processes number | auto;
Default: worker_processes 1;
Context:    main
worker_processes 表示工作进程的数量,一般情况设置成CPU核的数量即可,一个cpu配置多于一个worker数,对Nginx而言没有任何益处,另外不要忘了设置 worker_cpu_affinity ,这个配置用于将worker process与指定cpu核绑定,降低由于多CPU核切换造成的寄存器等现场重建带来的性能损耗。grep processor /proc/cpuinfo | wc -l 这个命令会告诉你当前机器是多少核,输出为2即表示2核。
events
http://nginx.org/en/docs/ngx_core_module.html#events
Syntax:    events { ... }
Default:    —
Context:    main
worker_connections
http://nginx.org/en/docs/ngx_core_module.html#worker_connections
Syntax:    worker_connections number;
Default: worker_connections 512;
Context:    events
worker_connections 配置表示每个工作进程的并发连接数,默认设置为1024。
include
http://nginx.org/en/docs/ngx_core_module.html#include
Syntax:    include file | mask;
Default:    —
Context:    any
ngx_stream_proxy_module
Module ngx_stream_proxy_module
https://nginx.org/en/docs/stream/ngx_stream_proxy_module.html
Nginx TCP/UDP 4层代理配置
TCP and UDP Load Balancing
https://docs.nginx.com/nginx/admin-guide/load-balancer/tcp-udp-load-balancer/
stream {
    # ...
    # Configuration of an upstream server group
    upstream appservers {
        zone appservers 64k;
        server appserv1.example.com:12345 weight=5;
        server appserv2.example.com:12345 fail_timeout=5s;
        server backup1.example.com:12345 backup;
        server backup2.example.com:12345 backup;
    }

    server {
        # Server that proxies connections to the upstream group
        proxy_pass appservers;
        health_check;
    }
}
Nginx 4层代理超时配置
https://nginx.org/en/docs/stream/ngx_stream_proxy_module.html#proxy_timeout
Syntax:    proxy_timeout timeout;
Default:
proxy_timeout 10m;
Context:    stream, server
ngx_http_proxy_module
Module ngx_http_proxy_module
http://nginx.org/en/docs/http/ngx_http_proxy_module.html
配置实例
nginx+tomcat负载均衡
最常用的 nginx+Tomcat 负载均衡配置
通过 nginx 用于反向代理的服务器,并将请求转发给后端多台 Tomcat 服务器,从而达到负载均衡的目的。
http {
  upstream tomcats {
      server 127.0.0.1:9001;
      server 127.0.0.1:9002;
  }

  server {
      listen 80;
      server_name  masikkk.com;
      location / {
          proxy_pass_header Server;
          proxy_set_header Host $http_host;
          proxy_set_header X-Real-IP $remote_addr;
          proxy_set_header X-Scheme $scheme;
          proxy_pass http://tomcats;
      }
  }
}
Nginx 反向代理详解
https://juejin.im/entry/57fb07b0816dfa0056c0ada8
根据不同path转发到不同后台服务
一台主机上部署了多个不同的后端服务,需要在 80 端口通过不通 path 访问这些后端服务,可以使用 nginx 的反向代理功能: 用 nginx 在 80 端口监听所有请求,并依据转发规则(比较常见的是以 URI 来转发)转发到对应的后端服务。
例如有 webmail, webcom 以及 webdefault 三个服务器分别运行在 portmail, portcom, portdefault 端口,要实现从 80 端口同时访问这三个web服务,则可以在 80 端口运行 nginx, 然后将 /mail 下的请求转发到 webmail 服务器, 将 /com下的请求转发到 webcom 服务器, 将其他所有请求转发到 webdefault 服务器。
假设服务器域名为 example.com,则对应的 nginx http 配置如下:
http {
  server {
    server_name example.com;

    location /mail/ {
      proxy_pass http://example.com:protmail/;
    }

    location /com/ {
      proxy_pass http://example.com:portcom/main/;
    }

    location / {
      proxy_pass http://example.com:portdefault;
    }
  }
}
以上的配置会按以下规则转发请求( GET 和 POST 请求都会转发):
将 http://example.com/mail/ 下的请求转发到 http://example.com:portmail/
将 http://example.com/com/ 下的请求转发到 http://example.com:portcom/main/
将其它所有请求转发到 http://example.com:portdefault/
需要注意的是,在以上的配置中,webdefault 的代理服务器设置是没有指定 URI 的,而 webmail 和 webcom 的代理服务器设置是指定了 URI 的(分别为 / 和 /main/)。
如果 proxy_pass 转发地址中是带有 URI 的,此 URI 会替换掉 location 所匹配的 URI 部分
比如 proxy_pass http://example.com:protmail/ 带 URI /,则匹配 /mail/index.html 时 / 代替 location 中匹配的 /mail/ 部分,最终请求到后端的 URL 是 http://example.com:portmail/index.html
又比如 proxy_pass http://example.com:portcom/main/ 带 URI /main/,则匹配 /com/index.html 时 /main/ 代替 location 中匹配的 /com/ 部分,最终转发到后端的 URL 是 http://example.com:portcom/main/index.html
而如果 proxy_pass 转发地址中是不带 URI 的,则会用完整的请求 URL 来转发到代理服务器
比如 proxy_pass http://example.com:portdefault 不带 URI,则匹配 /other/index.htm 时 完整转发,最终转发到后端的 URL 是 http://example.com:portdefault/other/index.htm
官方文档描述:
If the proxy_pass directive is specified with a URI, then when a request is passed to the server, the part of a normalized request URI matching the location is replaced by a URI specified in the directive
If proxy_pass is specified without a URI, the request URI is passed to the server in the same form as sent by a client when the original request is processed, or the full normalized request URI is passed when processing the changed URI
Module ngx_http_proxy_module
http://nginx.org/en/docs/http/ngx_http_proxy_module.html#proxy_pass
以上配置的转发示例:
http://example.com/mail/index.html -> http://example.com:portmail/index.html
http://example.com/com/index.html -> http://example.com:portcom/main/index.html
http://example.com/mail/static/a.jpg -> http://example.com:portmail/static/a.jpg
http://example.com/com/static/b.css -> http://example.com:portcom/main/static/b.css
http://example.com/other/index.htm -> http://example.com:portdefault/other/index.htm
nginx实现请求转发
https://blog.csdn.net/tobacco5648/article/details/51099426
if条件判断header是否存在进行转发
server {
    listen 80;
    server_name  masikkk.com;

    location / {
        if ($http_myheader) {
            # serviceA
            proxy_pass http://127.0.0.1:8081/$http_path?$http_param;
            break;
        }
        # serviceA
        proxy_pass http://127.0.0.1:8080/$http_path?$http_param;
    }
}
如果 myheader header 存在且不是空串,转发到 serviceA, 否则转发到 serviceB
break; 表示匹配后立即结束,否则还会继续匹配其他location
监听不同子域名转发到不同后台服务
比如我有个静态 html 博客,又有一个 springboot 后台 api 服务,都在一台服务器上。
但我只有一个域名,想要主域名 http://madaimeng.com 访问博客,子域名 http://api.madaimeng.com/ 访问api接口。
可以配置nginx监听两个不同的server_name,然后主域名转到静态文件目录,子域名转到对应的springboot服务,配置如下:
server {
    listen       80;
    server_name  api.masikkk.com api.madaimeng.com api.devgou.com;

    location / {
      proxy_pass http://localhost:8001; # 转发到本机spring boot接口
      proxy_set_header Host $host;
      proxy_set_header X-Real-IP $remote_addr;
      proxy_set_header X-Forwarded-For $proxy_add_x_forwarded_for;
    }
}

server {
    listen       80;
    server_name  devgou.com www.devgou.com;

    location / {
      root   /home/ec2-user/git/madaimeng; # 转发到博客静态目录
      index  index.html;
    }
}
pathA替换为pathB
背景: pathA 和 pathB 是同一个服务的两个接口,请求返回完全相同,pathB 性能更好,但调用方不能随便改动,所以在 nginx 网关增加个配置将 pathA 的请求转为 pathB
location = /path/to/pathA {
    proxy_pass    http://my-app-service:8080/path/to/pathB;
}
Nginx 代理转发 WebSocket
假如 /ws/chat 是个 WebSocket 接口,Nginx 中增加如下配置可转发此 WebSocket 接口到后端 backend 服务:
http {
    map $http_upgrade $connection_upgrade {
        default upgrade;
        ''      close;
    }

    server {
        ...

        location /ws/chat/ {
            proxy_pass http://backend;
            proxy_send_timeout 600s; # 超时设置,不配置默认 60 秒
            proxy_read_timeout 600s; # 超时设置,不配置默认 60 秒

            proxy_http_version 1.1;
            proxy_set_header Upgrade $http_upgrade;
            proxy_set_header Connection $connection_upgrade;
        }
    }
}
其中 map 指令用于 HTTP 协议升级的 header 设定,$http_upgrade 是 Nginx 内置变量,表示获取 upgrade http header 的值,根据他的值设置自定义变量 $connection_upgrade。
WebSocket 请求中会有下面两个 header:
Upgrade: websocket
Connection: Upgrade
根据上面的配置相应中会有下面两个 header,就将 HTTP 升级为 WebSocket 了:
Upgrade: websocket
Connection: Upgrade
默认情况下,WebSocket 连接将会在无数据传输 60 秒后关闭,proxy_read_timeout 参数可延长超时时间。
WebSocket proxying
http://nginx.org/en/docs/http/websocket.html
nginx配置CORS跨域访问
如果是允许单域名跨域访问直接配置就行了,如下:
http {
  server {
        listen       80;
        server_name  api.masikkk.com

        location / {
            add_header Access-Control-Allow-Origin "http://masikkk.com";
            add_header Access-Control-Allow-Methods "POST, GET, PUT, OPTIONS, DELETE";
            add_header Access-Control-Max-Age "3600";
            add_header Access-Control-Allow-Headers "Origin, X-Requested-With, Content-Type, Accept;
        }
  }
}
上面的配置只允许 http://masikkk.com 跨域访问。
如果要支持所有域名都可以跨域访问,可以配置为*,不过不推荐这样做,因为不安全
add_header Access-Control-Allow-Origin "*";
如果不想允许所有,但是又需要允许多个域名,那么就需要用到 map
http {
    map $http_origin $corsHost {
        default 0;
        "~http://madaimeng.com" http://madaimeng.com;
        "~http://devgou.com" http://devgou.com;
        "~http://masikkk.com" http://masikkk.com;
        "~http://localhost:4000" http://localhost:4000;
    }

    server {
        listen       80;
        server_name  api.masikkk.com api.madaimeng.com api.devgou.com;

        location / {
          add_header 'Access-Control-Allow-Origin' $corsHost;
          proxy_pass http://localhost:8001;
        }
    }
}
Nginx map 使用详解
http://blog.51cto.com/tchuairen/2175525
nginx通过CORS实现跨域
https://www.cnblogs.com/sunmmi/articles/5956554.html
Nginx双网关统一转发方案
背景与需求
有两个互相不通的网络——网络A和网络B,A,B之间想要互通的话只能通过配置七层负载均衡进行网络转发,也就是配置基于 ip:port/path 的七层转发通道。
(为什么不配置四层负载均衡?就是基于ip:port的转发,答:出于安全考虑此环境不支持四层转发,过于开放了,必须指定path配置)
现在问题来了,我们有上百个接口需要跨网络访问,每个接口的path都配置一遍的话非常繁琐,能否只配置一个通用的接口,然后所有原始接口都通过这个通用的接口进行转发?
通过nginx可以实现,在接口转发通道两边分别架设一台nginx,数据流:A -> nginxA -> 接口通道 -> nginxB -> B
至于怎么把不同的原始接口都放到一个接口中转发,实现用一个通用的接口做数据传输,有几个方案:
1、nginxA 把原接口的path路径、方法method、query参数都放入param转发给nginxB,nginxB再反解析成原接口地址。
2、nginxA 把原接口的path路径、方法method、query参数都放入header转发给nginxB,nginxB再反解析成原接口地址。
3、nginxA 把原接口的path路径、方法method、query参数都放入json body中(注意如果原接口有json body,需要读取后给他添加3个参数path,method,param,不能直接替换,需要nginx lua模块操作body),转发给nginxB,nginxB再反解析body成原接口。
实际上线时使用了第二种方法,因为方法1放入param的参数会被url编码,到网络B的nginx还需要解码,而且把所有param再放入param的方式很容易混淆。方法3还需要操作body体,现场是原始nginx没有lua能力。
通过query参数转发
举例
请求 GET /user/v1/info?key1=value1&key2=value2, nginx1 将其转为 GET /common/service?path=/user/v1/info¶m=key1=value1&key2=value2&method=GET, 转发给nginx2,nginx2反解为 GET /user/v1/info?key1=value1&key2=value2
模拟配置如下,数据流是:A -> nginxA -> nginxB -> B,省略了中间的七层接口通道,主要是为了验证中间加两层nginx是否行得通。
nginxA 配置
http {
# nginxB地址
upstream nginxB {
server 127.0.0.1:8082;
}
server {
listen 8081;
server_name localhost;
# 原接口信息放入query param转发到nginxB
location ~/(.*) {
proxy_pass http://nginxB/common/service?path=/$1¶m=$args&method=$request_method;
}
}
}
$1 代表正则捕获的第一个变量,也就是原接口的path,$args是nginx变量表示所有query参数,$request_method是nginx变量表示请求的http方法
nginxB 配置
http {
    # 网络B的后端服务地址
    upstream network-b-service {
        server 127.0.0.1:8080;
    }

    server {
        listen       8082;
        server_name  localhost;

        location /common/service {
            proxy_method $arg_method;
            proxy_pass http://network-b-service/$arg_path?$args;
        }
    }
}
$arg_method 表示method参数,即原始接口的http方法,通过proxy_method指令恢复原http方法arg_path 表示path参数,即原始接口的path,将其恢复到路径中。$args 表示所有query参数,拼在路径之后。
访问 GET localhost:8081/user/v1/info?key1=value1&key2=value2
nginxA 将其转为 POST localhost:8082/common/service?path=/user/v1/info¶m=key1=value1&key2=value2&method=GET
nginxB 再反解为 GET localhost:8080/user/v1/info?key1=value1&key2=value2
请求到达后端服务中。
通过header转发
nginxA 把原接口的path路径、方法method、query参数都放入header转发给nginxB,nginxB再反解析成原接口地址。
举例
请求 GET /menu?k1=v1, nginxA将其转为
GET /common/service
method:GET
path:/menu
param:k1=v1
转发给nginx2,nginx2反解为 GET /user/v1/info?key1=value1&key2=value2
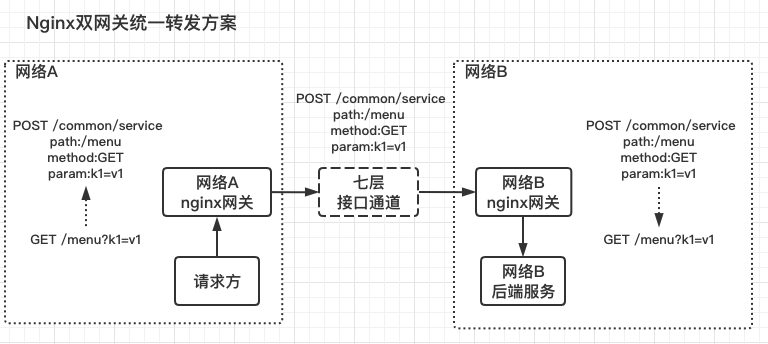
将原始接口信息放入header通过双nginx进行统一转发
模拟配置如下,数据流是:A -> nginxA -> nginxB -> B,省略了中间的七层接口通道,主要是为了验证中间加两层nginx是否行得通。
nginxA 配置
http {
    # nginxB地址
    upstream nginxB {
        server 127.0.0.1:8082;
    }

    server {
        listen       8081;
        server_name  localhost;

        # 原接口信息放入header转发到nginxB
        location ~/(.*) {
            proxy_set_header method $request_method;
            proxy_set_header path $1;
            proxy_set_header param $args;
            proxy_pass http://nginxB/common/service?path=/$1;
        }
    }
}
$request_method 是nginx变量表示请求的http方法$1 代表正则捕获的第一个变量,也就是原接口的path$args 代表所有query参数,之所以还需要加一个path参数,是因为如果在正则表达式 location 中使用带 uri 的 proxy_pass, 则必须在 uri 中使用一个或多个正则匹配的变量,否则报错 [emerg] “proxy_pass” cannot have URI part in location given by regular expression
nginxB 配置
http {
    # 服务地址
    upstream network-b-service {
        server 127.0.0.1:8080;
    }

    server {
        listen       8082;
        server_name  localhost;

        location /common/service {
            proxy_method $http_method;
            proxy_pass http://network-b-service/$http_path?$http_param;
        }
    }
}
$http_method 表示 method 头,即原始接口的http方法,通过proxy_method指令恢复原http方法。$http_path 是 path 头,即原始接口的path,将其恢复成路径。$http_param 是 param 头,即原始接口的query 参数,拼在路径之后。
proxy_pass
http://nginx.org/en/docs/http/ngx_http_proxy_module.html#proxy_pass
Syntax: proxy_pass URL;
Default: —
Context: location, if in location, limit_except
“proxy_pass” cannot have URI part in location given by regular expression
我加了个如下的配置,想把 path 和 query 参数都放到 header中,然后都转发到 /user/service 这个路径上,但报错
location ~/user/v1/(.*) {
    proxy_set_header path /archive/saas/$1;
    proxy_set_header param $args;
    proxy_pass http://localhost:8080/user/service;
}
nginx: [emerg] “proxy_pass” cannot have URI part in location given by regular expression, or inside named location, or inside “if” statement, or inside “limit_except” block in /usr/local/etc/nginx/nginx-from.conf
意思是
1、如果在正则表达式 location 中使用带 uri 的 proxy_pass, 则必须在 uri 中使用一个或多个正则匹配的变量,比如
location ~ ^/([A-Za-z0-9]+) {
    proxy_pass http://api/urlshortener/v1/$1;
}
2、或者,使用不带 uri 的 proxy_pass, 然后通过 rewrite...break 来构造想要的 uri
location ~ ^/([A-Za-z0-9]+) {
    rewrite ^/([A-Za-z0-9]+) /urlshortener/v1/$1 break;
    proxy_pass http://api;
}
proxy_method
http://nginx.org/en/docs/http/ngx_http_proxy_module.html#proxy_method
Syntax: proxy_method method;
Default: —
Context: http, server, location
设置被转发的请求的 http 方法,可以覆盖请求的原http方法。
nginx转发请求时修改http方法
原请求是 PUT 方法,转发时改为 POST 方法
location ~/user/v1/(.*) {
    proxy_method POST;
    proxy_pass http://localhost:8080/user/v2/$1;
}
proxy_hide_header
http://nginx.org/en/docs/http/ngx_http_proxy_module.html#proxy_pass_header
Syntax: proxy_hide_header field;
Default: —
Context: http, server, location
默认情况下,nginx将后端服务器的response转发给client时,会隐藏 Date, Server, X-Pad, X-Accel-... 这几个header。
通过 proxy_hide_header 指令可以添加额外的需要隐藏的header。
相反,如果想把某个header转发给client,可以通过指令 proxy_pass_header 添加允许的header
proxy_pass_header
http://nginx.org/en/docs/http/ngx_http_proxy_module.html#proxy_pass_header
Syntax: proxy_pass_header field;
Default: —
Context: http, server, location
配置nginx在将后端服务器的response转发给client时,允许哪些header被转发。
proxy_set_header 设置请求头
http://nginx.org/en/docs/http/ngx_http_proxy_module.html#proxy_set_header
Syntax:    proxy_set_header field value;
Default: proxy_set_header Host $proxy_host;
         proxy_set_header Connection close;
Context:    http, server, location
add_header 用于设置响应头,proxy_set_header 用于设置请求头,注意区别。
允许重新定义或者添加发往后端服务器的请求头。value可以包含文本、变量或者它们的组合。
当且仅当当前配置级别中没有定义proxy_set_header指令时,会从上面的级别继承配置。
默认情况下,只有两个请求头会被重新定义:
proxy_set_header Host       $proxy_host;
proxy_set_header Connection close;
$proxy_add_x_forwarded_for
$proxy_add_x_forwarded_for 变量包含客户端请求头中的X-Forwarded-For,与$remote_addr两部分,他们之间用逗号分开。
即$proxy_add_x_forwarded_for = X-Forwarded-For, $remote_addr
例如客户端请求要经过两个nginx转发,两台的配置都是:
proxy_set_header X-Forwarded-For $proxy_add_x_forwarded_for;
经过第一台nginx转发时,$proxy_add_x_forwarded_for变量的”X-Forwarded-For”部分是空的,所以只有$remote_addr,而$remote_addr的值是用户的ip,于是赋值以后,X-Forwarded-For变量的值就是用户的真实的ip地址了。
经过第二胎nginx转发时,$proxy_add_x_forwarded_for变量的”X-Forwarded-For”部分包含的是用户的真实ip,$remote_addr部分的值是上一台nginx的ip地址,于是通过这个赋值以后现在的X-Forwarded-For的值就变成了用户的真实ip,第一台nginx的ip
Nginx常见场景代理转发配置
https://blog.csdn.net/faye0412/article/details/75200607
proxy_send_timeout
http://nginx.org/en/docs/http/ngx_http_proxy_module.html#proxy_read_timeout
Syntax: proxy_send_timeout time;
Default: proxy_send_timeout 60s;
Context: http, server, location
nginx 发送数据给后端服务器(proxied server)的超时时间,单位秒。
proxy_send_timeout 时间内 upstream 没收到数据,则超时
proxy_read_timeout
http://nginx.org/en/docs/http/ngx_http_proxy_module.html#proxy_read_timeout
Syntax: proxy_read_timeout time;
Default: proxy_read_timeout 60s;
Context: http, server, location
nginx 接收后端服务器(proxied server)数据的超时时间,单位秒。
规定时间内 nginx 没收到数据,则超时。
它决定了 nginx 会等待多长时间来获得请求的响应。
proxy_connect_timeout
https://nginx.org/en/docs/http/ngx_http_proxy_module.html#proxy_connect_timeout
Syntax:    proxy_connect_timeout time;
Default: proxy_connect_timeout 60s;
Context:    http, server, location
nginx与后端服务器(proxied server)之间的连接超时时间,单位秒。
504 Gateway Time-out
<html>

<head>
    <title>504 Gateway Time-out</title>
</head>

<body bgcolor="white">
    <center>
        <h1>504 Gateway Time-out</h1>
    </center>
    <hr>
    <center>nginx/1.4.4</center>
</body>

</html>
fastcgi_connect_timeout 300;
fastcgi_send_timeout 300;
fastcgi_read_timeout 300;
proxy_connect_timeout 300s;
proxy_send_timeout 300s;
proxy_read_timeout 300s;
proxy_intercept_errors
https://nginx.org/en/docs/http/ngx_http_proxy_module.html#proxy_intercept_errors
Syntax:    proxy_intercept_errors on | off;
Default: proxy_intercept_errors off;
Context:    http, server, location
开启后,上游返回 code 大于 300 的 response 会被重定向到 nginx 的 error_page
ngx_http_core_module
http://nginx.org/en/docs/http/ngx_http_core_module.html
http
http://nginx.org/en/docs/http/ngx_http_core_module.html#http
Syntax:    http { ... }
Default:    —
Context:    main
default_type
http://nginx.org/en/docs/http/ngx_http_core_module.html#default_type
Syntax:    default_type mime-type;
Default: default_type text/plain;
Context:    http, server, location
sendfile
http://nginx.org/en/docs/http/ngx_http_core_module.html#sendfile
Syntax:    sendfile on | off;
Default: sendfile off;
Context:    http, server, location, if in location
是否开启 Linux sendfile() 零拷贝
keepalive_timeout
http://nginx.org/en/docs/http/ngx_http_core_module.html#keepalive_timeout
Syntax:    keepalive_timeout timeout [header_timeout];
Default: keepalive_timeout 75s;
Context:    http, server, location
server
http://nginx.org/en/docs/http/ngx_http_core_module.html#server
Syntax:    server { ... }
Default:    —
Context:    http
listen
http://nginx.org/en/docs/http/ngx_http_core_module.html#listen
Syntax:    listen address[:port] [default_server] [ssl] [http2 | spdy] [proxy_protocol] [setfib=number] [fastopen=number] [backlog=number] [rcvbuf=size] [sndbuf=size] [accept_filter=filter] [deferred] [bind] [ipv6only=on|off] [reuseport] [so_keepalive=on|off|[keepidle]:[keepintvl]:[keepcnt]];
listen port [default_server] [ssl] [http2 | spdy] [proxy_protocol] [setfib=number] [fastopen=number] [backlog=number] [rcvbuf=size] [sndbuf=size] [accept_filter=filter] [deferred] [bind] [ipv6only=on|off] [reuseport] [so_keepalive=on|off|[keepidle]:[keepintvl]:[keepcnt]];
listen unix:path [default_server] [ssl] [http2 | spdy] [proxy_protocol] [backlog=number] [rcvbuf=size] [sndbuf=size] [accept_filter=filter] [deferred] [bind] [so_keepalive=on|off|[keepidle]:[keepintvl]:[keepcnt]];
Default: listen *:80 | *:8000;
Context:    server
server_name
http://nginx.org/en/docs/http/ngx_http_core_module.html#server_name
Syntax:    server_name name ...;
Default: server_name "";
Context:    server
多个域名用空格分开,例如
server_name api.masikkk.com api.madaimeng.com api.devgou.com;
location 配置
http://nginx.org/en/docs/http/ngx_http_core_module.html#location
Syntax:    location [ = | ~ | ~* | ^~ ] uri { ... }
location @name { ... }
Default:    —
Context:    server, location
location 指令是 http 模块当中最核心的一项配置,根据预先定义的 URL 匹配规则来接收用户发送的请求,根据匹配结果,将请求转发到后台服务器、非法的请求直接拒绝并返回403、404、500错误处理等。
Nginx之location 匹配规则详解
http://www.cnblogs.com/lidabo/p/4169396.html
基本语法
location 指令分为两种匹配模式:
1、普通字符串匹配:以 = 开头或开头无引导字符(~)的规则
2、正则匹配:以~或~*开头表示正则匹配,~*表示正则不区分大小写
= 严格匹配
精确匹配(严格匹配),即 exact match,匹配上后立即停止,不再执行正则匹配。
例如 location = / {…} 只有当用户请求是 http://host:port/ 时,才会使用该 location 下的配置
~ 区分大小写的正则匹配
波浪线表示一个正则匹配,区分大小写
~* 不区分大小写的正则匹配
表示一个正则匹配,不区分大小写
^~ 最大前缀匹配(非正则匹配)
表示普通字符匹配,即最大前缀匹配,不区分大小写,且匹配上后立即停止,不再执行正则匹配
^表示“非”,表示“正则”,字符意思是:不要继续匹配正则 /image/ {…} 以 /images/ 开始的请求都会匹配上
例如 location ^
@ 内部重定向
@ 表示仅用于 nginx 服务内部请求之间的重定向,带有 @ 的 location 不直接处理用户请求,带 @ 的 location 是 named_location
nginx如何处理一个请求
How nginx processes a request
http://nginx.org/en/docs/http/request_processing.html
location URI匹配规则
当 nginx 收到一个请求后,会截取请求的 URI 部份,去搜索所有 location 指令中定义的 URI 匹配模式。在 server 模块中可以定义多个 location 指令来匹配不同的 url 请求。
有多个不同 location 匹配模式时,总体的匹配原则是:先匹配普通字符串模式,再匹配正则模式。
注意:location 匹配只识别URI部份,query串(?k=v)不在URI范围内,例如:/films.htm?fid=123 的URI 是/films.htm
例如请求为:/test/abc/user.do?name=xxxx, nginx匹配这个请求的流程如下:
1、先查找是否有=开头的精确匹配,如:location = /test/abc/user.do { … }
2、再查找普通匹配,以 最大前缀 为原则,如有以下两个location,则会匹配后一项
location /test/ { … }
location /test/abc { … }
3、匹配到一个普通格式后,搜索并未结束,而是暂存当前匹配的结果,并继续搜索正则匹配模式
4、所有正则匹配模式 location 中找到第一个匹配项后,就以此项为最终匹配结果
所有正则匹配项匹配规则,受定义的前后顺序影响,但普通匹配模式不会
5、如果未找到正则匹配项,则以3中缓存的结果为最终匹配结果
6、如果一个匹配都没搜索到,则返回404
正则location与普通location
例如location ~* \.(gif|jpg|jpeg)$ {...}
匹配以.gif、.jpg、.jpeg结尾的请求
普通location与正则location
正则location匹配让步普通location的严格精确匹配结果;但覆盖普通location的最大前缀匹配结果。
(1) “普通location”与“正则location”之间的匹配规则是:先匹配普通location ,再匹配正则location 。
(2) “普通location”内部(普通location与普通location)是如何匹配的呢?简单的说:最大前缀匹配。
(3) 选择出“普通location ”的最大前缀匹配结果后,还需要继续搜索正则location。
(4) 普通location与顺序无关,而正则location还是与顺序有关的,并且只要匹配到一条正则location ,就不再考虑后面的。
(5) 如果继续搜索的“正则location”也有匹配上的,那么“正则location”覆盖“普通location”的最大前缀匹配;但是如果“正则location”没有能匹配上,那么就用“普通location”的最大前缀匹配结果。
(6) 当“最大前缀”匹配恰好就是一个“严格精确(exact match )”匹配,照样会停止后面的正则匹配。
location / {} 默认匹配
遵守普通 location 的最大前缀匹配,由于任何 URI 都必然以 / 根开头,所以对于一个 URI,如果有更 specific 的匹配,那自然是选这个更 specific 的,如果没有,/ 一定能为这个 URI 垫背(至少能匹配到/),也就是说 location / {} 有点默认配置的味道。
location =/ { … } 与 location / { … } 的差别:
前一个是精确匹配,只响应/请求,所有/xxx或/xxx/xxxx类的请求都不会以前缀的形式匹配到它
后一个是只要以 / 为前缀的请求都会被匹配到。如:/abc , /test/abc, /test/abc/aaaa
正则表达式语法
^ 匹配字符串的开始$ 匹配字符串的结束
. 匹配除换行符以外的任意字符
\ 转义字符,可以转义. * ?等
* 重复零次或更多次+ 重复一次或更多次? 重复零次或一次
例如:
location ~ ^/prefix/.*\.html$ {
    deny all;
}
表示对于以/prefix/开头,并且以.html结尾的所有URI请求,都拒绝访问
分析 ^/prefix/.*\.html$^/prefix/ 表示匹配以/prefix/开头的,.* 表示任意字符重复0或多次,\. 是对.进行转义,即无特别含义的小数点,\.html$ 表示以.html结尾的
正则捕获与变量$1
$1, $2, $3, $n 是 nginx 在匹配正则时生成的变量,用于捕获一个正则表达式括号中匹配的字符串(从左到右依次存储在$1|$2|$3 …中),新值覆盖旧值。
例如
location ~/service/(.*)/(.*) {
    set $para1 $1
    set $para2 $2
}
请求 /service/user/info 则 $1 是 user, $2 是 info
root 网站根目录
ngx_http_core_module.html/root
http://nginx.org/en/docs/http/ngx_http_core_module.html#root
Syntax:    root path;
Default: root html;
Context: http, server, location, if in location
root 设置请求的根目录。例如有下面的配置块
location /i/ {
    root /data/w3;
}
则请求 /i/top.gif 时会返回 /data/w3/i/top.gif 文件。
root 指定项目的根目录,可在多个层级中配置。如果内层 locaiton 没有指定,会往其外层的 server 或 http 中寻找继承。
1、对于匹配后的 url 地址,将匹配的 location 中的 root 路径替换访问 url 的 host 即得到文件的真实地址。(多个斜杠其实等价于一个斜杠)
2、如果不匹配 location,则寻找更外层的 root 做替换。
3、root 指令最后的斜杠可加可不加。
Nginx静态服务配置—详解root和alias指令
https://www.jianshu.com/p/4be0d5882ec5
404 Not Found错误
一开始我把root目录配置为 ~/git/madaimeng 每次都提示 404 ,后来改为 /home/ec2-user/git/madaimeng 绝对路径就不报这个错误了。
server {
    listen       80;
    server_name  devgou.com www.devgou.com;

    location / {
          root   ~/git/madaimeng;
          index  index.html;
    }
}
alias
http://nginx.org/en/docs/http/ngx_http_core_module.html#alias
Syntax:    alias path;
Default:    —
Context:    location
root和alias
alias后跟的指定目录是准确的,并且末尾必须加“/”,否则找不到文件
root后跟的指定目录是上级目录,并且该上级目录下要含有和location后指定名称的同名目录才行,末尾“/”加不加无所谓。
一般情况下,在location /中配置root,在location /other中配置alias是一个好习惯
error_page
http://nginx.org/en/docs/http/ngx_http_core_module.html#error_page
Syntax:    error_page code ... [=[response]] uri;
Default:    —
Context:    http, server, location, if in location
try_files
http://nginx.org/en/docs/http/ngx_http_core_module.html#try_files
Syntax:    try_files file ... uri;
        try_files file ... =code;
Default:    —
Context:    server, location
按照指定顺序检查文件或文件夹(结尾加斜线表示匹配文件夹)是否存在,并使用第一个找到的文件进行请求处理。
查找路径是按照给定的root或alias为根路径来查找的
如果给出的file都没有匹配到,则进行一个内部重定向到最后一个uri参数,最后一个参数可以指向一个命名地址(named location)或响应码(code)
如果最后一个参数是uri,则给出的file都没有匹配到时重定向到新的location进行匹配
如果最后一个参数是 =code, 则给出的file都没有匹配到时返回404响应码
例如
location /images/ {
    root /opt/html/;
    try_files $uri $uri/  /images/default.gif;
}
请求 127.0.0.1/images/test.gif 会依次查找
1、文件/opt/html/images/test.gif
2、文件夹 /opt/html/images/test.gif/下的index文件
3、请求127.0.0.1/images/default.gif
client_body_buffer_size
http://nginx.org/en/docs/http/ngx_http_core_module.html#client_body_buffer_size
Syntax:    client_body_buffer_size size;
Default: client_body_buffer_size 8k|16k;
Context: http, server, location
此指令设置用于 request body 的缓冲区大小。
如果 request body 超过缓冲区大小,则完整 body 或其一部分将写入临时文件。
如果 NGINX 配置为使用文件而不是内存缓冲区,则该指令会被忽略。
默认情况下,缓冲区大小是 2 倍内存页大小,在 x86 32 位系统中会设置一个 8k 大小的缓冲区,在 x64 64 位系统中会设置一个 16k 大小的缓冲区。
无client_body_temp权限导致请求体较大时500
这个问题是我在给 git 添加 webhooks 时出现的。
添加后每次 push 代码总是回调 webhooks 接口失败,但我自己通过 curl 或浏览器访问就能成功, 看了看 nginx error 日志
2019/08/29 16:38:52 [crit] 9611#0: *6500 open() "/var/lib/nginx/tmp/client_body_temp/0000000012" failed (13: Permission denied), client: 118.25.132.68, server: webhooks.devgou.com, request: "POST /pull/madaimeng HTTP/1.1", host: "webhooks.devgou.com"
原因:
我自己访问时没有请求体,coding 上回调时请求体很大,貌似把整个 diff 内容都发过去了,超过了 client_body_buffer_size 限制时 nginx 会用文件暂存较大的 body 请求体,client_body_temp 目录就是存放暂存 body 文件的,但没有 client_body_temp 目录的权限所以报错了。
解决方法sudo chmod -R 775 /var/lib/nginx
client_body_temp_path
http://nginx.org/en/docs/http/ngx_http_core_module.html#client_body_temp_path
Syntax:    client_body_temp_path path [level1 [level2 [level3]]];
Default: client_body_temp_path client_body_temp;
Context:    http, server, location
定义客户端 request body 临时文件存储目录,目录下最多 3 级子目录会被使用,例如如下配置:
client_body_temp_path /spool/nginx/client_temp 1 2;
则子目录可能是:
/spool/nginx/client_temp/7/45/00000123457
默认值是当前目录下的 client_body_temp 目录
client_max_body_size
Syntax:    client_max_body_size size;
Default: client_max_body_size 1m;
Context: http, server, location
此指令设置 NGINX 能处理的最大 request body 大小。
如果请求大于指定的大小,则 NGINX 发回 413 (Request Entity Too Large) 错误。
如果服务器处理大文件上传,则该指令非常重要。
默认情况下,该指令值为 1m
413 Request Entity Too Large
请求 body 大于 client_max_body_size 时会报 413 Request Entity Too Large 错误,改大这个配置即可,设为 0 可禁用 body 大小检查。
比如改为 20 MB, 在 http 配置块中加入如下配置:
client_max_body_size 20m;
http://nginx.org/en/docs/http/ngx_http_core_module.html#client_max_body_size
client_header_buffer_size
Syntax:    client_header_buffer_size size;
Default: client_header_buffer_size 1k;
Context: http, server
此指令与 client_body_buffer_size 类似,它为请求头分配一个缓冲区。
如果请求头大小大于指定的缓冲区,则使用 large_client_header_buffers 指令分配更大的缓冲区。
大部分情况 1KB 大小足够
http://nginx.org/en/docs/http/ngx_http_core_module.html#client_header_buffer_size
large_client_header_buffers
Syntax:    large_client_header_buffers number size;
Default: large_client_header_buffers 4 8k;
Context: http, server
此指令规定了用于读取大型客户端请求头的缓冲区的最大数量和大小。
这些缓冲区仅在缺省缓冲区不足时按需分配。
当处理请求或连接转换到保持活动状态时,释放缓冲区。
http://nginx.org/en/docs/http/ngx_http_core_module.html#large_client_header_buffers
先根据 client_header_buffer_size 配置的值分配一个buffer,如果分配的buffer无法容纳 request_line/request_header
那么就会再次根据 large_client_header_buffers 配置的参数分配large_buffer
如果 large_buffer 还是无法容纳,那么就会返回 414 (Request-URI Too Large)(处理request_line)/ 400 (Bad Request)(处理request_header)错误。
414 Request-URI Too Large
当 http 的 URI 太长或者 request header 过大时会报 414 Request URI too large 或 400 bad request 错误。
解决方法有:
1、修改 Nginx 网关 header 大小
2、改用 post 方法查询,过长的入参放到 body 中
3、减少入参长度,改多次调用
<html>
    <head>
        <title>414 Request-URI Too Large</title>
    </head>
    <body bgcolor="white">
        <center>
            <h1>414 Request-URI Too Large</h1>
        </center>
        <hr>
        <center>openresty/1.13.6.1</center>
    </body>
</html>
在 nginx 的 nginx.conf 修改如下参数的:
# 客户端请求头缓冲区大小,如果请求头总长度大于小于 128k 则使用此缓冲区,
# 请求头总长度大于 128k 时使用 large_client_header_buffers 设置的缓存区
client_header_buffer_size 128k;

# large_client_header_buffers 指令参数 4 为个数,128k 为大小,默认是 8k。申请4个128k。
large_client_header_buffers 4 128k;
ngx_http_headers_module
add_header 设置响应头
http://nginx.org/en/docs/http/ngx_http_headers_module.html#add_header
Syntax: add_header name value [always];
Default: —
Context: http, server, location, if in location
add_header 用于设置响应头,proxy_set_header 用于设置请求头,注意区别。
仅当当前层级中没有add_header指令才会继承父级设置。
这是Nginx的故意行为,http、server和location三处均可配置add_header,但起作用的是最接近的配置,往上的配置都会失效。
ngx_http_index_module
Module ngx_http_index_module
http://nginx.org/en/docs/http/ngx_http_index_module.html
ngx_http_index_module 模块处理以斜线 / 结尾的请求,这些请求也可以被 ngx_http_autoindex_module 和 ngx_http_random_index_module 模块处理。
index
Syntax:    index file ...;
Default: index index.html;
Context:    http, server, location
index 指令定义可作为主页的一个或多个文件。其中的 file 文件名中可以包含变量。
index 可以指定多个文件,按指定的顺序依次检查这些文件,最后一个文件可以配置成一个兜底的绝对路径文件,例如
index index.$geo.html index.0.html /index.html;
注意使用 index 文件可能引起内部重定向,请求可以在不同的 location 中处理,例如,有下面的配置:
location = / {
    index index.html;
}

location / {
    ...
}
则请求 / 最终会在第二个 location 中作为 /index.html 处理。
nginx的初始页选择策略
Nginx 给了三种方式来选择初始页,三种方式按照顺序来执行:
- ngx_http_random_index_module 模块,从给定的目录中随机选择一个文件作为初始页,而且这个动作发生在 ngx_http_index_module 之前,注意:这个模块默认情况下没有被安装,需要在安装时提供配置参数
--with-http_random_index_module - ngx_http_index_module 模块,根据 index 指令规则来选择初始页;
- ngx_http_autoindex_module 模块,可以使用指定方式,根据给定目录中的文件列表自动生成初始页,这个动作发生在 ngx_http_index_module 之后,即只有通过 index 指令无法确认初始页,此时启用后的自动生成模块才会被使用。
ngx_http_rewrite_module
http://nginx.org/en/docs/http/ngx_http_rewrite_module.html
rewrite
http://nginx.org/en/docs/http/ngx_http_rewrite_module.html#rewrite
Syntax: rewrite regex replacement [flag];
Default: —
Context: server, location, if
rewrite 只是会改写 uri,不会改动查询参数(?id=5&key=33),所以无需关心查询参数,rewrite 会自动添加到 uri 之后
在 server 块下,rewrite部分优先于location块被匹配。
flag参数
last 相当于Apache里的(L)标记,表示结束当前rewrite指令并重新搜索location匹配;break 本条规则匹配完成后,终止匹配,不再匹配后面的规则,也不在匹配其他locationredirect 返回302临时重定向,浏览器地址会显示跳转后的URL地址permanent 返回301永久重定向,浏览器地址栏会显示跳转后的URL地址
last和break用来实现URL重写,浏览器地址栏URL地址不变
last与break的区别
1、server中的rewrite break和last没什么区别,都会去匹配location,所以没必要用last再发起新的请求,可以留空。
2、location中的rewirte:
不写last和break - 那么流程就是依次执行这些rewrite
rewrite break - url重写后,直接使用当前资源,不再执行location里余下的语句,完成本次请求,地址栏url不变
rewrite last - url重写后,马上发起一个新的请求,再次进入server块,重试location匹配,超过10次匹配不到报500错误,地址栏url不变
捕获变量
如果 regex 中使用了某种匹配模式,并且模式串里面带括号,那么表示会捕捉(capture)括号括起来的模式匹配到的字符串,
并将捕捉到的字符串依次设为变量$1,$2,…,然后在 replacement 中就可以使用这些变量了。
rewrite后去掉参数或改变参数
http://blog.sina.com.cn/s/blog_64e2219d01018lbr.html
关键点就在于“?”这个尾缀,重定向的目标地址结尾处如果加了?号,则不会在目标地址后添加源url中问号后的参数。
例如:
把http://example.com/test.php?para=xxx 重定向到http://example.com/new
若按照默认的写法:rewrite ^/test.php(.) /new permanent;
重定向后的结果是:http://example.com/new?para=xxx
如果改写成:rewrite ^/test.php(.) /new? permanent;
那结果就是:http://example.com/new
保留特定参数
假如又想保留某个特定的参数,那又该如何呢?
可以利用Nginx本身就带有的$arg_PARAMETER参数自行补充来实现。
例如:
把 http://example.com/test.php?para=xxx&p=xx
重写向到 http://example.com/new.php?p=xx
可以写成:rewrite ^/test.php /new.php?p=$arg_p? permanent;
if语法
http://nginx.org/en/docs/http/ngx_http_rewrite_module.html#if
Syntax:    if (condition) { ... }
Default:    —
Context:    server, location
对给定的条件condition进行判断。如果为真,大括号内的指令将被执行。
注意:nginx里没有 else 语法
if条件(conditon)可以是如下任何内容:
正则表达式匹配
$arg 一个变量名;变量是空字符串或者以0开始的字符串则为false;=:用来判断相等,用于字符串的比较~:与指定正则表达式模式匹配时返回true,区分大小写;~*:与指定正则表达式模式匹配时返回true,不区分大小写;!~:与指定正则表达式模式不匹配时返回true,区分大小写;!~*:与指定正则表达式模式不匹配时返回true,不区分大小写;
文件及目录匹配判断
-f, !-f:判断指定的路径是否为存在且为文件;-d, !-d:判断指定的路径是否为存在且为目录;-e, !-e:判断指定的路径是否存在,文件或目录均可;-x, !-x:判断指定路径的文件是否存在且可执行;
不建议在location中使用if指令
官方不建议在 location 配置块中使用 if 指令,会有问题,详见下面的官方说明
If is Evil… when used in location context
https://www.nginx.com/resources/wiki/start/topics/depth/ifisevil/
ngx_http_map_module
Module ngx_http_map_module
http://nginx.org/en/docs/http/ngx_http_map_module.html
map指令
Syntax:    map string $variable { ... }
Default:    —
Context:    http
map 指令是由 ngx_http_map_module 模块提供的,默认情况下安装 nginx 都会安装该模块。
map 的主要作用是创建自定义变量,通过使用 nginx 的内置变量,去匹配某些特定规则,如果匹配成功则设置某个值给自定义变量。 而这个自定义变量又可以作于他用。
map 指令的作用是根据客户端请求中的值,来构造改变 $variable 的值,即根据变量的值创建新的变量 $variable,创建的规则就是 {} 里面的东西,若无匹配则使用 default 对应的值。
例如:匹配请求 url 的参数 $args,如果参数是 debug 则设置 $foo = 1 ,默认设置 $foo = 0
map $args $foo {
    default 0;
    debug   1;
}
解释:$args 是 nginx 内置变量,就是获取的请求 url 的参数。 如果 $args 匹配到 debug 那么 $foo 的值会被设为 1 ,如果 $args 一个都匹配不到 $foo 就是default 定义的值,在这里就是 0
map 语法
map $var1 $var2 {...}
map 的 $var1 为源变量,通常可以是 nginx 的内置变量,$var2 是自定义变量。 $var2 的值取决于 $var1 在对应表达式的匹配情况。 如果一个都匹配不到则 $var2 就是 default 对应的值。
map 在 Nginx 配置文件中的作用段是 http{} ,注意不能写在 server{} 否则会报错
map 指令的三个参数:
1、default : 指定源变量匹配不到任何表达式时将使用的默认值。当没有设置 default,将会用一个空的字符串作为默认的结果。
2、hostnames : 允许用前缀或者后缀掩码指定域名作为源变量值。这个参数必须写在值映射列表的最前面。
3、include : 包含一个或多个含有映射值的文件。
一个正则表达式如果以 ~ 开头,表示这个正则表达式对大小写敏感。以 ~* 开头,表示这个正则表达式对大小写不敏感。
实例(二)
使用源变量(通常是 nginx 内置变量)匹配一些规则,创建自定义变量,然后在页面输出. 这通常在调试的时候非常有用
http {
  map $uri $match {
      ~^/hello/(.*) http://www.hello.com/;
  }
  server {
    listen       8080;
    server_name  test.hello.com;

    location /hello {
            default_type text/plain;
            echo uri: $uri;
            echo match: $match;
            echo capture: $1;
            echo new: $match$1;
    }
  }
}
Nginx map 使用详解
http://blog.51cto.com/tchuairen/2175525
ngx_http_log_module
nginx日志格式
log_format
http://nginx.org/en/docs/http/ngx_http_log_module.html#log_format
$request_time
请求处理时间,单位秒。
代表 Nginx 从收到客户端请求、到发送完响应的整个时间。
如果 Nginx 本身接受用户请求花了比较久的时间,比如用户 POST 比较大的文件数据,那么少说得好几秒吧,这时 request_time 就反应不了后端 Upstream 的运行情况了。
nginx日志打印指定header
和 header 变量一样,$http_HEADER 表示某个请求头,直接加在 log_format 里即可。
例如在每行日志最后打印 header path 和 param, log_format 中增加 '"$http_path" "$http_param"'
log_format  main  '$remote_addr - $remote_user [$time_local] "$request" '
                  '$status $body_bytes_sent "$http_referer" '
                  '"$http_user_agent" "$http_x_forwarded_for"'
                  '"$http_path" "$http_param"';
$upstream_response_time
这个变量由 ngx_http_upstream_module 模块提供,表示 upstream 处理请求的时间。
ngx_http_upstream_module
http://nginx.org/en/docs/http/ngx_http_upstream_module.html#variables
nginx开启debug日志
官方文档
http://nginx.org/en/docs/debugging_log.html
中文翻译
https://docshome.gitbook.io/nginx-docs/readme/tiao-shi-ri-zhi
nginx想要开启debug日志首先要保证 debug 模块被编译到nginx中,如果是手动编译安装,可以增加配置项 ./configure --with-debug ...
然后再nginx配置中开启 error_log /path/to/log debug;
如果是安装编译好的nginx包,则依赖于此包是否含有debug日志模块。
查看安装的nginx是否支持debug日志,执行 nginx -V
输出结果 configure arguments 中包含 --with-debug ... 则代表nginx含有debug日志模块,可以开启debug日志。
Nginx 变量
Alphabetical index of variables
http://nginx.org/en/docs/varindex.html
binary_remote_addr #二进制的客户地址。
body_bytes_sent    #响应时送出的body字节数数量。即使连接中断,这个数据也是精确的。
content_length     #请求头中的Content-length字段。
content_type       #请求头中的Content-Type字段。
cookie_COOKIE      #cookie COOKIE变量的值
document_root      #当前请求在root指令中指定的值。
document_uri       #与uri相同。
host               #请求主机头字段,否则为服务器名称。
hostname           #Set to the machine’s hostname as returned by gethostname

http_HEADER
is_args            #如果有args参数,这个变量等于”?”,否则等于”",空值。
http_user_agent    #客户端agent信息
http_cookie        #客户端cookie信息
limit_rate         #这个变量可以限制连接速率。
query_string       #与args相同。
request_body_file  #客户端请求主体信息的临时文件名。
request_method     #客户端请求的动作,通常为GET或POST。
remote_addr        #客户端的IP地址。
remote_port        #客户端的端口。
remote_user        #已经经过Auth Basic Module验证的用户名。
request_completion #如果请求结束,设置为OK. 当请求未结束或如果该请求不是请求链串的最后一个时,为空(Empty)。
request_method     #GET或POST
request_filename   #当前请求的文件路径,由root或alias指令与URI请求生成。
request_uri        #包含请求参数的原始URI,不包含主机名,如:”/foo/bar.php?arg=baz”。不能修改。
scheme             #HTTP方法(如http,https)。
server_protocol    #请求使用的协议,通常是HTTP/1.0或HTTP/1.1。
server_addr        #服务器地址,在完成一次系统调用后可以确定这个值。
server_name        #服务器名称。
server_port        #请求到达服务器的端口号
$request_method 请求的http方法
客户端请求的http方法,通常为GET或POST。
http://nginx.org/en/docs/http/ngx_http_core_module.html#var_request_method
$args 所有query参数
args 这个变量等于请求行中(GET请求)的参数,例如foo=123&bar=blahblah;
http://nginx.org/en/docs/http/ngx_http_core_module.html#var_args
$arg_PARAMETER 某个query参数
在 ngx_lua 中访问 Nginx 内置变量 ngx.var.arg_PARAMETER 即可获得 query 参数的内容。
在 nginx 配置中,通过 $arg_PARAMETER 即可获得 query 参数的内容。
例如 http://example.com/test.php?id=5&key=33 则 $arg_id 的值为5, $arg_key 的值为33
http://nginx.org/en/docs/http/ngx_http_core_module.html#var_arg_
$http_HEADER 某个请求头
在 ngx_lua 中访问 Nginx 内置变量 ngx.var.http_HEADER 即可获得请求头 HEADER 的内容。
在 nginx 配置中,通过 $http_HEADER 即可获得请求头 HEADER 的内容。
比如“双网关统一转发方案”中,用 $http_path 获取 path 头,用 $http_param 获取 param 头
http://nginx.org/en/docs/http/ngx_http_core_module.html#var_http_
问题
nginx content-length丢失
Accept-Encoding 和 Content-Encoding 是 HTTP 中用来对「采用何种编码格式传输正文」进行协定的一对头部字段。
浏览器发送请求时,通过Accept-Encoding带上自己支持的内容编码格式列表,服务端从中挑选一种用来对内容编码,编好码的数据就放在实体主体中,再通过Content-Encoding响应头指明选定的格式,浏览器拿到相应正文后再依据Content-Encoding进行解压。
Content-Length首部指示出报文实体主体的字节大小,这个大小是包含了所有内容编码的。比如对文本文件进行了gzip压缩的话,Content-Length首部就是压缩后的大小,而不是原始大小。
另外Content-Length首部对于长连接是必不可少的,长连接代表在连接期间会有多个http请求响应在排队,而服务器不能够关闭连接,客户端只能通过Content-Length知道一条报文在哪里结束,下一条报文在哪里开始。
除非使用了分块编码 Transfer-Encoding: chunked,否则响应头首部必须使用 Content-Length 首部
传输编码和分块编码
分块编码把「报文」分割成若干个大小已知的块,块之间是紧挨着发送的,这样就不需要在发送之前知道整个报文的大小了。(也意味着不需要写回Content-Length首部了)
当使用持久连接时,在服务器写主体之前,必须知道它的大小并在Content-Length首部中发送。如果服务器动态创建内容,可能在发送之前无法知道主体大小,分块编码就是为了解决这种情况。服务器把主体逐块发送,说明每一块的大小。服务器再用大小为0的块作为结束块。,为下一个响应做准备。
http响应头首部Content-Length
https://segmentfault.com/a/1190000006194778
Http协议之Content-Length
https://blog.51cto.com/nxlhero/1868483
nginx http 499 错误码
rfc2616 (也就是HTTP/1.1协议)中,400~500间的错误码仅定义到了417,所以499是nginx自己定义的。
nginx 源码中,499 对应的是 client has closed connection
很有可能是因为服务器端处理的时间过长,客户端关闭了连接。
Nginx 499 error codes
https://stackoverflow.com/questions/12973304/nginx-499-error-codes
nginx配置相关问题
[emerg] invalid parameter “server_name”
nginx -t -c nginx.conf 提示
nginx: [emerg] invalid parameter “server_name” in /usr/local/etc/nginx/nginx.conf:
对应的配置段如下
server {
    listen       8081
    server_name  localhost;

    ... ...
}
原因很简单,就是因为 server_name 上一行的末尾没有分号
invalid parameter server_name in /etc/nginx/sites-enabled/django
https://stackoverflow.com/questions/42181879/invalid-parameter-server-name-in-etc-nginx-sites-enabled-django
no resolver defined to resolve localhost
如果 proxy_pass 语句中没有变量,nginx 会在启动和reload时使用 gethostbyaddr 系统调用来解析域名,并永久的缓存解析结果。
如果 proxy_pass 语句中有变量,需要给 nginx 配置一个解析器 resolver 来进行域名解析。
location ^~ /freegeoip/ {
  #use google as dns
  resolver 8.8.8.8;
  proxy_pass http://freegeoip.net/json/$remote_addr;
}
https://stackoverflow.com/questions/17685674/nginx-proxy-pass-with-remote-addr
下一篇 Spring-Test
页面信息
location:protocol: host: hostname: origin: pathname: href: document:referrer: navigator:platform: userAgent: