Spring-Web
Spring web 笔记
SpringMVC 的路径匹配规则
Spring Boot 2.6 及以上默认路劲的匹配规则是 PATH_PATTERN_PARSER
Spring Fox/Swagger 使用的路径匹配是基于 ANT_PATH_MATCHER
Spring Boot 2.6 引入枚举 MatchingStrategy
public static enum MatchingStrategy {
    ANT_PATH_MATCHER,
    PATH_PATTERN_PARSER;

    private MatchingStrategy() {
    }
}
ANT_PATH_MATCHER 对应 org.springframework.util.AntPathMatcher
PATH_PATTERN_PARSER 对应 RequestMappingInfoHandlerMapping
AntPathMatcher Ant风格匹配策略
? 匹配1个字符,并且不能是代表路径分隔符的/* 匹配0个或多个字符,但是不能是路径** 匹配路径中的0个或多个目录{spring:[a-z]+} 将正则表达式 [a-z]+ 匹配到的值,赋值给名为 spring 的路径变量。
https://www.cnblogs.com/syp172654682/p/9257282.html
PATH_PATTERN_PARSER
PATH_PATTERN_PARSER是一种更复杂的匹配策略,它支持更多的条件匹配,例如:
请求方法匹配(例如 GET、POST 等)。
请求头匹配(例如 Content-Type、Accept 等)。
请求参数匹配(例如 ?name=value)。
HandlerInterceptor Spring拦截器
SpringWebMVC 的处理器拦截器,类似于 Servlet 开发中的过滤器 Filter ,用于处理器进行预处理和后处理。
应用场景
1、日志记录:记录请求信息的日志,以便进行信息监控、信息统计、计算PV(Page View)等。
2、权限检查:如登录检测,进入处理器检测检测是否登录,如果没有直接返回到登录页面;
3、性能监控:有时候系统在某段时间莫名其妙的慢,可以通过拦截器在进入处理器之前记录开始时间,在处理完后记录结束时间,从而得到该请求的处理时间(如果有反向代理,如apache可以自动记录);
4、通用行为:读取cookie得到用户信息并将用户对象放入请求,从而方便后续流程使用,还有如提取Locale、Theme信息等,只要是多个处理器都需要的即可使用拦截器实现。
HandlerInterceptor
preHandle(请求处理前)
boolean preHandle(HttpServletRequest request, HttpServletResponse response, Object handler) throws Exception
预处理回调方法,实现处理器的预处理(如检查登陆),第三个参数为响应的处理器也就是controller类
在preHandle中,可以进行编码、安全控制等处理;
返回值:true表示继续流程(如调用下一个拦截器或处理器);false表示流程中断(如登录检查失败),不会继续调用其他的拦截器或处理器,此时我们需要通过response来产生响应;
调用时机:通过 HandlerMapping 找到了具体的处理器(handler),也就是 controller 类,但还没正式开始处理之前。
postHandle(视图渲染前)
void postHandle(HttpServletRequest request, HttpServletResponse response, Object handler, ModelAndView modelAndView) throws Exception
后处理回调方法,实现处理器的后处理(但在渲染视图之前),此时我们可以通过modelAndView(模型和视图对象)对模型数据进行处理或对视图进行处理,modelAndView也可能为null。
在postHandle中,有机会修改ModelAndView;
调用时机:handler 完成了处理,但还没渲染视图。
afterCompletion(视图渲染后)
void afterCompletion(HttpServletRequest request, HttpServletResponse response, Object handler, Exception ex) throws Exception;
整个请求处理完毕回调方法,即在视图渲染完毕时回调,如性能监控中我们可以在此记录结束时间并输出消耗时间,还可以进行一些资源清理,类似于try-catch-finally中的finally,但仅调用处理器执行链中
在afterCompletion中,可以根据ex是否为null判断是否发生了异常,进行日志记录。
调用时机:handler 完成了处理,且完成视图渲染。
package org.springframework.web.servlet;

import javax.servlet.http.HttpServletRequest;
import javax.servlet.http.HttpServletResponse;

import org.springframework.lang.Nullable;
import org.springframework.web.method.HandlerMethod;

public interface HandlerInterceptor {
    boolean preHandle(HttpServletRequest request, HttpServletResponse response, Object handler)
            throws Exception;

    void postHandle(
            HttpServletRequest request, HttpServletResponse response, Object handler, ModelAndView modelAndView)
            throws Exception;

    void afterCompletion(
            HttpServletRequest request, HttpServletResponse response, Object handler, Exception ex)
            throws Exception;
}
HandlerInterceptorAdapter 拦截器适配器(5.3+废弃)
有时候我们可能只需要实现三个回调方法中的某一个,如果实现 HandlerInterceptor 接口的话,三个方法必须实现,不管你需不需要,此时spring提供了一个HandlerInterceptorAdapter适配器(一种适配器设计模式的实现),允许我们只实现需要的回调方法。
从 Spring 5.3 开始不建议再使用 HandlerInterceptorAdapter,建议直接实现 HandlerInterceptor 接口,HandlerInterceptor 内部的3个方法都加了默认实现,所以也不需要实现全部3个方法。
Deprecated as of 5.3 in favor of implementing HandlerInterceptor and/ or AsyncHandlerInterceptor directly.
package org.springframework.web.servlet.handler;

import javax.servlet.http.HttpServletRequest;
import javax.servlet.http.HttpServletResponse;

import org.springframework.lang.Nullable;
import org.springframework.web.servlet.AsyncHandlerInterceptor;
import org.springframework.web.servlet.ModelAndView;

public abstract class HandlerInterceptorAdapter implements AsyncHandlerInterceptor {

    @Override
    public boolean preHandle(HttpServletRequest request, HttpServletResponse response, Object handler)
            throws Exception {

        return true;
    }

    @Override
    public void postHandle(HttpServletRequest request, HttpServletResponse response, Object handler,
            @Nullable ModelAndView modelAndView) throws Exception {
    }

    @Override
    public void afterCompletion(HttpServletRequest request, HttpServletResponse response, Object handler,
            @Nullable Exception ex) throws Exception {
    }

    @Override
    public void afterConcurrentHandlingStarted(HttpServletRequest request, HttpServletResponse response,
            Object handler) throws Exception {
    }
}
afterConcurrentHandlingStarted 不是HandlerInterceptor的接口实现,是AsyncHandlerInterceptor的,AsyncHandlerInterceptor实现了HandlerInterceptor
处理器拦截器(HandlerInterceptor)详解
https://www.jianshu.com/p/1e8d088c2be9
注册拦截器到Spring
有了拦截器 MyInterceptor,还需要对拦截器进行注册。需要使用 WebMvcConfigurerAdapter 下的 addInterceptors() 方法
package com.masikkk.common.config;

import com.masikkk.common.web.LogInterceptor;
import org.springframework.beans.factory.annotation.Autowired;
import org.springframework.context.annotation.ComponentScan;
import org.springframework.context.annotation.Configuration;
import org.springframework.web.servlet.config.annotation.InterceptorRegistry;
import org.springframework.web.servlet.config.annotation.WebMvcConfigurer;

/**
 * Spring MVC 配置
 */
@ComponentScan(basePackages = {"com.masikkk.common.web", "com.masikkk.common.helper"})
@Configuration
public class SpringWebMvcConfig implements WebMvcConfigurer {
    @Autowired
    private LogInterceptor logInterceptor;

    @Autowired
    private AuthHandlerInterceptor authHandlerInterceptor;

    @Override
    public void addInterceptors(InterceptorRegistry registry) {
        registry.addInterceptor(logInterceptor);
        // 指定 url 模式匹配
        registry.addInterceptor(authHandlerInterceptor).addPathPatterns("/user/**", "/account/xx");
    }
}
多个拦截器的执行顺序
SpringMVC 中的 Interceptor 是链式的调用的,在一个应用中或者说是在一个请求中可以同时存在多个 Interceptor 。每个 interceptor 的调用会依据它的声明顺序依次执行,而且最先执行的都是 Interceptor 中的 preHandle 方法
1、按 registry.addInterceptor() 加入的先后顺序执行所有拦截器的 preHandle 方法
2、请求处理完后,按倒序执行所有 postHandle 方法
3、按倒序执行所有 afterCompletion 方法
@Configuration
public class MyAdapter implements WebMvcConfigurer {

    @Resource
    private FirstInterceptor firstInterceptor;

    @Resource
    private SecondInterceptor secondInterceptor;

    @Resource
    private ThirdInterceptor thirdInterceptor;

    @Override
    public void addInterceptors(InterceptorRegistry registry) {
        registry.addInterceptor(firstInterceptor).addPathPatterns("/**");
        registry.addInterceptor(secondInterceptor).addPathPatterns("/**");
        registry.addInterceptor(thirdInterceptor).addPathPatterns("/**");
    }
}
执行顺序为
firstInterceptor 的 preHandle
secondInterceptor 的 preHandle
thirdInterceptor 的 preHandle
thirdInterceptor 的 postHandle
secondInterceptor 的 postHandle
firstInterceptor 的 postHandle
thirdInterceptor 的 afterCompletion
secondInterceptor 的 afterCompletion
firstInterceptor 的 afterCompletion
记录请求处理时间
实现分析:
1、在进入处理器之前记录开始时间,即在拦截器的preHandle记录开始时间;
2、在结束请求处理之后记录结束时间,即在拦截器的afterCompletion记录结束实现,并用结束时间-开始时间得到这次请求的处理时间。
问题:
我们的拦截器是单例,因此不管用户请求多少次都只有一个拦截器实现,即线程不安全,那我们应该怎么记录时间呢?
解决方案是使用ThreadLocal,它是线程绑定的变量,提供线程局部变量(一个线程一个ThreadLocal,A线程的ThreadLocal只能看到A线程的ThreadLocal,不能看到B线程的ThreadLocal)。
public class StopWatchHandlerInterceptor extends HandlerInterceptorAdapter {
    private NamedThreadLocal<Long>  startTimeThreadLocal = new NamedThreadLocal<Long>("StopWatch-StartTime");

    @Override
    public boolean preHandle(HttpServletRequest request, HttpServletResponse response, Object handler) throws Exception {
        long beginTime = System.currentTimeMillis();//1、开始时间
        startTimeThreadLocal.set(beginTime);//线程绑定变量(该数据只有当前请求的线程可见)
        return true;//继续流程
    }

    @Override
    public void afterCompletion(HttpServletRequest request, HttpServletResponse response, Object handler, Exception ex) throws Exception {
        long endTime = System.currentTimeMillis();//2、结束时间
        long beginTime = startTimeThreadLocal.get();//得到线程绑定的局部变量(开始时间)
        long consumeTime = endTime - beginTime;//3、消耗的时间
        if(consumeTime > 500) {//此处认为处理时间超过500毫秒的请求为慢请求
            //TODO 记录到日志文件
            System.out.println(String.format("%s consume %d millis", request.getRequestURI(), consumeTime));
        }
    }
}
Spring MVC学习(五)——-处理器拦截器详解
http://blog.51cto.com/3001448/1205771
ContentCachingRequestWrapper
请求 body 输入流只能读取一次问题
Spring MVC 提供了 ContentCachingRequestWrapper 类,旨在解决请求 body 输入流只能读取一次问题的问题。它是原始 HttpServletRequest 对象的包装。
当我们读取请求正文时,ContentCachingRequestWrapper 会缓存内容供以后使用。
注意:
1、requestWrapper.getContentAsByteArray() 必须是在 request.inputStream() 的内容使用过后才能缓存请求中 body 的内容,下次需要再使用 body 只能使用此方法requestWrapper.getContentAsByteArray() 才能再次获取body中的值。
所以,在 HandlerInterceptor 拦截器中提前使用 requestWrapper.getContentAsByteArray() 是获取不到值的,因为 inputStream 还没被消费。
2、如果在 HandlerInterceptor 拦截器中,使用了 request.inputStream() 输入流中的内容,那么在控制层 @RequestBody 标记的内容就获取不到任何内容了,因为 @RequestBody 是从request.getInputStream() 中获取内容的。但是此 inputStream 已经关闭了。
所以 ContentCachingRequestWrapper 本身也不太好用。
在 SpringBoot 中进行签名验证时,如果需要 body 参与签名,直接使用 @RequestBody bean json序列化的话经常有问题:null值是否序列化,key是否排序,最好是直接从 ServletRequest 中获取原始 body str,但 ServletRequest body 有只能读取一次的问题,需要特别注意
Java签名验证、request body数据多次读取(request body数据用以签名时注意问题)、Content-Type
https://blog.csdn.net/ldw201510803006/article/details/94911389
Http Servlet request lose params from POST body after read it once
https://stackoverflow.com/questions/10210645/http-servlet-request-lose-params-from-post-body-after-read-it-once
@ControllerAdvice 加 @ExceptionHandler 进行异常统一处理
@ControllerAdvice 是 spring3.2 提供的新注解,从名字上可以看出大体意思是控制器增强。
该注解使用 @Component 注解,这样的话当我们使用context:component-scan扫描时也能扫描到
即把 @ControllerAdvice 注解内部使用 @ExceptionHandler、@InitBinder、@ModelAttribute 注解的方法应用到所有的 @RequestMapping 注解的方法。非常简单,不过只有当使用@ExceptionHandler 最有用,另外两个用处不大。
@ExceptionHandler 指明要捕获的异常
@ExceptionHandler 注解的方法就当做一个处理异常的Controller,可以返回自定义的错误response
/**
 * 处理UdsException
 * @param e
 * @param httpServletRequest
 * @return
 */
@ResponseBody
@ExceptionHandler({UdsRuntimeException.class})
@ResponseStatus(HttpStatus.OK)
public UdsHttpResponse handleServerError(UdsRuntimeException e, HttpServletRequest httpServletRequest) {
    logger.warn("[Handled] Uds exception", e);
    falconClient.avgByTime("uds_exception_count", 1, 30);
    return constructResponse(UdsHttpResponse.createFailedResponse(e.getErrorCode(), e.getMessage(), e.getData()),
            httpServletRequest);
}
Spring3.2新注解@ControllerAdvice
http://jinnianshilongnian.iteye.com/blog/1866350
Spring MVC中@ControllerAdvice注解实现全局异常拦截
https://www.cnblogs.com/EasonJim/p/7887646.html
@ControllerAdvice 只对某些类生效
设置 basePackageClasses 即可使 @ControllerAdvice 仅对指定的类生效,例如:
@ControllerAdvice(basePackageClasses = {UserService.class, AddressService.class})
@Around比@ExceptionHandler先拦截到异常
RequestContextHolder 线程隔离的http请求上下文Holder
Spring 提供的保存请求信息的一套静态方法
用于保存请求信息的 requestAttributesHolder 是 ThreadLocal 的,所以能保证并发有多个请求时,在每个请求的处理过程中获取的是当前请求线程的request信息
获取当前http请求信息
在使用 spring 框架的任意方法中通过下面两行代码都能获取当前http请求信息
ServletRequestAttributes servletRequestAttributes = (ServletRequestAttributes) RequestContextHolder.getRequestAttributes();
HttpServletRequest request = servletRequestAttributes.getRequest();
开启子线程继承属性
假如在Service中开启了一个新的线程,在新的线程中使用
RequestAttributes ra = RequestContextHolder.getRequestAttributes();
获取出来为null,因为默认情况下没有开启 RequestContextHolder 的子线程继承属性。
只要在开启新线程之前,将RequestAttributes对象设置为子线程共享即可,setRequestAttributes() 方法的第二个参数设为true表示开启子线程共享
ServletRequestAttributes sra = (ServletRequestAttributes) RequestContextHolder.getRequestAttributes();
RequestContextHolder.setRequestAttributes(sra, true);
获取客户端真实ip
有两种方式可以从HTTP请求中获得请求者的IP地址。一个是从Remote Address中获得,另一个是从X-Forward-For中获得,但他们的安全性和使用场景各有不同。一旦用错,就可能为系统造成漏洞。因此,需要开发者对这两个参数深入的理解。
Remote Address代表的是当前HTTP请求的远程地址,即HTTP请求的源地址。HTTP协议在三次握手时使用的就是这个Remote Address地址,在发送响应报文时也是使用这个Remote Address地址。因此,如果请求者伪造Remote Address地址,他将无法收到HTTP的响应报文,此时伪造没有任何意义。这也就使得Remote Address默认具有防篡改的功能。
在一些大型网站中,来自用户的HTTP请求会经过反向代理服务器的转发,此时,服务器收到的Remote Address地址就是反向代理服务器的地址。在这样的情况下,用户的真实IP地址将被丢失,因此有了HTTP扩展头部X-Forward-For。当反向代理服务器转发用户的HTTP请求时,需要将用户的真实IP地址写入到X-Forward-For中,以便后端服务能够使用。由于X-Forward-For是可修改的,所以X-Forward-For中的地址在某种程度上不可信。
所以,在进行与安全有关的操作时,只能通过Remote Address获取用户的IP地址,不能相信任何请求头。
当然,在使用nginx等反向代理服务器的时候,是必须使用X-Forward-For来获取用户IP地址的(此时Remote Address是nginx的地址),因为此时X-Forward-For中的地址是由nginx写入的,而nginx是可信任的。不过此时要注意,要禁止web对外提供服务。
HTTP 请求头中的 X-Forwarded-For(XFF)
https://blog.csdn.net/yizhenn/article/details/60955599
从HttpServletRequest中获取客户端真实IP
1、在Spring MVC项目的任意位置都可执行如下代码来获取请求端的ip,因为 RequestContextHolder 是Spring mvc提供的一个全局变量
2、通过httpServletRequest.getHeader() 方法获取header是忽略大小写的,所以获取 X-Forwarded-For header时写成 httpServletRequest.getHeader("x-forwarded-for") 或 httpServletRequest.getHeader("X-Forwarded-For") 都行。
X-Real-IP 就是记录请求的客户端真实IP。跟X-Forwarded-For 类似。
Proxy-Client-IP 顾名思义就是代理客户端的IP,如果客户端真实IP获取不到的时候,就只能获取代理客户端的IP了。
WL-Proxy-Client-IP 是在Weblogic下获取真实IP所用的的参数。
HTTP_CLIENT_IP 与 HTTP_X_FORWARDED_FOR 可以理解为X-Forwarded-For , 因为它们是PHP中的用法。
public String getIp() {
    // 从RequestContextHolder中获取HttpServletRequest
    ServletRequestAttributes servletRequestAttributes = (ServletRequestAttributes)RequestContextHolder.getRequestAttributes();
    HttpServletRequest httpServletRequest = servletRequestAttributes.getRequest();

    String Xip = httpServletRequest.getHeader("X-Real-IP");
    String XFor = httpServletRequest.getHeader("X-Forwarded-For");
    if(StringUtils.isNotEmpty(XFor) && !"unKnown".equalsIgnoreCase(XFor)){
        //多次反向代理后会有多个ip值,第一个ip才是真实ip
        int index = XFor.indexOf(",");
        if(index != -1){
            return XFor.substring(0,index);
        }else{
            return XFor;
        }
    }
    XFor = Xip;
    if(StringUtils.isNotEmpty(XFor) && !"unKnown".equalsIgnoreCase(XFor)){
        return XFor;
    }
    if (StringUtils.isBlank(XFor) || "unknown".equalsIgnoreCase(XFor)) {
        XFor = httpServletRequest.getHeader("Proxy-Client-IP");
    }
    if (StringUtils.isBlank(XFor) || "unknown".equalsIgnoreCase(XFor)) {
        XFor = httpServletRequest.getHeader("WL-Proxy-Client-IP");
    }
    if (StringUtils.isBlank(XFor) || "unknown".equalsIgnoreCase(XFor)) {
        XFor = httpServletRequest.getHeader("HTTP_CLIENT_IP");
    }
    if (StringUtils.isBlank(XFor) || "unknown".equalsIgnoreCase(XFor)) {
        XFor = httpServletRequest.getHeader("HTTP_X_FORWARDED_FOR");
    }
    if (StringUtils.isBlank(XFor) || "unknown".equalsIgnoreCase(XFor)) {
        XFor = httpServletRequest.getRemoteAddr();
    }
    return XFor;
}
Java 通过Request请求获取IP地址
https://blog.csdn.net/chwshuang/article/details/71940858
Spring-boot 配置Aop获取controller里的request中的参数以及其返回值
https://blog.csdn.net/jiaobuchong/article/details/50420379
Spring Aspect获取request和response
https://blog.csdn.net/kid_2412/article/details/52180657
获取header
ServletRequestAttributes servletRequestAttributes = (ServletRequestAttributes) RequestContextHolder.getRequestAttributes();
HttpServletRequest httpServletRequest = servletRequestAttributes.getRequest();
String signature = httpServletRequest.getHeader("Signature");
@Controller 和 @RestController
@RestController 注解相当于 @ResponseBody + @Controller 合在一起的作用。
@Controller 是用来响应页面的,@Controller必须配合模版来使用。spring-boot 支持多种模版引擎包括:
1,FreeMarker
2,Groovy
3,Thymeleaf (Spring 官网使用这个)
4,Velocity
5,JSP
@RestController 是Spring4之后新加入的注解,原来返回json需要@ResponseBody和@Controller配合,现在只需一个注解即可。
如果只是开发后台接口,需要返回JSON,XML或自定义mediaType内容到页面,则需要在对应的方法上加上@ResponseBody注解。
package org.springframework.web.bind.annotation;

import java.lang.annotation.Documented;
import java.lang.annotation.ElementType;
import java.lang.annotation.Retention;
import java.lang.annotation.RetentionPolicy;
import java.lang.annotation.Target;
import org.springframework.core.annotation.AliasFor;
import org.springframework.stereotype.Controller;

@Target({ElementType.TYPE})
@Retention(RetentionPolicy.RUNTIME)
@Documented
@Controller
@ResponseBody
public @interface RestController {
    @AliasFor(
        annotation = Controller.class
    )
    String value() default "";
}
@RequestHeader 获取 SpringMVC HTTP Header
获取指定的单个Header
@GetMapping("/greeting")
public ResponseEntity<String> greeting(@RequestHeader("accept-language") String language) {
    return new ResponseEntity<String>(greeting, HttpStatus.OK);
}
当我们明确地指定某个 Header 的名称时,默认这个 Header 是必需的,如果请求中不存在,将会发生 400 错误。
可以使用 required 属性来表明某个 Header 不是必需的。
@GetMapping("/nonRequiredHeader")
public ResponseEntity<String> evaluateNonRequiredHeader(
  @RequestHeader(value = "optional-header", required = false) String optionalHeader) {
    return new ResponseEntity<String>(
      String.format("Was the optional header present? %s!", (optionalHeader == null ? "No" : "Yes")),
      HttpStatus.OK);
}
获取所有Header
在使用 @RequestHeader 注解时,不指定名称即可。
@GetMapping("/listHeaders")
public ResponseEntity<String> listAllHeaders(@RequestHeader Map<String, String> headers) {
    headers.forEach((key, value) -> {
        LOG.info(String.format("Header '%s' = %s", key, value));
    });
    return new ResponseEntity<String>(String.format("Listed %d headers", headers.size()), HttpStatus.OK);
}
如果使用 Map,则当某个 Header 有多个值时,只能拿到第一个值。这等价于我们使用 MultiValueMap 时,调用 getFirst 方法。
如果 Header 中有多个参数,可以使用 MultiValueMap 来接收参数值。
@GetMapping("/multiValue")
public ResponseEntity<String> multiValue(@RequestHeader MultiValueMap<String, String> headers) {
    headers.forEach((key, value) -> {
        LOG.info(String.format("Header '%s' = %s", key, value.stream().collect(Collectors.joining("|"))));
    });

    return new ResponseEntity<String>(String.format("Listed %d headers", headers.size()), HttpStatus.OK);
}
从REST Controller获取HTTP请求头
http://www.spring4all.com/article/14950
BindingResult 处理参数绑定错误
比如有请求参数类
@Data
@JsonIgnoreProperties(ignoreUnknown = true)
@JsonInclude(Include.NON_NULL)
public class CreatePageViewRequest {
    @NotBlank(message = "pathname can not be blank")
    private String pathname;

    @NotBlank(message = "host can not be blank")
    private String host;

    private String title;

    private String referrer;

    private String platform;

    private String useragent;
}
在 controller 上,通过增加 BindingResult 参数,可以知道入参绑定和验证是否有错误,并可以获取错误信息。
当然通过统一的拦截器处理错误更好。
@RequestMapping(
        method = RequestMethod.POST
)
public GetPageViewResponse createPageView(@Valid CreatePageViewRequest request, BindingResult bindingResult) {
    // 如果有捕获到参数不合法
    if (bindingResult.hasErrors()) {
        // 得到全部不合法的字段
        List<FieldError> errorList = bindingResult.getFieldErrors();
        // 获取不合法的字段名和不合法原因,拼接成错误信息
        String message = errorList.stream().map(error -> error.getField() + "字段错误:" + error.getDefaultMessage()).collect(
                        Collectors.joining(";"));
    }
    log.info("Enter method createPageView, request:{}", JSONUtils.writeValue(request));
    // 上报 pv
    pageViewService.createPageView(request);
    // 查询 pv
    GetPageViewResponse response = pageViewService.getPageView(request.getPathname());
    log.info("End method createPageView, response:{}", JSONUtils.writeValue(response));
    return response;
}
@RequestMapping
@RequestMapping 是一个用来处理请求地址映射的注解,可用于类或方法上。用于类上,表示类中的所有响应请求的方法都是以该地址作为父路径。
RequestMapping
https://docs.spring.io/spring-framework/docs/current/javadoc-api/org/springframework/web/bind/annotation/RequestMapping.html
通配符
? 匹配任何单字符* 匹配0或者任意数量的字符** 匹配0或者更多的目录
匹配规则
当一个URL同时匹配多个模式时,只会选择最匹配的一个:
- URI模式变量的数目和通配符数量的总和最少的那个路径模式更准确。比如,
/hotels/{hotel}/*这个路径拥有一个URI变量和一个通配符,而/hotels/{hotel}/**这个路径则拥有一个URI变量和两个通配符,因此前者是更准确的路径模式。 - 如果两个模式的URI模式数量和通配符数量总和一致,则路径更长的那个模式更准确。举个例子,
/foo/bar*就被认为比/foo/*更准确,因为前者的路径更长。 - 如果两个模式的数量和长度均一致,则那个具有更少通配符的模式是更加准确的。比如,
/hotels/{hotel}就比/hotels/*更精确。 - 默认的通配模式
/**比其他所有的模式都更“不准确”。比方说,/api/{a}/{b}/{c}就比默认的通配模式/**要更准确 - 前缀通配(比如
/public/**)被认为比其他任何不包括双通配符的模式更不准确。比如说,/public/path3/{a}/{b}/{c}就比/public/**更准确
Spring MVC中映射请求路径:@RequestMapping标注详解
https://www.tianmaying.com/tutorial/spring-mvc-request-mapping
value 匹配path
指定请求的实际地址,指定的地址可以是URI Template 模式(后面将会说明);
value的uri值为以下三类:
A) 可以指定为普通的具体值;
B) 可以指定为含有某变量的一类值(URI Template Patterns with Path Variables);
@RequestMapping(value="/owners/{ownerId}", method=RequestMethod.GET)
public String findOwner(@PathVariable String ownerId, Model model) {
  Owner owner = ownerService.findOwner(ownerId);
  model.addAttribute("owner", owner);
  return "displayOwner";
}
C) 可以指定为含正则表达式的一类值( URI Template Patterns with Regular Expressions);
  @RequestMapping("/spring-web/{symbolicName:[a-z-]+}-{version:\d\.\d\.\d}.{extension:\.[a-z]}")
  public void handle(@PathVariable String version, @PathVariable String extension) {
    // ...
  }
}
method 匹配方法(默认全部,可指定多个)
指定 http 请求的 method 类型, GET、POST、PUT、DELETE 等;
缺省 method 可以处理任何类型的 http 请求
指定 method 是为了细化映射(缩小处理方法的映射范围),在 method 没有指定的情况下,它的映射范围是最大的。
@RequestMapping("/enter")
public String enter(){
    return "example_enter_page";
}
method 可用数组方式同时指定多个
@RequestMapping(
        method = {RequestMethod.GET, RequestMethod.POST},
        value = "/api/v1/download/{filePath}")
void download(@PathVariable("filePath") String filePath, HttpServletResponse response);
consumes 匹配内容类型
consumes: 指定处理请求的提交内容类型(Content-Type),例如application/json, text/html;
@Controller
@RequestMapping(value = "/pets", method = RequestMethod.POST, consumes="application/json")
public void addPet(@RequestBody Pet pet, Model model) {
    // implementation omitted
}
方法仅处理request Content-Type为“application/json”类型的请求。
HTTP 协议 Header 中有两个东西:Content-Type 和 Accept
ContentType 用来告诉服务器当前发送的数据是什么格式
Accept 用来告诉服务器,客户端能认识哪些格式,最好返回这些格式中的其中一种
比如,有个用户给我发了一个请求,请求头中
ContentType = application/json
Accept      =  */*
就是说用户发送的json格式的数据,可以接收任意格式的数据返回
但假如我的接口中定义了 consumes={"application/xml"},produces={"application/xml"}
我只接收 application/xml 格式,也只返回xml格式
很明显,用户调不通这个接口
所以改为 consumes={"application/xml","application/json"},produces={"application/xml"}
注: 除了格式支持,还需要与数据对应的http转换器(HttpMessageConverter)此处先跳过
MediaType 其实就是 application/xml,application/json 等类型格式
produces 指定返回内容类型
produces 指定返回的内容类型,仅当 request 请求头中的(Accept)类型中包含该指定类型才返回;
@Controller
@RequestMapping(value = "/pets/{petId}", method = RequestMethod.GET, produces="application/json")
@ResponseBody
public Pet getPet(@PathVariable String petId, Model model) {
    // implementation omitted
}
此方法返回的内容类型为application/json;
Accept:text/html,application/xml,application/json
将按照如下顺序进行produces的匹配 ①text/html ②application/xml ③application/json
Accept:application/xml;q=0.5,application/json;q=0.9,text/html
将按照如下顺序进行produces的匹配 ①text/html ②application/json ③application/xml
q参数为媒体类型的质量因子,越大则优先权越高(从0到1)
Accept:*/,text/,text/html
将按照如下顺序进行produces的匹配 ①text/html ②text/* ③*/*
即匹配规则为:最明确的优先匹配。
springMVC produces属性含义
https://blog.csdn.net/lzwglory/article/details/17252099
方法级别覆盖类级别
如类级别的映射为 @RequestMapping(value=”/narrow”, produces=”text/html”),方法级别的为 @RequestMapping(produces=”application/xml”),此时方法级别的映射将覆盖类级别的,因此请求头“Accept:application/xml”是成功的,而“text/html”将报406错误码,表示不支持的请求媒体类型。
只有 consumes/produces 是 覆盖,其他的参数都是继承,如headers、params等都是继承。
组合使用是“或”的关系
@RequestMapping(produces={“text/html”, “application/json”}) 将匹配“Accept:text/html”或“Accept:application/json”
springMVC produces属性含义
https://blog.csdn.net/lzwglory/article/details/17252099
params
params: 指定request中必须包含某些参数值是,才让该方法处理。
@Controller
@RequestMapping("/owners/{ownerId}")
public class RelativePathUriTemplateController {
  @RequestMapping(value = "/pets/{petId}", method = RequestMethod.GET, params="myParam=myValue")
  public void findPet(@PathVariable String ownerId, @PathVariable String petId, Model model) {
    // implementation omitted
  }
}
仅处理请求中包含了名为“myParam”,值为“myValue”的请求;
headers
headers: 指定request中必须包含某些指定的header值,才能让该方法处理请求。
@Controller
@RequestMapping("/owners/{ownerId}")
public class RelativePathUriTemplateController {

@RequestMapping(value = "/pets", method = RequestMethod.GET, headers="Referer=http://www.ifeng.com/")
  public void findPet(@PathVariable String ownerId, @PathVariable String petId, Model model) {
    // implementation omitted
  }
}
仅处理request的header中包含了指定“Refer”请求头和对应值为“http://www.ifeng.com/”的请求
@RequestMapping 用法详解之地址映射
https://blog.csdn.net/walkerJong/article/details/7994326
HandlerMethodArgumentResolver 参数解析器
HandlerMethodArgumentResolver 接口源码
boolean supportsParameter(MethodParameter parameter): 给定的参数 parameter 是否此被此解析器支持resolveArgument 解析参数
package org.springframework.web.method.support;

import org.springframework.core.MethodParameter;
import org.springframework.lang.Nullable;
import org.springframework.web.bind.WebDataBinder;
import org.springframework.web.bind.support.WebDataBinderFactory;
import org.springframework.web.context.request.NativeWebRequest;

public interface HandlerMethodArgumentResolver {

    boolean supportsParameter(MethodParameter parameter);

    Object resolveArgument(MethodParameter parameter, @Nullable ModelAndViewContainer mavContainer,
            NativeWebRequest webRequest, @Nullable WebDataBinderFactory binderFactory) throws Exception;

}
PathVariableMethodArgumentResolver
它用于处理标注有 @PathVariable 注解的方法参数,用于从URL中获取值
RequestParamMethodArgumentResolver
顾名思义,是解析标注有 @RequestParam 的方法入参解析器,这个注解比上面的注解强大很多了,它用于从请求参数(?后面的)中获取值完成封装。这是我们的绝大多数使用场景。
HandlerMethodArgumentResolver(一):Controller方法入参自动封装器【享学Spring MVC】
https://juejin.im/post/5d6614756fb9a06b1b19d12e
@RequestParam和@PathVariable
@RequestParam 和 @PathVariable 注解是用于从request中接收请求的,两个都可以接收参数,关键点不同的是 @RequestParam 是从request里面拿取值,而 @PathVariable 是从一个URI模板里面来填充
http://localhost:8080/springmvc/hello/101?param1=10¶m2=20
根据上面的这个URL,你可以用这样的方式来进行获取
public String getDetails(
    @RequestParam(value="param1", required=true) String param1,
    @RequestParam(value="param2", required=false) String param2){
...
}
@PathVariable
这个注解能够识别URL里面的一个模板,我们看下面的一个URL
http://localhost:8080/springmvc/hello/101?param1=10¶m2=20
上面的一个url你可以这样写:
@RequestMapping("/hello/{id}")
public String getDetails(
    @PathVariable(value="id") String id,
    @RequestParam(value="param1", required=true) String param1,
    @RequestParam(value="param2", required=false) String param2) {
      .......
}
@RequestParam默认值
public UdsHttpResponse queryLeadsFollowDetailsAPPV1(@PathVariable("userId") Long userId,
        @RequestParam(name = "offset", required = false, defaultValue = "0") Long offset,
        @RequestParam(name = "count", required = false, defaultValue = "10") Integer count) {
  ... ...
}
@RequestParam 支持下面四种参数
defaultValue 如果本次请求没有携带这个参数,或者参数为空,那么就会启用默认值
name 绑定本次参数的名称,要跟URL上面的一样
required 这个参数是不是必须的
value 跟name一样的作用,是name属性的一个别名
@RequestParam,@PathParam,@PathVariable等注解区别
https://blog.csdn.net/u011410529/article/details/66974974
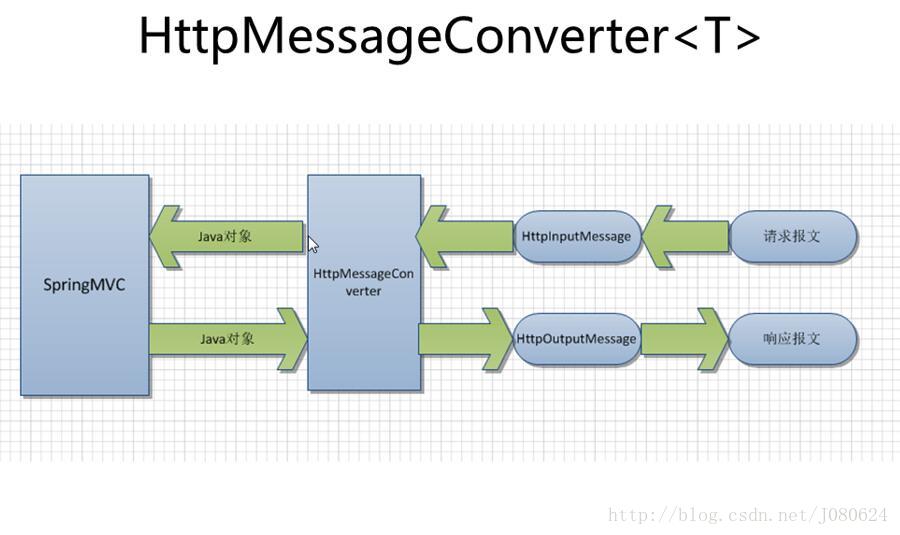
HttpMessageConverter HTTP消息转换器
浏览器与服务器之间的数据交换有很多类型,不只是表单提交数据这一种,比如ajax技术就大量使用json、xml等,这时候就涉及到浏览器端和服务器端数据格式转换的问题,服务器端都是Java对象,需要把请求信息转为Java对象,或者把Java对象转换为响应信息,Spring提供了很重要的接口 HttpMessageConverter
消费的数据,如JSON数据、XML数据都是由我们读取请求的 InputStream 并根据需要自己转换为相应的模型数据,比较麻烦;
生产的数据,如JSON数据、XML数据都是由我们自己先把模型数据转换为json/xml等数据,然后输出响应流,也是比较麻烦的。
Spring提供了一组注解 @RequestBody @ResponseBody 和一组转换类 HttpMessageConverter 来完成我们遇到的问题
HttpMessageConverter 接口指定了一个可以把Http request信息和Http response信息进行格式转换的转换器。
HttpMessageConverter常用实现类
HttpMessageConverter 接口有很多实现类,比如:
ByteArrayHttpMessageConverter
读写二进制数据StringHttpMessageConverter
从请求和响应读取/编写字符串。默认情况下,它支持媒体类型 text/* 并使用文本/无格式内容类型编写。FormHttpMessageConverter
从请求和响应读取/编写表单数据。默认情况下,它读取媒体类型 application/x-www-form-urlencoded 并将数据写入MultiValueMap<String,String>MappingJackson2HttpMessageConverter
使用 Jackson 的 ObjectMapper 读取/编写 JSON 数据。
它默认转换媒体类型为 application/json, application/*+json UTF-8 的数据。可通过其setSupportedMediaTypes方法配置支持的媒体类型
可通过构造函数MappingJackson2HttpMessageConverter(ObjectMapper objectMapper)构造带有订制化 ObjectMapper 的 converterSourceHttpMessageConverter—-读写javax.xml.transform.Source类型的数据
SourceHttpMessageConverter 处理请求类型 Request type: text/xml, application/xml,从HTTP request和response读写javax.xml.transform.Source .支持 DOMSource, SAXSource,StreamSource
XmlAwareFormHttpMessageConverter—-转换部分表单数据是xml的数据
Jaxb2RootElementHttpMessageConverter—-通过JAXB2读写XML数据
MarshallingHttpMessageConverter 使用 Spring 的 marshaller/un-marshaller 读取/编写 XML 数据。它转换媒体类型为 application/xml 的数据。
AtomFeedHttpMessageConverter 使用 ROME 的 Feed API 读取/编写 ATOM 源。它转换媒体类型为 application/atom+xml 的数据。
RssChannelHttpMessageConverter 使用 ROME 的 feed API 读取/编写 RSS 源。它转换媒体类型为 application/rss+xml 的数据。
BufferedImageHttpMessageConverter 处理请求类型 Request type:支持Java I/O API,从HTTP request和response中读写java.awt.image.BufferedImage
DispatcerServlet默认装配了RequestMappingHandlerAdapter,而后者默认装配了上面前4个HttpMessageConverter
其实json跟Java对象的转换就三个要素:一个转换器,两个注解(@RequestBody、@ResponseBody)
0059 Spring MVC与浏览器间的JSON数据转换--@RequestBody--@ResponseBody–MappingJacson2HttpMessageConverter
https://www.cnblogs.com/sonng/p/6652059.html
SpringMVC默认加载的MessageConverter
SpringMvc启动时默认加载的Converter。
在mvc启动时默认会加载下面的几种HttpMessageConverter,相关代码在 org.springframework.web.servlet.config.annotation.WebMvcConfigurationSupport 中的 addDefaultHttpMessageConverters 方法中,
spring-webmvc 5.2.1.RELEASE 中代码如下:
各个 Spring 版本, 添加的默认 MessageConverter 还不一样,可以启动时加断点具体看下。
代码如下
protected final void addDefaultHttpMessageConverters(List<HttpMessageConverter<?>> messageConverters) {
  messageConverters.add(new ByteArrayHttpMessageConverter());
  messageConverters.add(new StringHttpMessageConverter());
  messageConverters.add(new ResourceHttpMessageConverter());
  messageConverters.add(new ResourceRegionHttpMessageConverter());
  try {
    messageConverters.add(new SourceHttpMessageConverter<>());
  }
  catch (Throwable ex) {
    // Ignore when no TransformerFactory implementation is available...
  }
  messageConverters.add(new AllEncompassingFormHttpMessageConverter());

  if (romePresent) {
    messageConverters.add(new AtomFeedHttpMessageConverter());
    messageConverters.add(new RssChannelHttpMessageConverter());
  }

  if (jackson2XmlPresent) {
    Jackson2ObjectMapperBuilder builder = Jackson2ObjectMapperBuilder.xml();
    if (this.applicationContext != null) {
      builder.applicationContext(this.applicationContext);
    }
    messageConverters.add(new MappingJackson2XmlHttpMessageConverter(builder.build()));
  }
  else if (jaxb2Present) {
    messageConverters.add(new Jaxb2RootElementHttpMessageConverter());
  }

  if (jackson2Present) {
    Jackson2ObjectMapperBuilder builder = Jackson2ObjectMapperBuilder.json();
    if (this.applicationContext != null) {
      builder.applicationContext(this.applicationContext);
    }
    messageConverters.add(new MappingJackson2HttpMessageConverter(builder.build()));
  }
  else if (gsonPresent) {
    messageConverters.add(new GsonHttpMessageConverter());
  }
  else if (jsonbPresent) {
    messageConverters.add(new JsonbHttpMessageConverter());
  }

  if (jackson2SmilePresent) {
    Jackson2ObjectMapperBuilder builder = Jackson2ObjectMapperBuilder.smile();
    if (this.applicationContext != null) {
      builder.applicationContext(this.applicationContext);
    }
    messageConverters.add(new MappingJackson2SmileHttpMessageConverter(builder.build()));
  }
  if (jackson2CborPresent) {
    Jackson2ObjectMapperBuilder builder = Jackson2ObjectMapperBuilder.cbor();
    if (this.applicationContext != null) {
      builder.applicationContext(this.applicationContext);
    }
    messageConverters.add(new MappingJackson2CborHttpMessageConverter(builder.build()));
  }
}
SpringMVC HttpMessageConverter 匹配规则(分析源码非常详细)
https://segmentfault.com/a/1190000012659486
HttpMessageConverter消息转换流程
当用户发送请求后,@Requestbody 注解会读取请求body中的数据,默认的请求转换器 HttpMessageConverter 通过获取请求头 Header 中的 Content-Type 来确认请求头的数据格式,从而来为请求数据适配合适的转换器。
例如 contentType:applicatin/json ,那么转换器会适配 MappingJacksonHttpMessageConverter 。
响应时候的时候同理, @Responsebody 注解会启用 HttpMessageConverter,通过检测Header中Accept属性来适配的响应的转换器。
Http消息转换器工作流程
RequestResponseBodyMethodProcessor
org.springframework.web.servlet.mvc.method.annotation.RequestResponseBodyMethodProcessor 负责消息转换过程
这个类同时实现了 HandlerMethodArgumentResolver 和 HandlerMethodReturnValueHandler 两个接口。
前者是将请求报文绑定到处理方法形参的策略接口,后者则是对处理方法返回值进行处理的策略接口。
两个接口的源码如下:
package org.springframework.web.method.support;

import org.springframework.core.MethodParameter;
import org.springframework.web.bind.WebDataBinder;
import org.springframework.web.bind.support.WebDataBinderFactory;
import org.springframework.web.context.request.NativeWebRequest;

public interface HandlerMethodArgumentResolver {

    boolean supportsParameter(MethodParameter parameter);

    Object resolveArgument(MethodParameter parameter,
                           ModelAndViewContainer mavContainer,
                           NativeWebRequest webRequest,
                           WebDataBinderFactory binderFactory) throws Exception;

}

package org.springframework.web.method.support;

import org.springframework.core.MethodParameter;
import org.springframework.web.context.request.NativeWebRequest;

public interface HandlerMethodReturnValueHandler {

    boolean supportsReturnType(MethodParameter returnType);

    void handleReturnValue(Object returnValue,
                           MethodParameter returnType,
                           ModelAndViewContainer mavContainer,
                           NativeWebRequest webRequest) throws Exception;

}
RequestResponseBodyMethodProcessor 这个类,同时充当了方法参数解析和返回值处理两种角色。我们从它的源码中,可以找到上面两个接口的方法实现。
对 HandlerMethodArgumentResolver 接口的实现:
public boolean supportsParameter(MethodParameter parameter) {
    return parameter.hasParameterAnnotation(RequestBody.class);
}

public Object resolveArgument(MethodParameter parameter, ModelAndViewContainer mavContainer,
        NativeWebRequest webRequest, WebDataBinderFactory binderFactory) throws Exception {

    Object argument = readWithMessageConverters(webRequest, parameter, parameter.getGenericParameterType());

    String name = Conventions.getVariableNameForParameter(parameter);
    WebDataBinder binder = binderFactory.createBinder(webRequest, argument, name);

    if (argument != null) {
        validate(binder, parameter);
    }

    mavContainer.addAttribute(BindingResult.MODEL_KEY_PREFIX + name, binder.getBindingResult());

    return argument;
}
对 HandlerMethodReturnValueHandler 接口的实现
public boolean supportsReturnType(MethodParameter returnType) {
    return returnType.getMethodAnnotation(ResponseBody.class) != null;
}

  public void handleReturnValue(Object returnValue, MethodParameter returnType,
        ModelAndViewContainer mavContainer, NativeWebRequest webRequest)
        throws IOException, HttpMediaTypeNotAcceptableException {

    mavContainer.setRequestHandled(true);
    if (returnValue != null) {
        writeWithMessageConverters(returnValue, returnType, webRequest);
    }
}
看完上面的代码,整个 HttpMessageConverter 消息转换的脉络已经非常清晰。
因为两个接口的实现,分别是以是否有 @RequestBody 和 @ResponseBody 为条件,然后分别调用 HttpMessageConverter 来进行消息的读写。
SpringMVC源码剖析(五)-消息转换器HttpMessageConverter
https://my.oschina.net/lichhao/blog/172562
SpringMVC - HttpMessageConverter与返回JSON
https://blog.csdn.net/j080624/article/details/70245741/
自定义HttpMessageConverter
HttpMessageConverter 接口提供了5个方法:
canRead :判断该转换器是否能将请求内容转换成Java对象
canWrite :判断该转换器是否可以将Java对象转换成返回内容
getSupportedMediaTypes :获得该转换器支持的MediaType类型
read :读取请求内容并转换成Java对象
write :将Java对象转换后写入返回内容
SpringBoot自定义HttpMessageConverter
https://www.cnblogs.com/weiyinfu/p/6861074.html
springboot自定义消息转换器HttpMessageConverter
https://www.cnblogs.com/hhhshct/p/9676604.html
添加自定义converter到SpringMVC
WebMvcConfigurer 配置接口中,添加一个converter的方式有
configureMessageConverters(List<HttpMessageConverter<?>> converters)
配置用于读取 request 请求或写入 response 响应体的 HttpMessageConverter 消息转换器,如果不配置,则会注册默认的消息转换器列表。
注意:给 converters 列表中添加消息转换器会禁用默认的消息转换器注册,如果只是想新增一个converter而不影响默认的,可以使用 extendMessageConverters 方法
add方法可以指定顺序,有多个自定义的WebMvcConfigurerAdapter时,可以改变相互之间的顺序.但是都在springmvc内置的converter前面
extendMessageConverters(List<HttpMessageConverter<?>> converters)
添加或修改已注册的消息转换器,在默认的消息转换器注册后执行 。
这里可以通过add指定顺序来调整优先级,也可以使用remove/clear来删除converter,功能强大
使用converters.add(xxx)会放在最低优先级(List的尾部)
使用converters.add(0,xxx)会放在最高优先级(List的头部)
@Configuration
public class SpringMvcConfig implements WebMvcConfigurer {
    @Override
    public void configureMessageConverters(List<HttpMessageConverter<?>> converters) {
        converters.add(new JavaSerializationConverter());
    }

    @Override
    public void extendMessageConverters(List<HttpMessageConverter<?>> converters) {
        converters.add(new JavaSerializationConverter());
    }
}
springboot学习(三)——使用HttpMessageConverter进行http序列化和反序列化
https://www.cnblogs.com/page12/p/8166935.html
@RequestBody 请求体绑定到Java对象
@RequestBody 注解常用来处理 content-type 不是默认的 application/x-www-form-urlencoded 编码的内容,比如说:application/json 或者是 application/xml 等。一般情况下来说常用其来处理 application/json 类型。
作用:
1、 该注解用于读取 Request 请求的 body 部分数据,使用系统默认配置的 HttpMessageConverter 进行解析,然后把相应的数据绑定到要返回的对象上;
2、 再把 HttpMessageConverter 返回的对象数据绑定到 controller 中方法的参数上。
使用时机:
A) GET、POST方式提时, 根据request header Content-Type的值来判断:
application/x-www-form-urlencoded, 可选(即非必须,因为这种情况的数据@RequestParam, @ModelAttribute也可以处理,当然@RequestBody也能处理);
multipart/form-data, 不能处理(即使用@RequestBody不能处理这种格式的数据);
其他格式, 必须(其他格式包括application/json, application/xml等。这些格式的数据,必须使用@RequestBody来处理);
B) PUT方式提交时, 根据request header Content-Type的值来判断:
application/x-www-form-urlencoded, 必须;
multipart/form-data, 不能处理;
其他格式, 必须;
说明:request的body部分的数据编码格式由header部分的Content-Type指定;
加与不加@RequestBody的区别
@RequestBody 这个注解的使用,使得REST接口接收的不再 content-type 为 application/x-www-form-urlencoded 的请求, 反而需要显示指定为 application/json
What is difference between @RequestBody and @RequestParam?
https://stackoverflow.com/questions/28039709/what-is-difference-between-requestbody-and-requestparam
@ResponseBody
作用:
注解用于将Controller的方法返回的对象,通过适当的HttpMessageConverter转换为指定格式后,写入到Response对象的body数据区。
使用时机:
返回的数据不是html标签的页面,而是其他某种格式的数据时(如json、xml等)使用;
@RequestBody, @ResponseBody 注解详解(转)
https://www.cnblogs.com/qq78292959/p/3760651.html
HttpMessageConverter接口源码
HttpMessageConverter 是一种策略接口
canRead(Class<?> clazz, MediaType mediaType) 给定的 clazz 是否可被本 converter 读canWrite(Class<?> clazz, MediaType mediaType) 给定的 clazz 是否可被本 converter 写List<MediaType> getSupportedMediaTypes() 返回支持的媒体类型T read(Class<? extends T> clazz, HttpInputMessage inputMessage) 从 inputMessage 中读取 clazz 类型的数据,其中 clazz 类型必须是 canRead() 返回 true 的write(T t, MediaType contentType, HttpOutputMessage outputMessage) 写入 t 类型数据到 outputMessage中,其中 t 类型必须是 canWrite() 返回 true 的
package org.springframework.http.converter;

import java.io.IOException;
import java.util.List;

import org.springframework.http.HttpInputMessage;
import org.springframework.http.HttpOutputMessage;
import org.springframework.http.MediaType;

public interface HttpMessageConverter<T> {

    boolean canRead(Class<?> clazz, MediaType mediaType);

    boolean canWrite(Class<?> clazz, MediaType mediaType);

    List<MediaType> getSupportedMediaTypes();

    T read(Class<? extends T> clazz, HttpInputMessage inputMessage)
            throws IOException, HttpMessageNotReadableException;

    void write(T t, MediaType contentType, HttpOutputMessage outputMessage)
            throws IOException, HttpMessageNotWritableException;
}
问题
415 Unsupported Media Type application/x-www-form-urlencoded;charset=UTF-8
spring boot 如下Controller
@RestController
public class CommentV1Controller {
    @Autowired
    CommentService commentService;

    @RequestMapping(
        value = "/comment",
        method = RequestMethod.POST,
        produces = MediaType.APPLICATION_JSON_UTF8_VALUE,
        consumes = MediaType.APPLICATION_FORM_URLENCODED_VALUE
    )
    public String createComment(@RequestBody CreateCommentRequest request) throws Exception {
        return commentService.createComment(request);
    }
}
使用postman application/x-www-form-urlencoded 发送post请求时提示
{
    "timestamp": "2019-02-24T11:43:29.576+0000",
    "status": 415,
    "error": "Unsupported Media Type",
    "message": "Content type 'application/x-www-form-urlencoded;charset=UTF-8' not supported",
    "path": "/comment"
}
看网上的解决方法,多数是如下两种:
一、@RequestBody 无法接收 x-www-form-urlencoded 类型的请求,需要在postman中把请求格式改为 application/json
二、去掉 @RequestBody注解,改用 @RequestParam Map<String, String> body 来接收 x-www-form-urlencoded 类型参数
Spring boot Unsupported Media Type with @RequestBody
https://stackoverflow.com/questions/44230121/spring-boot-unsupported-media-type-with-requestbody
Content type ‘application/x-www-form-urlencoded;charset=UTF-8’ not supported for @RequestBody MultiValueMap
https://stackoverflow.com/questions/33796218/content-type-application-x-www-form-urlencodedcharset-utf-8-not-supported-for
但我就想用 @RequestBody 来接收 application/x-www-form-urlencoded 格式请求并转化为自定义的bean类,那也是有办法的,需要自定义一下spring的 HttpMessageConverter
Issue with content type in Spring
https://stackoverflow.com/questions/39385960/issue-with-content-type-in-spring/51160620#51160620
The request was rejected because no multipart boundary was found in springboot
原因: multipart/form-data 请求中缺少 boundary
multipart/form-data 格式的请求应如下格式:
POST /upload HTTP/1.1
Host: myhost
User-Agent: uploader/1.0
Accept: text/html,application/xhtml+xml,application/xml;q=0.9,*/*;q=0.8
Accept-Charset: ISO-8859-1,utf-8;q=0.7,*;q=0.7
Content-Type: multipart/form-data; boundary=----------287032381131322
Content-Length: {sizeofcontent}

------------287032381131322
Content-Disposition: form-data; name="file"; filename="myfile.txt"
Content-Type: text/plain

My file content;
------------287032381131322--
org.springframework.web.multipart.MultipartException: Failed to parse multipart servlet request; nested exception is org.apache.commons.fileupload.FileUploadException: the request was rejected because no multipart boundary was found
    at org.springframework.web.multipart.commons.CommonsMultipartResolver.parseRequest(CommonsMultipartResolver.java:169) ~[spring-web-4.3.22.RELEASE.jar:4.3.22.RELEASE]
    at org.springframework.web.multipart.commons.CommonsMultipartResolver.resolveMultipart(CommonsMultipartResolver.java:143) ~[spring-web-4.3.22.RELEASE.jar:4.3.22.RELEASE]
  ... ...
Caused by: org.apache.commons.fileupload.FileUploadException: the request was rejected because no multipart boundary was found
    at org.apache.commons.fileupload.FileUploadBase$FileItemIteratorImpl.<init>(FileUploadBase.java:990) ~[commons-fileupload-1.3.1.jar:1.3.1]
    at org.apache.commons.fileupload.FileUploadBase.getItemIterator(FileUploadBase.java:310) ~[commons-fileupload-1.3.1.jar:1.3.1]
    at org.apache.commons.fileupload.FileUploadBase.parseRequest(FileUploadBase.java:334) ~[commons-fileupload-1.3.1.jar:1.3.1]
    at org.apache.commons.fileupload.servlet.ServletFileUpload.parseRequest(ServletFileUpload.java:115) ~[commons-fileupload-1.3.1.jar:1.3.1]
    at org.springframework.web.multipart.commons.CommonsMultipartResolver.parseRequest(CommonsMultipartResolver.java:159) ~[spring-web-4.3.22.RELEASE.jar:4.3.22.RELEASE]
The request was rejected because no multipart boundary was found in springboot
https://stackoverflow.com/questions/36005436/the-request-was-rejected-because-no-multipart-boundary-was-found-in-springboot
FileUploadException: the request was rejected because no multipart boundary was found
https://stackoverflow.com/questions/44721596/fileuploadexception-the-request-was-rejected-because-no-multipart-boundary-was
WebMvcConfigurerAdapter
WebMvcConfigurerAdapter 在 Spring 5.0 已被废弃
Deprecated.
as of 5.0 WebMvcConfigurer has default methods (made possible by a Java 8 baseline) and can be implemented directly without the need for this adapter
An implementation of WebMvcConfigurer with empty methods allowing subclasses to override only the methods they’re interested in.
@Deprecated
public abstract class WebMvcConfigurerAdapter implements WebMvcConfigurer {
  ...
}
替代方案:直接实现 WebMvcConfigurer 接口
@Configuration
public class WebMvcConfg implements WebMvcConfigurer {
    //todo
}
DispatcherServlet
Spring MVC 框架是围绕 DispatcherServlet 来设计的,这个 Servlet 会把请求分发给各个处理器,并支持可配置的处理器映射、视图渲染、本地化、时区与主题渲染和文件上传等功能。
和任何普通的 Servlet 一样,DispatcherServlet 需要根据 Servlet 规范使用 Java 代码配置或在 web.xml 文件中声明请求和 Servlet 的映射关系。 DispatcherServlet 通过读取 Spring 的配置来发现它在请求映射,视图解析,异常处理等方面所依赖的组件。
DispatcherServlet 依靠这些特殊的 bean 来处理请求并返回响应。 这些特殊的 bean 是指实现 WebFlux 框架协议的,同样由 Spring 管理的对象。 这些对象都含有一套默认的配置,但也可以自定义各种属性,从而进行灵活扩展或功能改写。
配置 DispatcherServlet
DispatcherServlet其实就是个Servlet(它继承自HttpServlet基类),同样也需要在你Web应用的web.xml配置文件下声明。你需要在web.xml文件中把你希望DispatcherServlet处理的请求映射到对应的URL上去。这就是标准的Java EE Servlet配置;
XML配置
DispatcherServlet 配置和对应的请求映射
<web-app>
    <servlet>
        <servlet-name>example</servlet-name>
        <servlet-class>org.springframework.web.servlet.DispatcherServlet</servlet-class>
        <load-on-startup>1</load-on-startup>
    </servlet>

    <servlet-mapping>
        <servlet-name>example</servlet-name>
        <url-pattern>/example/*</url-pattern>
    </servlet-mapping>
</web-app>
在上面的例子中,所有路径以/example开头的请求都会被名字为example的DispatcherServlet处理。
Java代码配置
在Servlet 3.0+的环境下,还可以用编程的方式配置Servlet容器。下面是一段这种基于代码配置的例子,它与上面定义的web.xml配置文件是等效的。
public class MyWebApplicationInitializer implements WebApplicationInitializer {
    @Override
    public void onStartup(ServletContext container) {
        ServletRegistration.Dynamic registration = container.addServlet("dispatcher", new DispatcherServlet());
        registration.setLoadOnStartup(1);
        registration.addMapping("/example/*");
    }
}
WebApplicationInitializer是Spring MVC提供的一个接口,它会查找你所有基于代码的配置,并应用它们来初始化Servlet 3版本以上的Web容器。它有一个抽象的实现AbstractDispatcherServletInitializer,用以简化DispatcherServlet的注册工作:你只需要指定其Servlet映射即可。
DispatcherServlet初始化参数
contextClass
实现 WebApplicationContext 接口的类,当前的 servlet 用它来创建上下文。如果这个参数没有指定,默认使用 XmlWebApplicationContext。
contextConfigLocation
传给上下文实例(由contextClass指定)的字符串,用来指定上下文的位置。这个字符串可以被分成多个字符串(使用逗号作为分隔符)来支持多个上下文(在多上下文的情况下,如果同一个bean被定义两次,后面一个优先)。
namespace
WebApplicationContext命名空间。默认值是 [server-name]-servlet
DispatcherServlet 的初始化过程中,Spring MVC 会在你 Web 应用的 WEB-INF 目录下查找一个名为 [servlet-name]-servlet.xml 的配置文件,并创建其中所定义的 Bean。如果在全局上下文中存在相同名字的 Bean,则它们将被新定义的同名 Bean 覆盖。
比如已经在 web.xml 或 java 代码中注册了一个名为 example 的 DispatcherServlet,那么可以在应用中的 /WEB-INF/ 路径下创建一个 example-servlet.xml 的文件,在该文件中定义所有 Spring MVC 相关的组件(比如Bean等)。
当然也可以直接在 web.xml 中配置这个 DispatcherServlet 的属性。
相关功能Bean
在 Spring MVC 中,每个 DispatcherServlet 都持有一个自己的上下文对象 WebApplicationContext,它又继承了根(root) WebApplicationContext 对象中已经定义的所有 Bean。这些继承的 Bean 可以在具体的 Servlet 实例中被重载,在每个 Servlet 实例中你也可以定义其作用域(Scope)下的新Bean。
Spring 的 DispatcherServlet 使用了内置在 WebApplicationContext 中的特定的 Bean 来处理请求、渲染视图等,这些 Bean 是 Spring MVC 框架的一部分。如果你想指定使用哪个特定的 Bean,可以在 WebApplicationContext 中简单地配置它们。当然这只是可选的,Spring MVC 维护了一个默认的 Bean 列表,如果没有进行特别的配置,框架将会使用默认的Bean。
HandlerMapping
将请求映射到处理程序以及用于预处理和后续处理的一系列拦截器。 这种映射有着一套标准,具体的功能因 HandlerMapping 实现而异。 HandlerMapping 的两个最主要实现是 RequestMappingHandlerMapping 和 SimpleUrlHandlerMapping ,前者支持 @RequestMapping 注释方法,它为请求的处理进行 URI 映射的注册。
HandlerAdapter
HandlerAdapter 处理器适配器。拿到请求所对应的处理器后,适配器将负责去调用该处理器,这使得 DispatcherServlet 无需关心具体的调用细节。比方说,要调用的是一个基于注解配置的控制器,那么调用前还需要从许多注解中解析出一些相应的信息。因此,HandlerAdapter 的主要任务就是对 DispatcherServlet 屏蔽这些具体的细节。
例如,调用带注释的控制器中的方法需要先对 @RequestMapping 等注释进行解析。 HandlerAdapter 的主要功能是屏蔽 DispatcherServlet 的实现细节。
HandlerExceptionResolver
处理器异常解析器。它负责将捕获的异常映射到不同的视图或处理程序上去,此外还支持更复杂的异常处理代码。
ViewResolver
视图解析器。它负责将一个代表逻辑视图名的字符串(String)映射到实际的视图类型 View 上。
将处理程序中的方法返回值(字符串)的逻辑视图名称解析为实际视图,来将响应返回给客户端。
LocaleResolver,LocaleContextResolver
地区解析器 和 地区上下文解析器。它们负责解析客户端所在的地区信息甚至时区信息,为国际化的视图定制提供了支持。
ThemeResolver
主题解析器。它负责解析你web应用中可用的主题,比如,提供一些个性化定制的布局等。
MultipartResolver
解析 multi-part 的传输请求,比如支持通过HTML表单进行的文件上传等。
FlashMapManager
FlashMap管理器。它能够存储并取回两次请求之间的FlashMap对象。后者可用于在请求之间传递数据,通常是在请求重定向的情境下使用。
DispatcherServlet的处理流程
配置好 DispatcherServlet 以后,开始有请求会经过这个 DispatcherServlet。此时,DispatcherServlet 会依照以下的次序对请求进行处理:
- 首先,搜索应用的上下文对象 WebApplicationContext 并把它作为一个属性(attribute)绑定到该请求上,以便控制器和其他组件能够使用它。属性的键名默认为 DispatcherServlet.WEB_APPLICATION_CONTEXT_ATTRIBUTE
- 将地区(locale)解析器绑定到请求上,以便其他组件在处理请求(渲染视图、准备数据等)时可以获取区域相关的信息。如果你的应用不需要解析区域相关的信息,忽略它即可
- 将主题(theme)解析器绑定到请求上,以便其他组件(比如视图等)能够了解要渲染哪个主题文件。同样,如果你不需要使用主题相关的特性,忽略它即可
- 如果你配置了 multipart 文件处理器,那么框架将查找该文件是不是 multipart(分为多个部分连续上传)的。若是,则将该请求包装成一个 MultipartHttpServletRequest 对象,以便处理链中的其他组件对它做进一步的处理。
- 为该请求查找一个合适的处理器。如果可以找到对应的处理器,则与该处理器关联的整条执行链(前处理器、后处理器、控制器等)都会被执行,以完成相应模型的准备或视图的渲染
- 如果处理器返回的是一个模型(model),那么框架将渲染相应的视图。若没有返回任何模型(可能是因为前后的处理器出于某些原因拦截了请求等,比如,安全问题),则框架不会渲染任何视图,此时认为对请求的处理可能已经由处理链完成了
- 如果在处理请求的过程中抛出了异常,那么上下文 WebApplicationContext 对象中所定义的异常处理器将会负责捕获这些异常。通过配置你自己的异常处理器,你可以定制自己处理异常的方式。
Spring的DispatcherServlet也允许处理器返回一个Servlet API规范中定义的 最后修改时间戳(last-modification-date) 值。决定请求最后修改时间的方式很直接:DispatcherServlet会先查找合适的处理器映射来找到请求对应的处理器,然后检测它是否实现了 LastModified 接口。若是,则调用接口的long getLastModified(request)方法,并将该返回值返回给客户端。
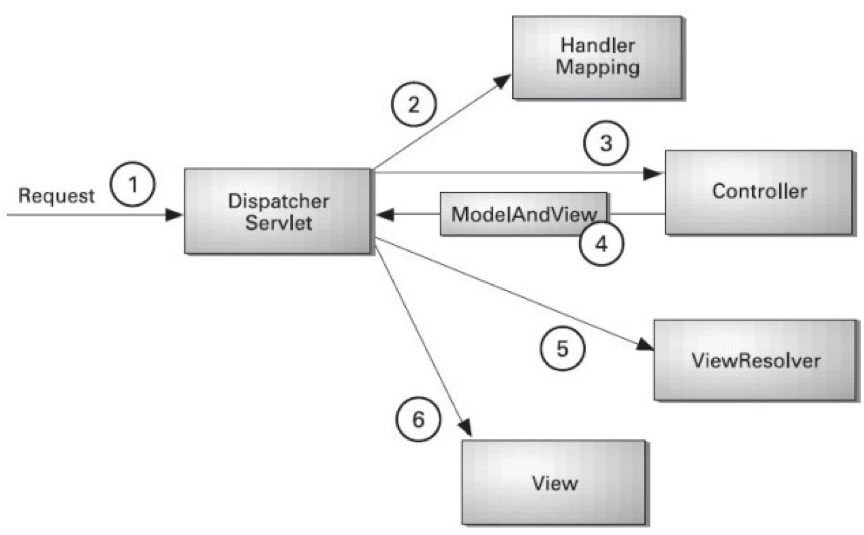
简化版
(1) 所有请求先发到 DispacherServlet
(2) DispacherServlet 根据请求地址去 HandlerMapping 查询相应的 Controller,然后返回给 DispacherServlet。
(3) DispacherServlet 得到 Controller 后,让 Controler 处理相应的业务逻辑。
(4) Controler 处理处理完后将结果返回给 DispacherServlet。
(5) DispacherServlet 把得到的结果用视图解析器解析后获得对应的页面。
(6) DispacherServlet 跳转到解析后的页面。
在整个过程中DispatcherServlet承当了一个中心控制器的角色来处理各种请求。
DispatcherServlet处理流程
SpringMVC 父子容器
Spring MVC 的应用上下文容器层次结构图如下
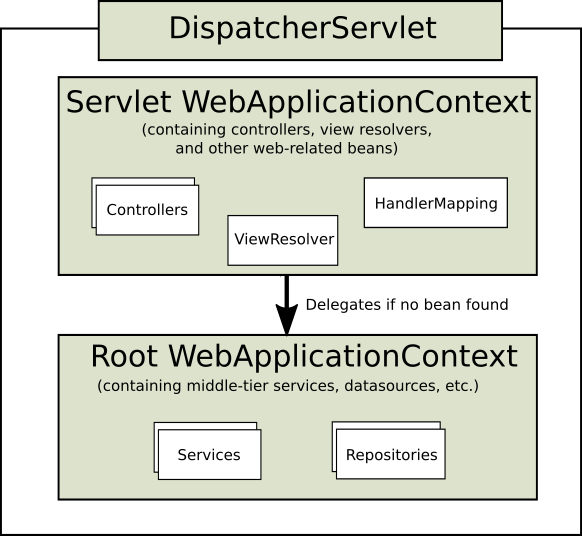
Spring MVC 应用上下文层次结构
Spring Web MVC
https://docs.spring.io/spring/docs/current/spring-framework-reference/web.html
从图中可以看到 DispatcherServlet 里面有一个 Servlet WebApplicationContext,继承自 Root WebApplicationContext。
WebApplicationContext 其实就是一个 IOC 容器,root WebApplicationContext 是 Spring 容器。
这说明 DispatcherServlet 中里创建了一个 IOC 容器并且这个容器继承了 Spring 容器,也就是 Spring 的子容器。
Spring 官方关于父子容器的描述如下:
For many applications, having a single WebApplicationContext is simple and suffices. It is also possible to have a context hierarchy where one root WebApplicationContext is shared across multiple DispatcherServlet (or other Servlet) instances, each with its own child WebApplicationContext configuration. See Additional Capabilities of the ApplicationContext for more on the context hierarchy feature.
The root WebApplicationContext typically contains infrastructure beans, such as data repositories and business services that need to be shared across multiple Servlet instances. Those beans are effectively inherited and can be overridden (that is, re-declared) in the Servlet-specific child WebApplicationContext, which typically contains beans local to the given Servlet
也就是:
1、应用中可以包含多个 IOC 容器。
2、DispatcherServlet 的创建的子容器主要包含 Controller、view resolvers 等和 web 相关的一些 bean。
3、父容器 root WebApplicationContex 主要包含包含一些基础的 bean,比如一些需要在多个 servlet 共享的 dao、service 等 bean。
4、如果在子容器中找不到 bean 的时候可以去父容器查找 bean。
SpringMVC 父子容器就是:controller层交给一个spring容器加载,其他的service和dao层交给另外一个spring容器加载,这两个容器组成了父子容器的关系
父子容器特点:
- 父容器和子容器是相互隔离的,他们内部可以存在名称相同的bean
- 子容器可以访问父容器中的bean,而父容器不能访问子容器中的bean
- 调用子容器的getBean方法获取bean的时候,会沿着当前容器开始向上面的容器进行查找,直到找到对应的bean为止
- 子容器中可以通过任何注入方式注入父容器中的bean,而父容器中是无法注入子容器中的bean,原因是第2点
为什么需要父子容器?
父子容器的主要作用应该是划分框架边界。有点单一职责的味道。在J2EE三层架构中,在service层我们一般使用spring框架来管理, 而在web层则有多种选择,如spring mvc、struts等。因此,通常对于web层我们会使用单独的配置文件。例如在上面的案例中,一开始我们使用spring-servlet.xml来配置web层,使用applicationContext.xml来配置service、dao层。如果现在我们想把web层从spring mvc替换成struts,那么只需要将spring-servlet.xml替换成Struts的配置文件struts.xml即可,而applicationContext.xml不需要改变。
Spring MVC 创建子容器的源码如下
protected WebApplicationContext initWebApplicationContext() {
    //1.获得rootWebApplicationContext
    WebApplicationContext rootContext =
            WebApplicationContextUtils.getWebApplicationContext(getServletContext());
    WebApplicationContext wac = null;
    //2.如果还没有webApplicatioinContext,创建webApplicationContext
    if (wac == null) {
    //创建webApplicationContext
        wac = createWebApplicationContext(rootContext);
    }
   return wac;
}
初始化webApplicationContext分为2步。
(1)获取父容器rootWebApplicationContext。
(2)创建子容器。
spring.xml和spring-mvc.xml定义了相同id的bean会怎样
如果 spring.xml 和 spring-mvc.xml 定义了相同 id 的 bean 会怎样?假设id=test。
1、首先 Spring 初始化,Spring IOC 容器中生成一个 id 为 test bean 实例。
2、Spring MVC 开始初始化,生成一个 id 为 test bean 实例。
此时,两个容器分别有一个相同 id 的 bean。那用起来会不会混淆?
答案是不会。
当你在 Spring MVC 业务逻辑中使用该 bean 时,Spring MVC 会直接返回自己容器的 bean。
当你在 Spring 业务逻辑中使用该 bean 时,因为子容器的 bean 对父亲是不可见的,因此会直接返回 Spring 容器中的 bean。
虽然上面的写法不会造成问题。但是在实际使用过程中,建议大家都把 bean 定义都写在 spring.xml文件中。
因为使用单例 bean 的初衷是在 IOC 容器中只存在一个实例,如果两个配置文件都定义,会产生两个相同的实例,造成资源的浪费,也容易在某些场景下引发缺陷。
Spring 系列(二):Spring MVC的父子容器
https://juejin.im/post/5cbc10b46fb9a0689f4c2c22
RestTemplate
Spring Framework 5 后废弃 RestTemplate 推荐使用 WebClient
https://docs.spring.io/spring-framework/reference/integration/rest-clients.html#rest-resttemplate
The RestClient offers a more modern API for synchronous HTTP access. For asynchronous and streaming scenarios, consider the reactive WebClient.
getForEntity
postForObject
postForEntity
exchange
@HttpExchange
需要 spring-boot-starter-webflux 依赖,需要用到其中的 org.springframework.web.reactive.function.client.WebClient 接口的实现类 org.springframework.web.reactive.function.client.DefaultWebClient
1、定义 Service
public interface HttpBinService {
    @PostExchange("/anything")
    String postString(@RequestBody(required = false) String body);
}
2、调用
@Test
public void testGet() {
    WebClient client = WebClient.builder().baseUrl("https://httpbin.org").build();
    HttpServiceProxyFactory factory = HttpServiceProxyFactory.builderFor(WebClientAdapter.create(client)).build();
    HttpBinService httpBinService = factory.createClient(HttpBinService.class);
    String resp = httpBinService.postString("test spring6");
    log.info("resp: {}", resp);
}
下一篇 AWS-S3使用笔记
页面信息
location:protocol: host: hostname: origin: pathname: href: document:referrer: navigator:platform: userAgent: